


93 Accord
-
Posts
129 -
Joined
-
Last visited
Content Type
Store
Calendar
Forums
Gallery
Downloads
Posts posted by 93 Accord
-
-
I got quotes as low as £800 from other places. But in the end as this is a keeper i wanted it to last. They are quite expensive, they are used to doing much higher calibre cars than the Accord lol. They have prefect customer service, hard to find from bodyshops from my experience. They also used the old school lead fill method which is more durable but more costly to do than just filler. Anyway final figure was £1250.
-
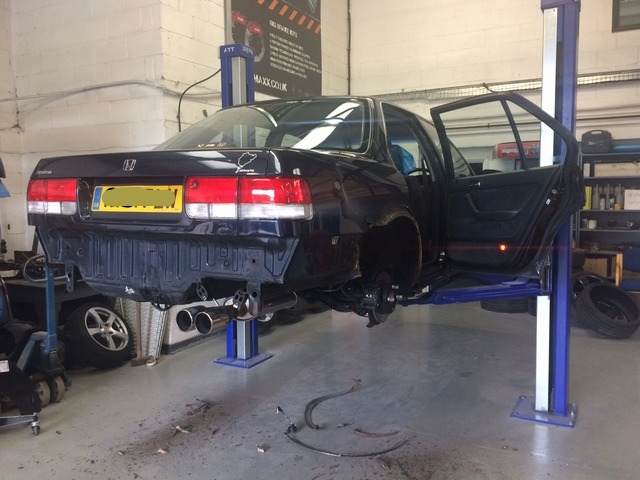
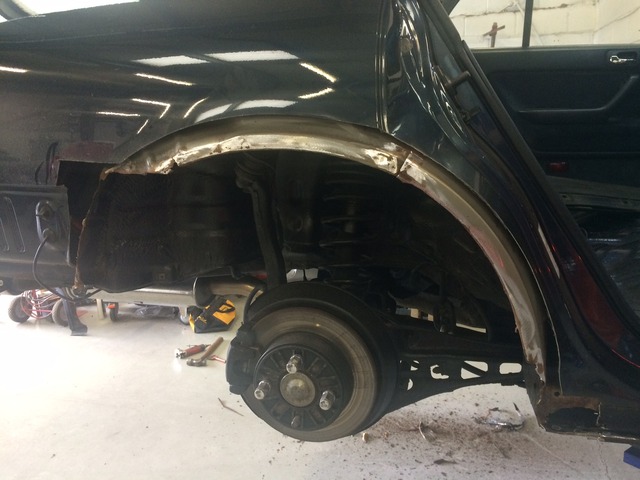
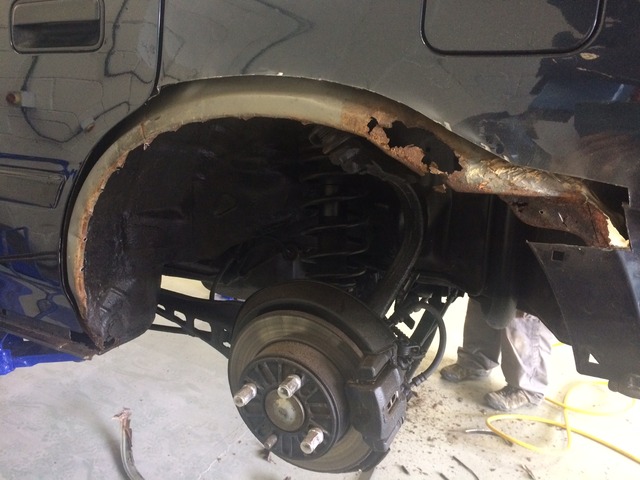
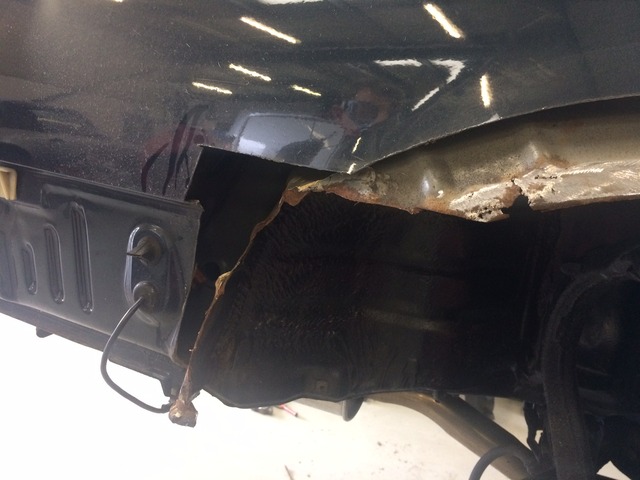
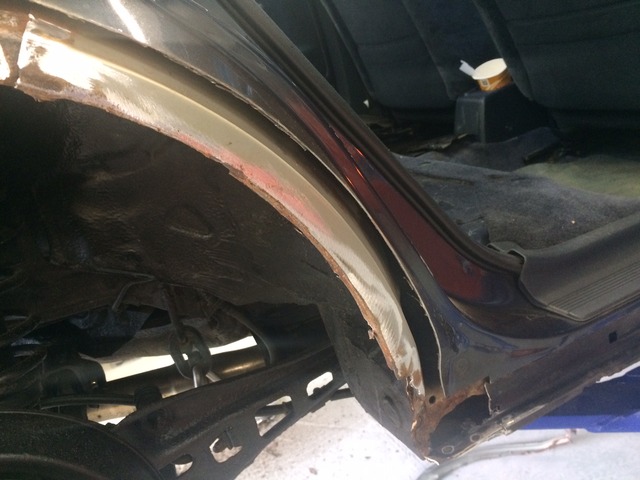
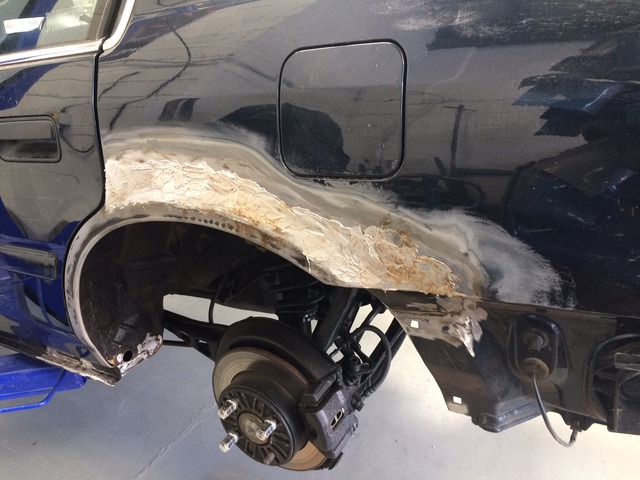
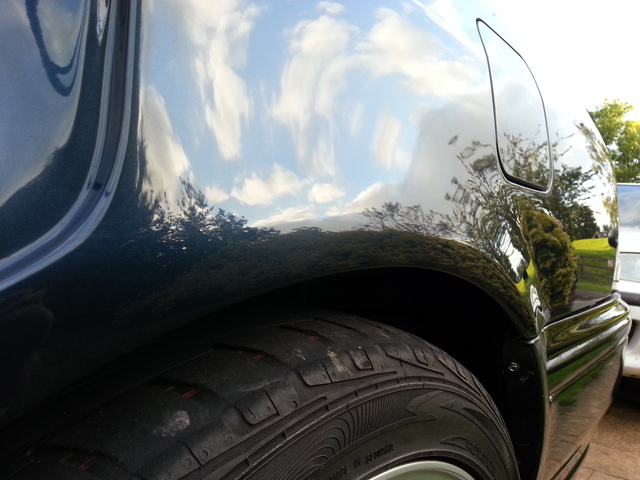
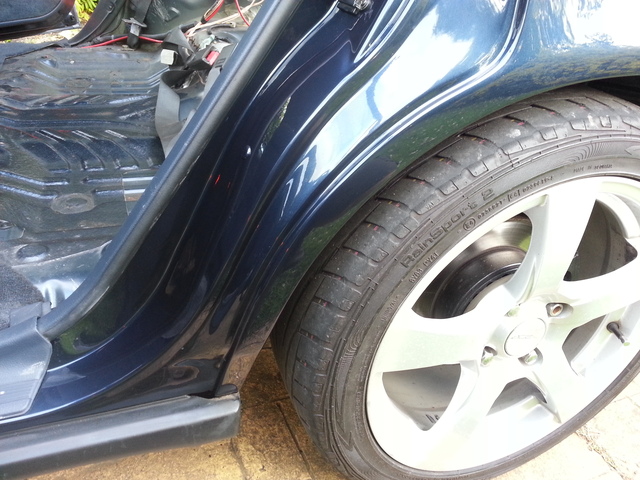
Well big update time, only been in the paintshop queue for like 3 months but, back in March I booked in for new rear arches.
Last week I got it back, and I very happy with the outcome
 This was done by a place called Reflex Auto Design in Daventry.
Progress pics from the paintshop
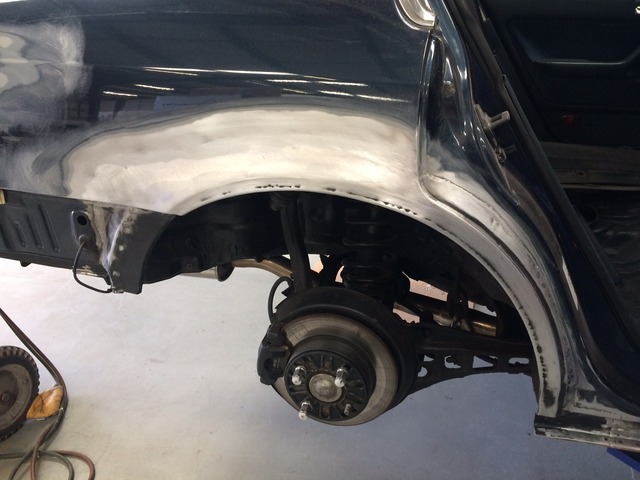
Finished product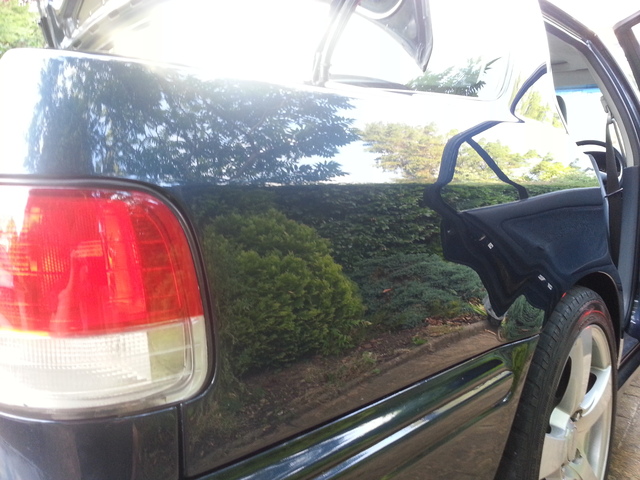
Filled the antenna hole while I was at it.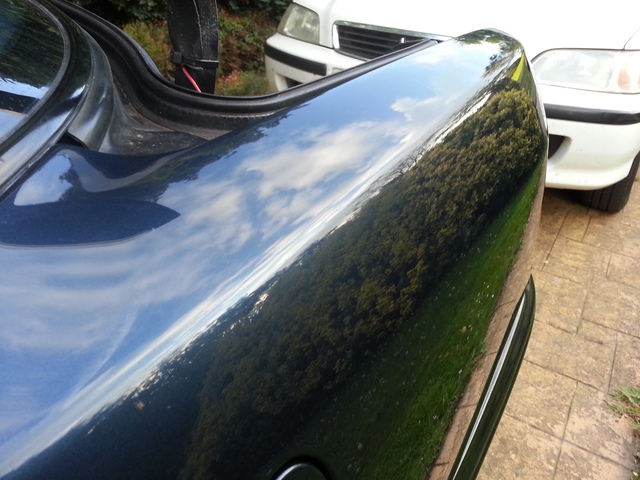
Also got these radius rod bushes in too.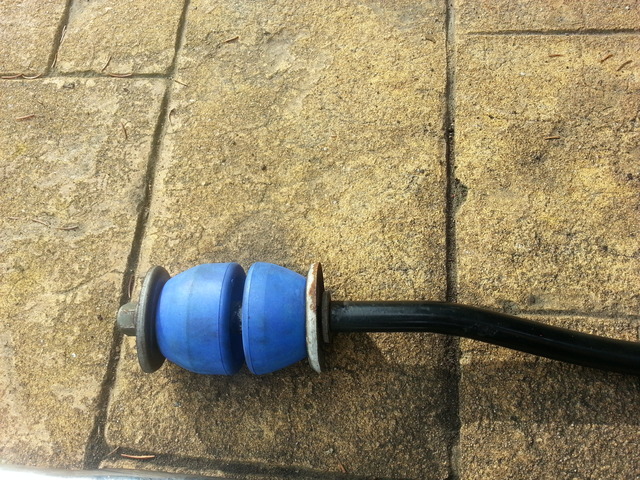
And did some serious tiding up inside all arches also.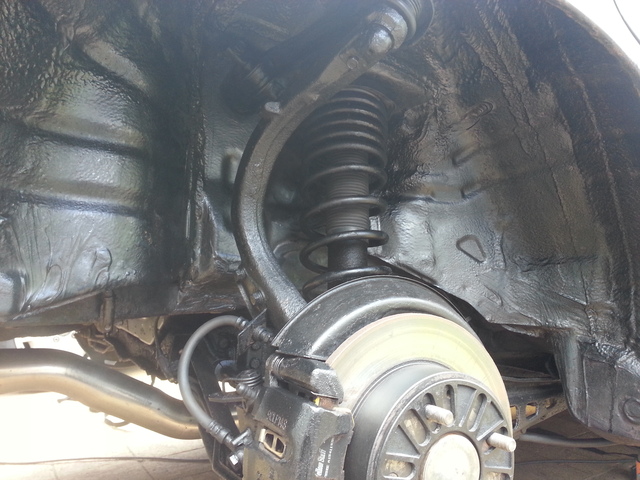
Put on some new rear tyres, Goddyear Eagle F1 Asymmetric 3 215/45/17 91Y XL too, loving them also.So yeah these arches were letting the side down
 Sorry had too. Really has freshened up the appearance.
-
 2
2
-
-
If you want quality
http://www.hardrace.co.uk/hard-race-civic-ef-eg-ek-dc2-crv-rear-trail-arm-bush-rub-2pc.html
Or if you want cheap check ebay.
-
Building the manifold up and test fit.Rosko Racing IACV adapter, hondabonded and mounted
 P13 throttle position sensor and vacuum line extension.
 ATR specific loom plug obtained to fit ATR air temp sensor. (Euro R guys dont need to worry about this bit) Still 2 wire and just slightly extended this from the CB loom.
 Manifold flange close fit to the P13 head! This is no grinding of the flange and a Thermotec gasket. This is fully tightened up and it just interference fits agains the fin there. Easy solution if worried about it is filling the fin.
 Test fit, ready to attach stuff.
 Things to do now:Fit fuel rail adapter from RoskoRacingFit fuel rail and new oringsAttach brake booster pipeAttach vacuum linesAttach coolant lines to IACVFit throttle cable and bracketloom tape the extended wiresAlso I would like to point out that I am trying to fit this and retain all of the stock functions. So all of the vacuum lines from the black box, EGR, cruise etc. Keeping stock injectors and rail and IACV. Only things I am changing on purpose is adding an oil catch tank, and bypassing the coolant lines to the throttle body.
-
So the little custom work on the manifold is done now, tapped and installed threadlocked grub screws, and capped of the big one on the bottom. All injector ports are now now ported out.I bought a Honda p13 gasket to get correct measurements for this. I used it unopened so I can return it now, since the thermal intake gasket I ordered has finally arrived.
 Now for the removal of the old one and the install. I am still awaiting the IACV adapter from Rosko, but that doesnt stop installation at least.
-
1
-
-
So, with all that exhaust dominating both the power increase and sound, I thought it best If I balance it out with a intake manifold upgrade.Accord Type R manifold (Euro R)


 After researching I now have gathered all the bits required to do the conversion.I have the IACV adapter plate from Rosko Racing ordered.I have a thermal intake manifold gasket which apart from the heat reduction, spaces out the manifold away from the head to save grinding off some flange.Grub screws to fill the little air injection holes on the flange.2 meters of 4mm ID silicon hosePack of vacuum pipe connectors spitters and reducers.Tube of Hondabond.So far Ive stripped it down, and cleaned up the manifold, and ported out the first runner (still needs smoothing)Turned the brake booster fitting 90deg so it points to the left hand side of the car. My brake booster pipe is a off centre U shape. Simply reverse fitting this pipe make it fit on the manifold just right. I also have cleaned out the EGR system.
 Left one ported, right one not done.
 Other things to note, are no real discussing anywhere into how to reattach all the vacuum lines onto the ATR manifold. The stock H22a has 6 small and 3 larger ones. The ATR one has only 2 small ports. This is where some rerouting and splitting will occur.Also to confirm, Stock H22a manifold outside throttle body diameter is 62mm and the stock H22a7 manifold outside diameter is 65.5mm (looks very much like 66mm though)Anyway more to come!
 -
Whats the place called?
I wouldnt book it in whilst yours is in. Let them perfect yours. Im thinking mid next year for this. This being the last winter those arches take.
-
Ok right thanks guys. Ill check that one out too
-
Leicester works for me, not far at all. Need him to see to this thread!
Other options still welcome please!
-
Well, my 4th gen Accord forum is in America and my UK Accord forum have cars that are not at the age of rust repair, so there is no point asking there!
Facebook groups are going to yield boge job answers.
Leaving me with you guys as a possibility.
This is for my Accord, I want a quality job, in the Midlands area. I have the repair panels already.
Ive been to 4 places so far, and they wont touch "that sort of work"
There is a custom coachworks place near me, but they wanted £1000 to do both sides, because they would treat the job as extended arches job weather I wanted OEM or not. I was expecting to pay around £500 for both sides. This might be meaningless concern if I cant even find a place to do the work!
Where do the show cars go for just "normal" work. Im not after crazy body kit, just OEM like for like lol.
-
It sounds loud, deep with a tuned noted. Will get a video clip up.
However I do have 3 sounds to choose from so to speak. In that I can insert the cat or straight pipe in place of the middle resonator.
Im enjoying it as it is currently. But I will swap them about soon to see how they sound. I suspect the straight pipe will induce some rasp. And the cat will be quieter but with slight rasp as it not a resonator. We shall see!
-
So I had an exhaust leak following the trackday just gone, it was near the collector. Anyway one thing led to another, and it got booked into ARO Exhausts in Buckinghamshire. He is a really nice guy called Ant, and wants the best from every car he gets in. He is a Powerflow Dealer.
Apologies for the dirty under carriage, Im dailying the Accord at the moment, and the roads are rough at the moment.
Here are some basic un-doctored phone pics that I quickly snapped after work.
2" to 2.5" collector mod

Angled 2.5" flexi for exhaust tuck clearance

Lipless 2.5" straight through Powerflow resonator. Clamped in so can be replaced with my Cat at anytime.

Reduced down to 2.25" at this point to keep the flow up to keep the bottom end torque up.

Powerflow 170mm 2.25" Oval silencer, with my old tail pipes welded back on.


So the issues this has solved:
Undersized system for the new engine
Too quiet
Crooked tail pipe due to rushed welding job last winter
Fixed collector leak
Properly hung and corrected tension on down pipe, stopping the manifold to downpipe gasket leaking under load.
In and out Cat for trackdays
Improved resonator clearance
A good few ponys freed up.
I think Ive justified it


-
2
-
-
Excellent to hear, hope you enjoy! Video perhaps?
-
Cheers guys! Yeah track days are the way forward. Im going to try other tracks starting again in the new year.
Also I have a further upgrade in the pipeline.. excuse the pun..
-
So what have I been up to, well, Mallory Park trackday thats what!Dont expect racecar speed but not bad for what it is. Listen out for some toe and heel blips!Btw this was early on in the day, but the car did 200laps and 60l of fuel, didnt miss a beat! Only fatalities were blowing flexi pipe towards the end of the day and lost a wheel centre cap!Were a mix of cars, some very oddly quick cars that came by, and some you would expect.Was full wet in the morning, mid morning damp drying line, after lunch full dry.Heres a video!
-
So I have decided to get another set of wheels for trackdays. Mainly so I dont have to swap over my road and track tyres every time.I wanted lighter wheels, and not over priced. I went with Rota Grids 17 x 7.5 in white.I know theres a thing with the Rota quality. They have the same manufacturing approvals as the Team Dynamics wheels that so many race championships here have as a control wheel so thats good enough for me.The Rotas are around 8.3kg a wheel, oppose to the 11kg Ace wheels I have. They feel alot more nimble in acceleration, braking and cornering. But most importantly a wet set of wheels and dry set. crucial with the quick changing UK weather!Yokohama A048 225 45 17 semi slicks (dry set)Half used but useable Uniroyal Rainsport 2 215 45 17 (wet set)


-
1
-
-
Yes actually the F20a8 originally in the car only managed 32mpg
-
I did a 350mile trip at the weekend. First long drive with the new gearbox U2Q7. I returned 36mpg. This is the same as what I got with the old gearbox M2A4. So interestingly the extra higher 400rpm made no difference to economy. It does make 5th gear very spritly.
-
Figured how to use Movie Maker, so stuck a picture on the audio file.
0-100 pull in the works private test grounds end of 4th is the end, I stick it in 5th to coast but already at 100.
Mounted the microphone to the airfilter!
-
Cheers guys. Just love driving it! Even more of a sleeper now nothing suggests what's under there on the outside. Other than the sound track which gives it away lol
-
So it in!H22A U2Q7 CB3!


 So I had it up on axle stands and fired it up, went the gears and bled the ps system, (vss sensor) and it went well, no grinds or clunks. (other than the surface rust on the discs scratching away lol)I have since test drove it, and its mega! A big difference trust me over the prelude box. 1 -3 are just manic, 4 is about the same 5 is short!The LSD is an animal, you can really feel the outside wheel pull you round. Really has completed the the front end for handling now!I have a audio file to upload, once I figure out how to separate it from a Go Pro 2 video (I mounted a microphone to the air filter and did a 0-100)
-
Yes Hondas are good for that. This 4th gen Accord is part CB Accord part BB Prelude part CH Accord part Acura CL lol.
-
So some updates been a while!Bought a ATR Gearbox


 So the H22a came with a open diffed M2A4 Gearbox. It was shorter ratio'd than the Accords but due to the extra rpm the H spun, each gear went longer resulting in shift speed points been the same as the Accord. With the U2q7 gearbox things get more dramatic with the close gearing. And Helical LSD!!The old M2A4 is out.
 Changing the stud positions on the new U2Q7 box.
 Used a M10x1.25 tap and a 9mm drill.(Dont own imperial drills or 8.9mm drill)
 U2Q7 OBD2 to M2A4 OBD1 VSS sensor conversion.
 So the differences are the U2Q7 box has no powersteering lines going to it and a different bottom cog. But does have the same electrical plug setup.So process is dismantle sensors, heat cog, remove cog from shaft, then heat other cog, and remove of shaft. Then swap over.


 M2A4 OBD1 powersteering VSS sensor mounted to a U2Q7
 Now ready for bolting the box in!
-
1
-
-
Ok challenge excepted! Ill post another pic of them after a couple weeks have go by, see if they are just as shiny!
-
1
-
Marcus' 4th Gen Accord ( H22A U2Q7 LSD Swapped)
in Other cars
Posted
Another trip to the Nurburgring this year!
This time with some semi slicks up front, decent brakes and the U2Q7 gears and LSD.
Pics to come, but I manage to go pro both a lap on the Nurburgring, and the Nurburgring GP Circuit.
Here is the GP Circuit. Go pro didnt record til half way through the session, I was about 10mins in by this point. Please be kind, I had to google the track layout whilst in the queue to go out
https://www.youtube.com/watch?v=Ubl6kJsgXiY
Also the Ring lap, I did 5 over a space of a couple of days, it opens for public use 5.15pm-7.15pm so normally a chaotic frenzy of people trying to get on. Again excuse the lifting of throttle, I am not a master of the ring!
https://www.youtube.com/watch?v=7W99FTsVTqw&feature=youtu.be