


Kaleverada
-
Posts
69 -
Joined
-
Last visited
-
Days Won
16
Content Type
Store
Calendar
Forums
Gallery
Downloads
Posts posted by Kaleverada
-
-
-
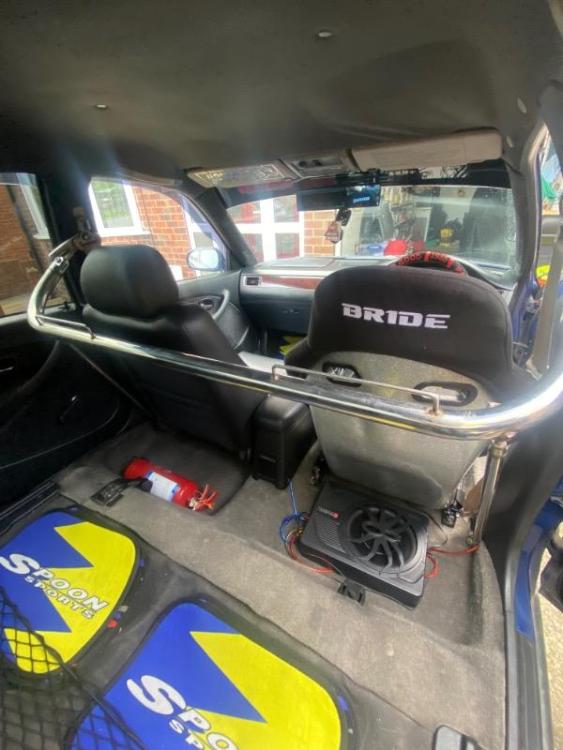

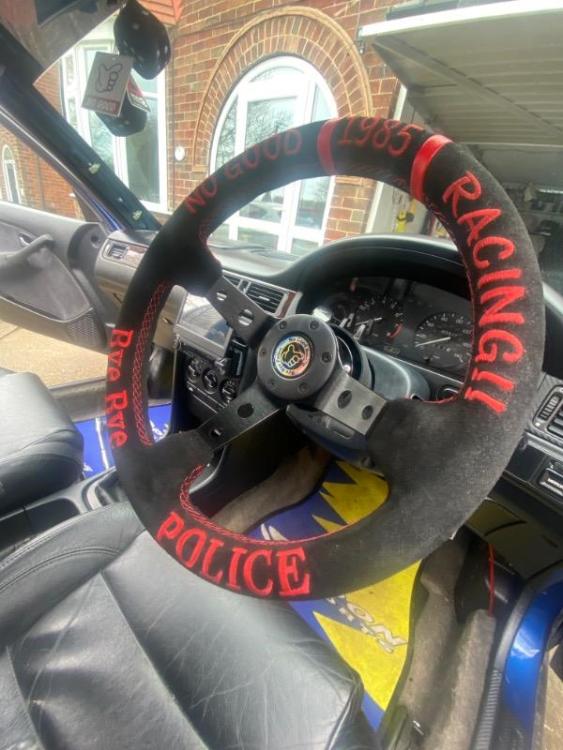
Fitted a Bride Low Max last week, certainly lives upto its name! Feels like driving a go kart now!
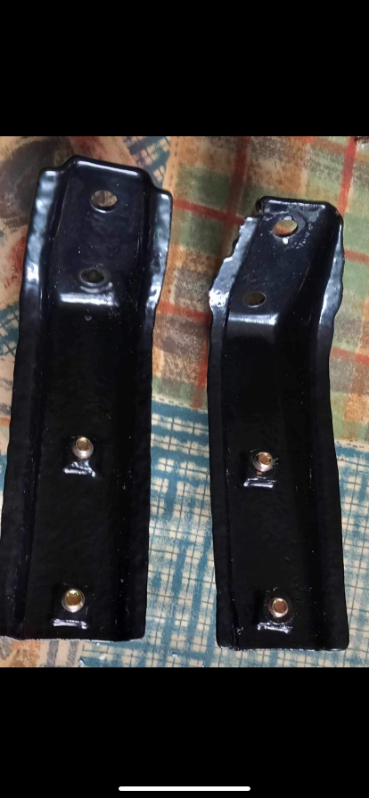
Was originally going to use the MB rails and modify them to fit, but the effort really wasn’t worth it for me. A lot of cutting, butchering and welding was needed so instead I bought M2 EK rails which almost lined up. The front two tabs line up fine, but the rear right tab is too far back so would need grinding off and welding just a little further forward, and the rear left tab grinding off and welding a little further forward also. However, I didn’t do this as I didn’t have access to a welder. So for the right side I used a long bolt that can reach through to gap and secure it tightly. Had to file a small amount of metal on the top side of the bolt hole on the rails to allow the the angle of the bolt. And the left side I drilled the rail tab out a little further infront of the original hole on the tab.
Everything fits snugly and is all tight and secure with no movement, ordered a harness too so will attach that when it comes.
Just have the other side to do now…..ahaha. But in hindsight I think I’ll be grinding the tabs off and welding them instead of messing about so much!-
 1
1
-
-
23 hours ago, dan1 said:
It all looks so good! Must be pleased with it!
How did you wrap the pillar trims? Spray adhesive then wrap the fabric on it like you would with vinyl wrapping?
Really similar to what i want to do!
Dont suppose you've got a photo of the interior, looking into the back from the front doors please?
I think i've seen one like this on aliexpress - called a billet shifter if i remember correctly.
Thanks man appreciate that!
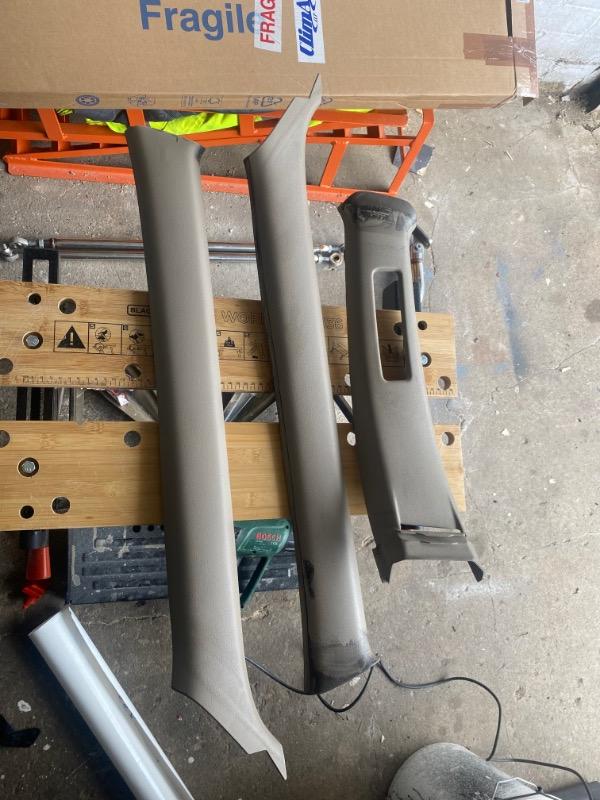
The fabric I used has self adhesive on the back of it that’s very strong so literally just stretched it and stuck it down, can’t see it coming off anytime soon either. If you typed in something like alcantara wrap on AliExpress I’m sure you’ll find it, though I’m sure it was listed as velvet ahahaAnd I’m not sure if I’ve got a photo from the front, though I have just fitted a low max and got a couple photos so I’ll see if any of them are good
-
On 4/26/2024 at 8:56 PM, Craigblight86 said:
Wot shifter is that ?????
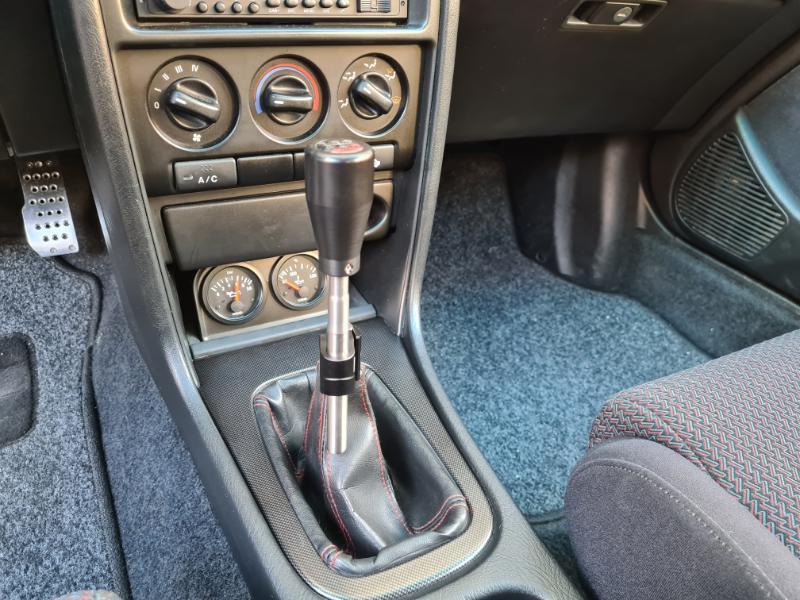
Yeah it’s a JackSpania copy, I mean all his stuff is from AliExpress anyway and I’m pretty certain he just marks it up massively! But yeah just a billet shifter. Hands down way better than all the others I’ve tried. Just not exactly made to directly fit but it’s not too hard to get everything lined up and bolted in! -
23 hours ago, SirPaperbag said:
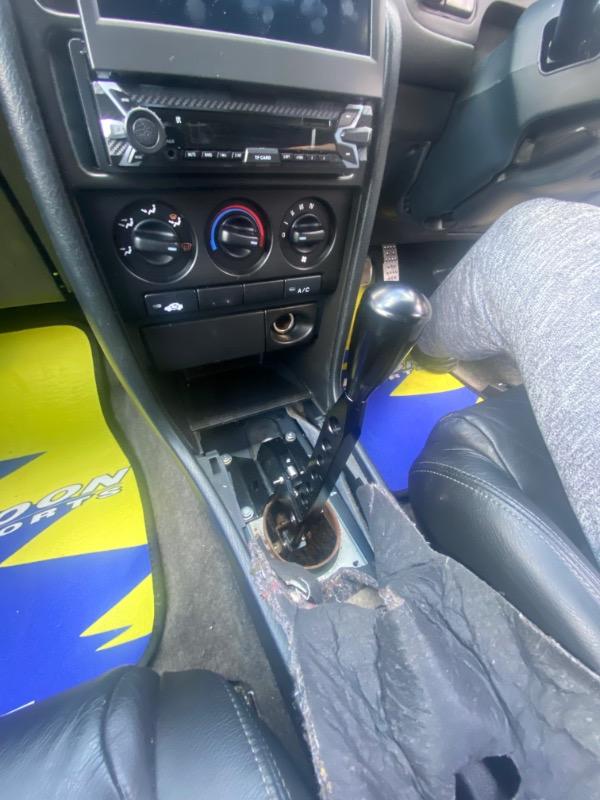
Took the time to do some more work on the ole Fastback today and installed a nice upgrade for the interior.
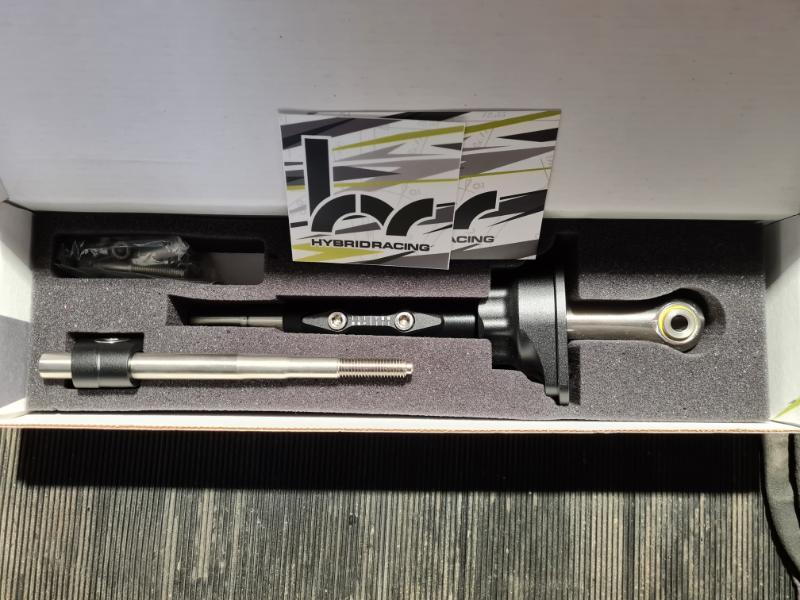
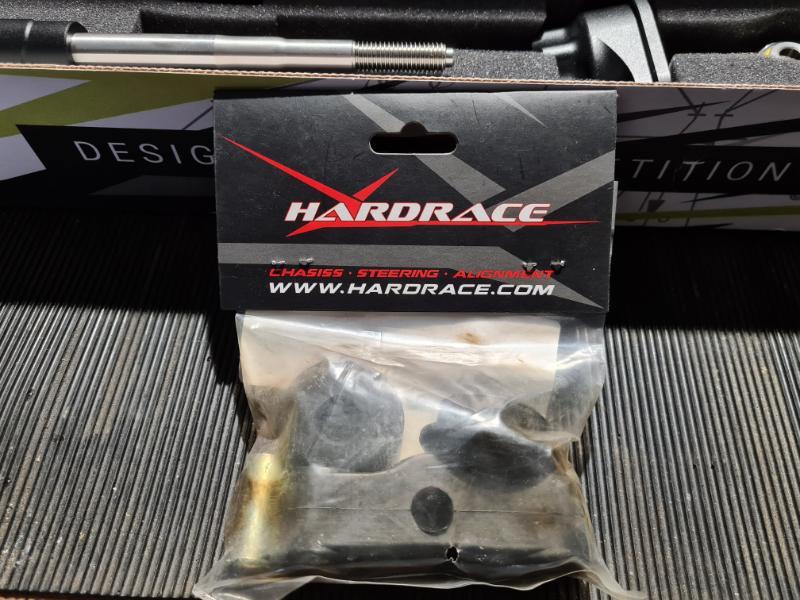
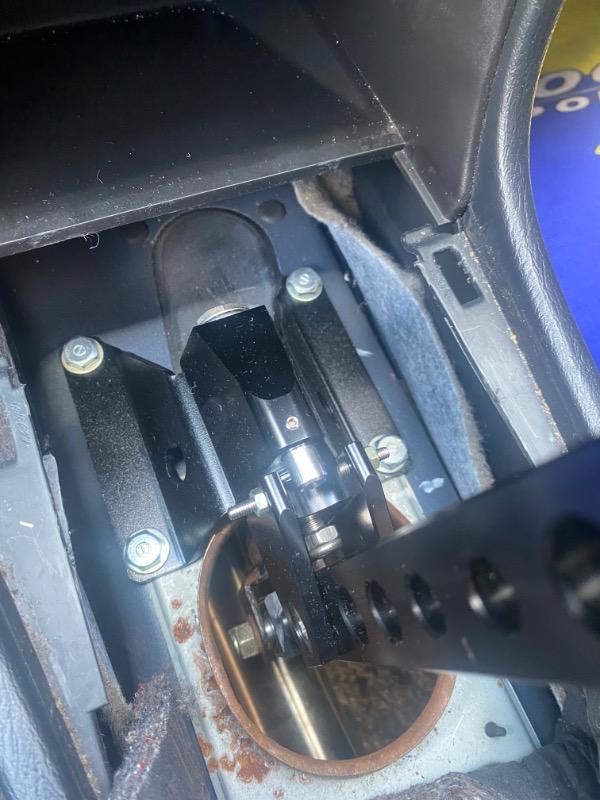
The object in question being a very nice short shifter from Hybrid Racing and a set of stiffer shift-linkage bushings from Hardrace.
The installation was pretty straightforward - take off the interior trim that surrounds the shifter, undo a few bolts and take out the b*tch pin, take off the old shifter and replace all the original parts with the shiny new ones.
Even the rubber gasket went on there relatively easily, with a bit of lubrication of course ;)
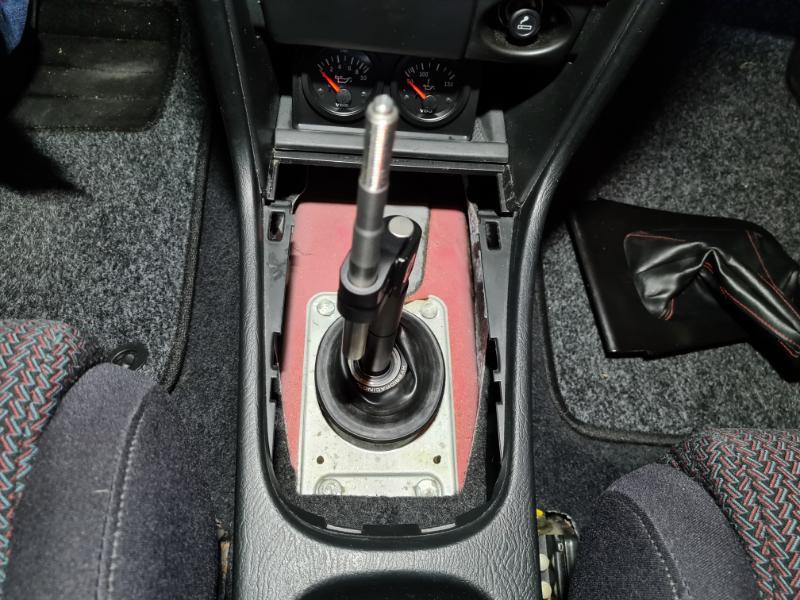
And the finished product looks like this:
Had to take out the small plastic ring out from the top of the shifter boot to be able to install the 'swan neck' part of the shifter on top of it, but I really like the way it looks (and feels)!
The biggest hold-up was the size of the hole where the shifter bolts onto the shift linkage. Had to take off some material or otherwise I'd have to choose between either only having gears 1 through 4 or gear 3 through reverse. Nothing bad though.
File down, reinstall, take off again and file down a bit more and boom - bob's your uncle.
There are still some vibrations to chase down, but nothing a bit of lubricant/machine oil can't fix.
All in all, I'd say it was a huge upgrade for the driving experience - it's super notchy and rowing through the gears almost feels like racking a gun at times.
I'd give the shifter itself a solid 9/10, feels well built, installation is straightforward and well documented by Hybrid Racing, they give you all the hardware you need and you don't have to damage or reuse old components (except filing down that linkage hole, but that's a M-chassis issue only).
Looks sweet that man!
Some of the vibration you mentioned could be from the stiffer or solid bushes you’ve fitted, quite a lot of gearbox vibration gets transmitted through those. Either that or whilst in gear the shifter actually sits on top of the the exhaust, I know when I had mine adjusted to as low as it went, so the shortest possible throw, it’s would knock into the exhaust. Have a completely different setup now but the Hybrid Racing one does looks good man! Well done
-
1
-
-
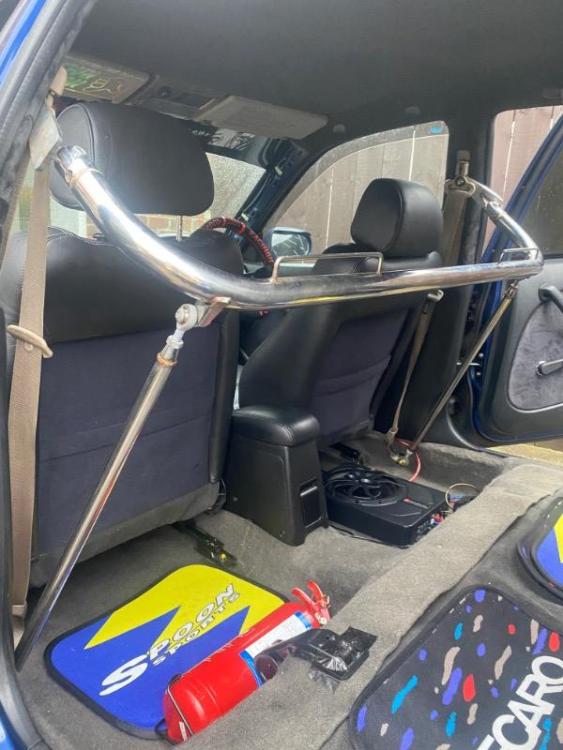
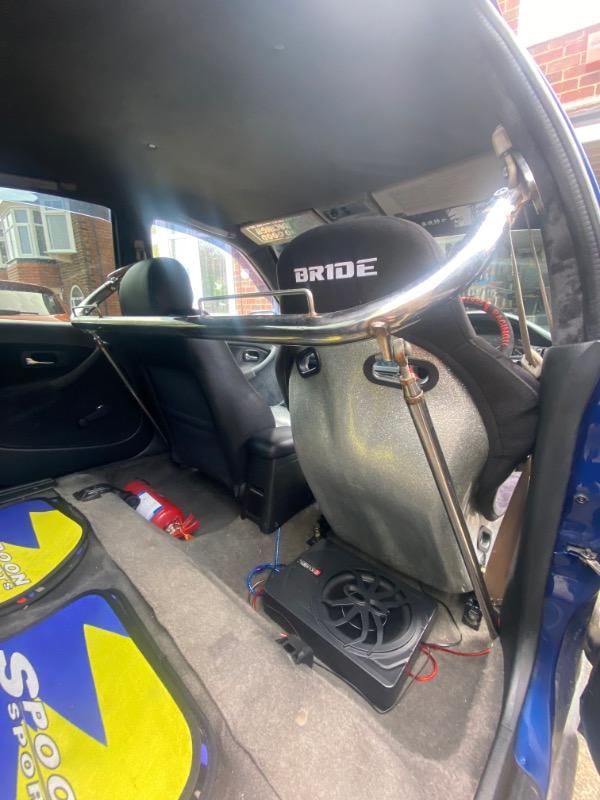
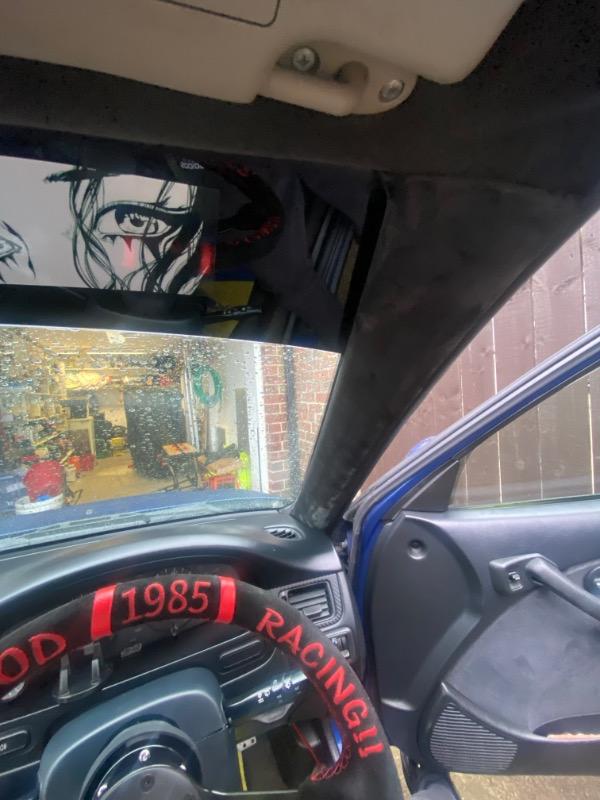
 All plastic trim wrapped and harness bar installed and nice and tight! All in all a decent day of messing about!
-
1
-
-
-
-
-
-
-
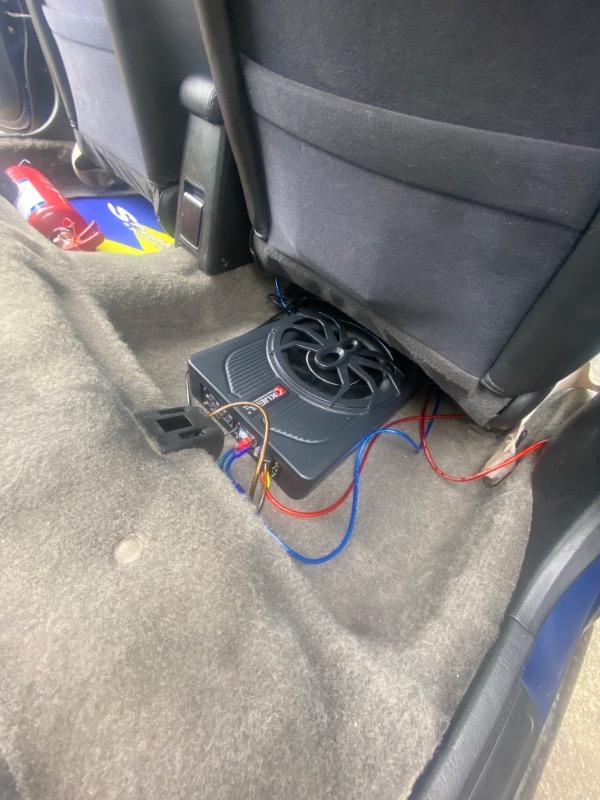
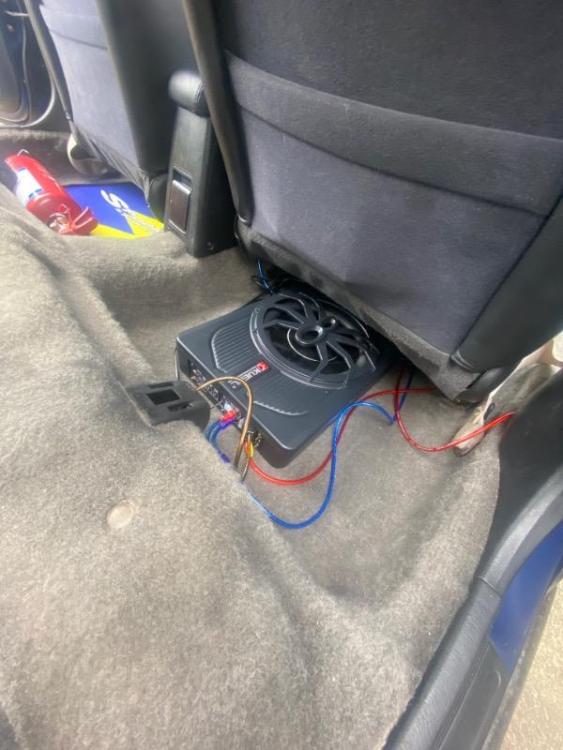 Chinas finest sub (I will tidy the wiring just wanted it in and working!)
-
 Got rid of the old quick release and fitted a much sturdier hub with a spacer
-
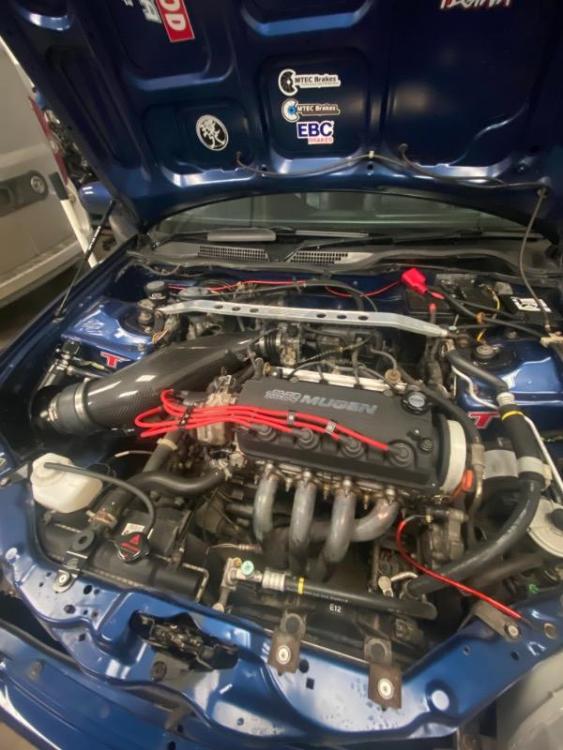
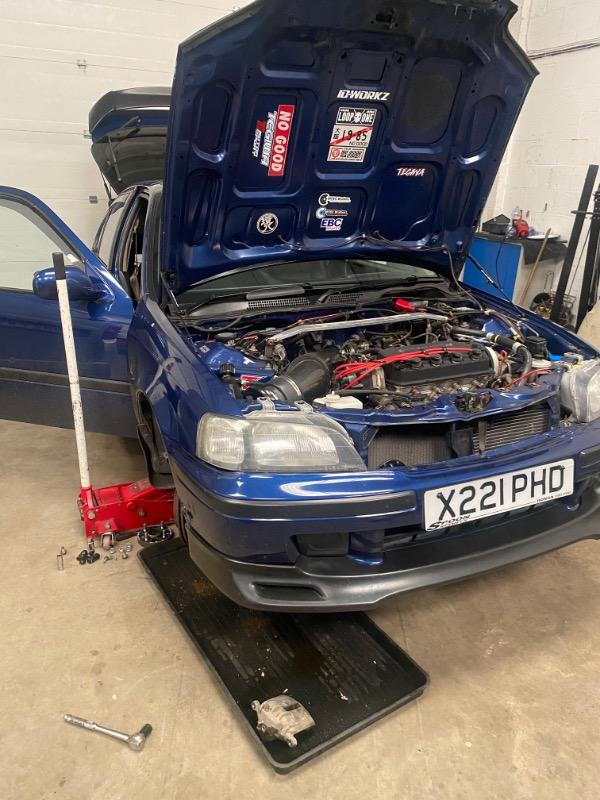
 Bay shot because why not. Changed whale d**k out to actual carbon fibre one, and changed rocker cover to a fake Mugen one. Looking a lot tidier under there now!
-
1
-
-
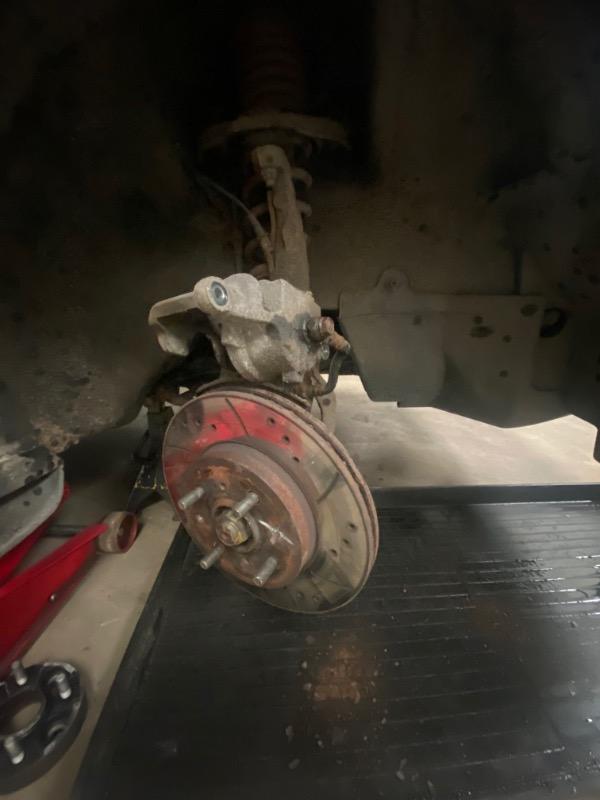
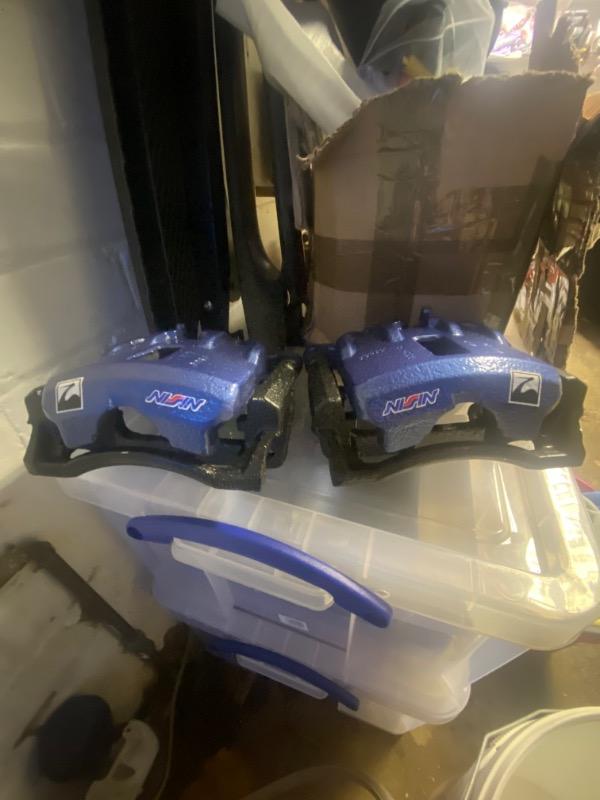
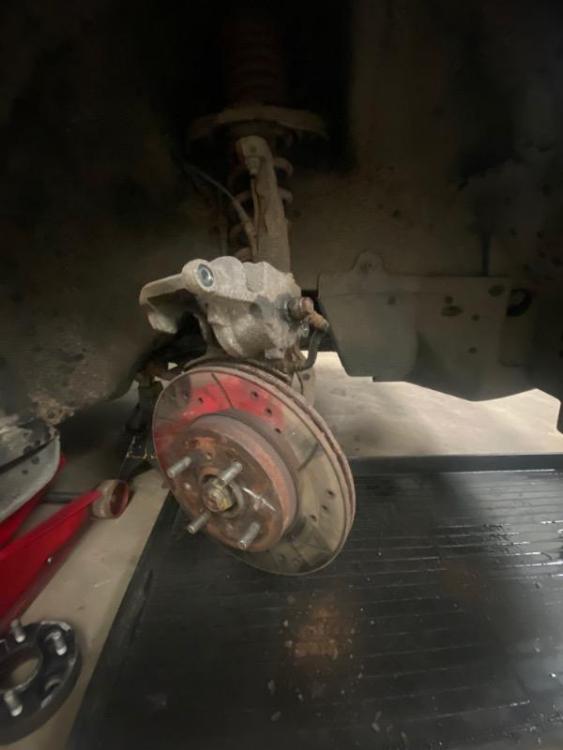 The old 262’s coming off

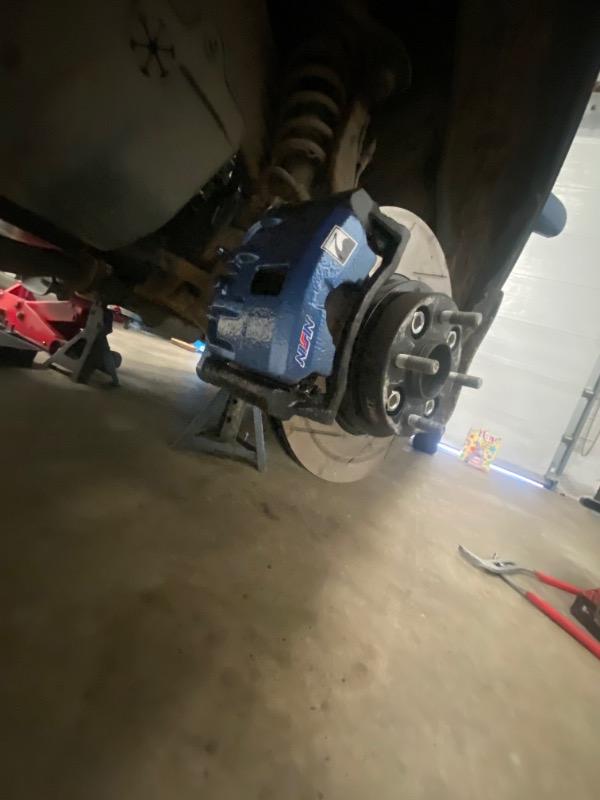
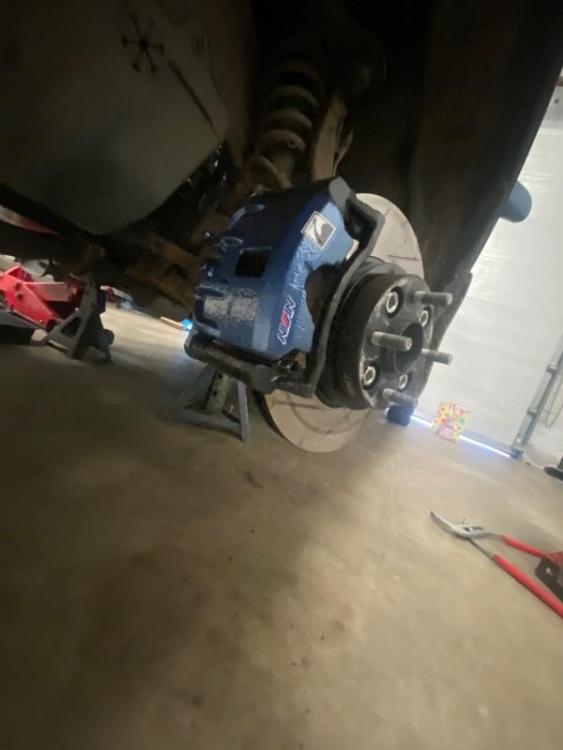 And new 282’s, discs and pads on!
-
1
-
-
Managed to be productive again after working 12 hours over nights, finding the time is getting harder and harder at the moment, so I offset this by buying a s**t ton of parts then letting them stack up until I can’t bare it and am forced to actually fit them. Seems to be working quite well at the moment!
Managed to get the 282 calipers fitted with the RPB discs and pads. Completely forgot about the 1 inch master and booster so brake pedal feeling is pretty bad but they certainly feel to have a lot more stopping power that’s for sure!
Got underseat sub wired in and rear speakers changed, bought 4 inch rears and they were 5 inch originally so made some adapters to fit them. Sound is actually really good now, fully recommend the sub to anyone!
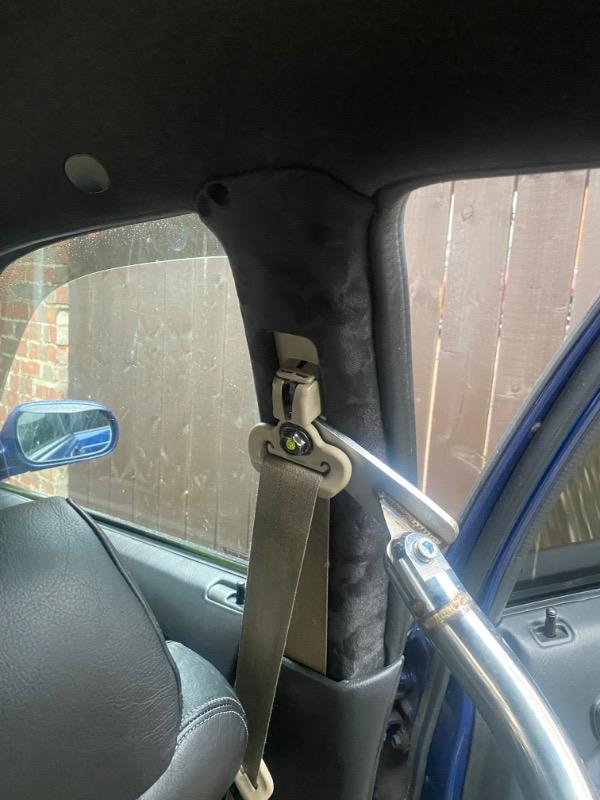
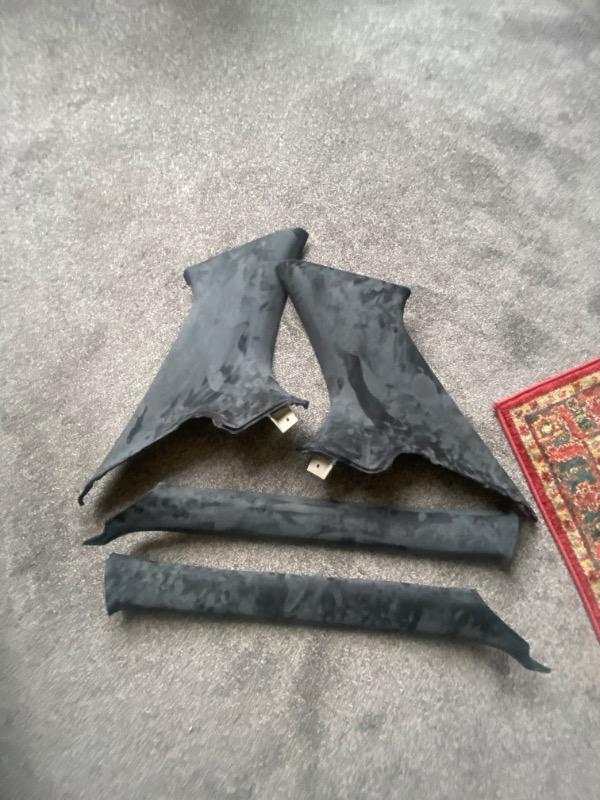
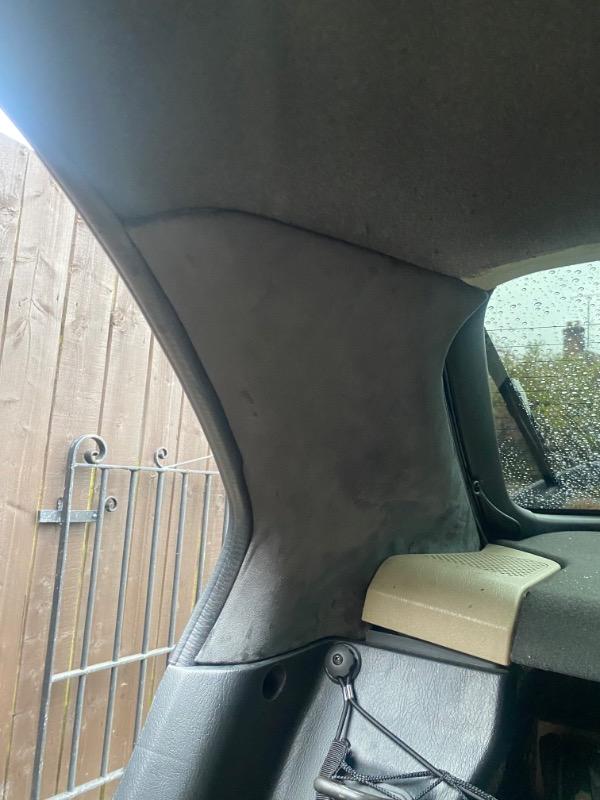
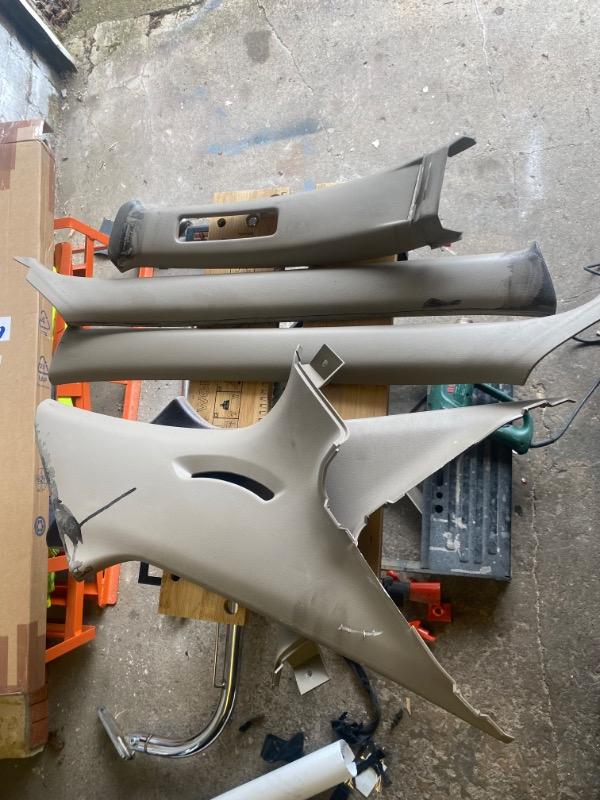
Then finally got round to wrapping all the beige interior plastics in a dark alcantara, turns out I’m actually quite good at it, who knew. Usually I’d lose my rag and end up throwing something but managed to make a decent job of it, also wrapped the front fog covers in a crushed carbon wrap but didn’t get a photo of that as of yet.
Got a tegiwa universal harness bar second hand and fitted that as I’ve got some low max glitter backs to fit soon too.
I’ll update with some photos shortly!
-
And this is the new shifter setup also, would recommend this over the ktuned style ones or oem bent ones any day! Super notchy shifts, makes everything nice and tight again, adjustable everywhere apart from height but sits perfectly where it is for me.
Plus, all the original trim fits back over it nicely too


-
1
-
-
Gave the 282’s a little bit of a clean up and paint now they’re ready too! Got very lucky finding them for 40 quid!

-
1
-
-
Just now, Kaleverada said:
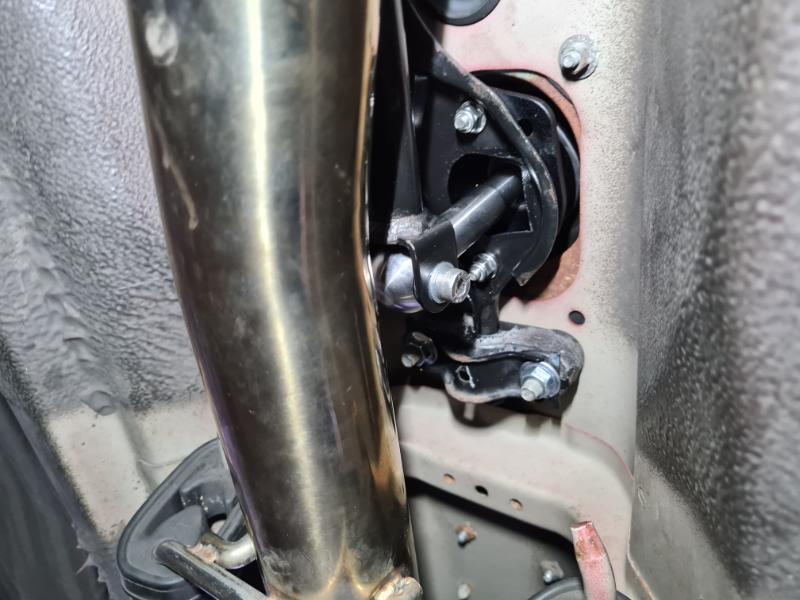
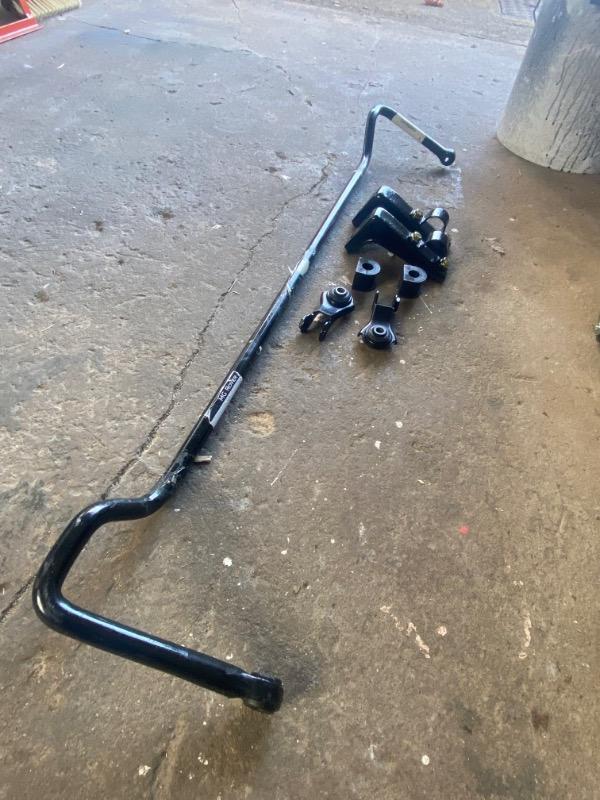
And this is the roll bar setup, think it’s either 16 or 18mm, it’s skinny but going from nothing to something will always make a difference!
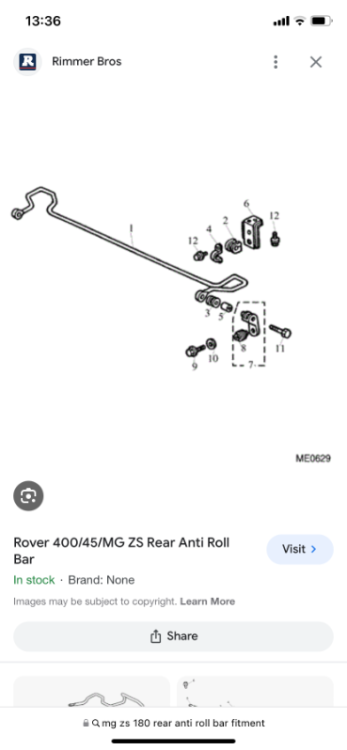
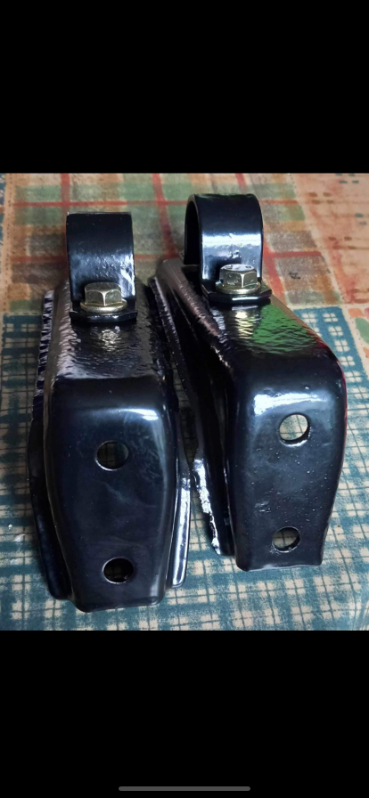
 Was a bit of a nightmare to find all the separate bits to have the full kit. The bar itself I managed to get extremely lucky with and buy from a Rover site as old back stock for dirt cheap. The L brackets I found on Facebook marketplace, some guy had two sets, had them both powder coated and only needed one set. And the links and bushes were an eBay job
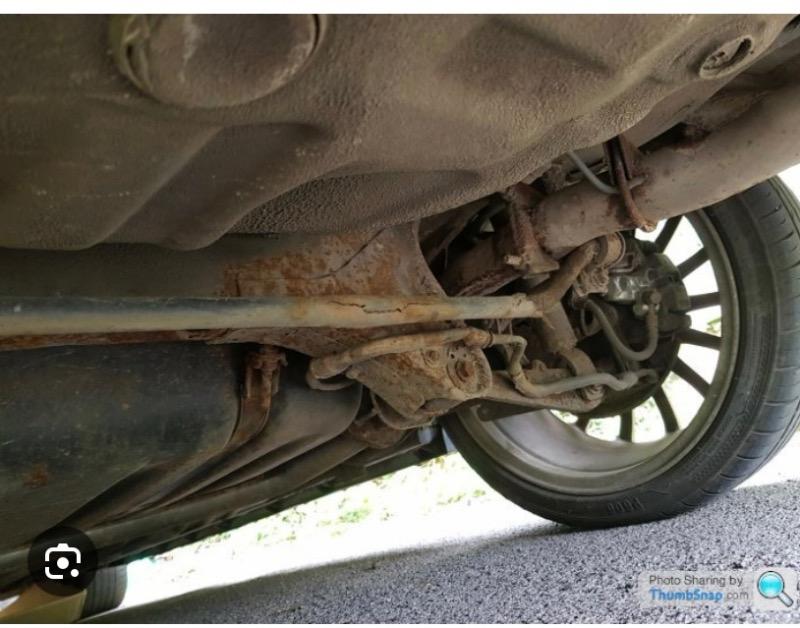
Bottom photo shows the fitment on an mgzs for reference as I was a little confused as to where it actually mounted!
-
And this is the roll bar setup, think it’s either 16 or 18mm, it’s skinny but going from nothing to something will always make a difference!
Was a bit of a nightmare to find all the separate bits to have the full kit. The bar itself I managed to get extremely lucky with and buy from a Rover site as old back stock for dirt cheap. The L brackets I found on Facebook marketplace, some guy had two sets, had them both powder coated and only needed one set. And the links and bushes were an eBay job
-
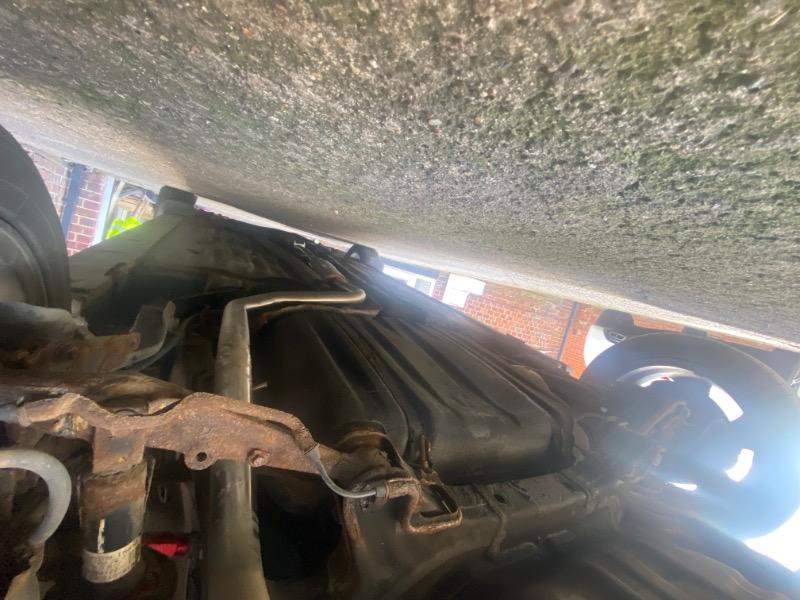
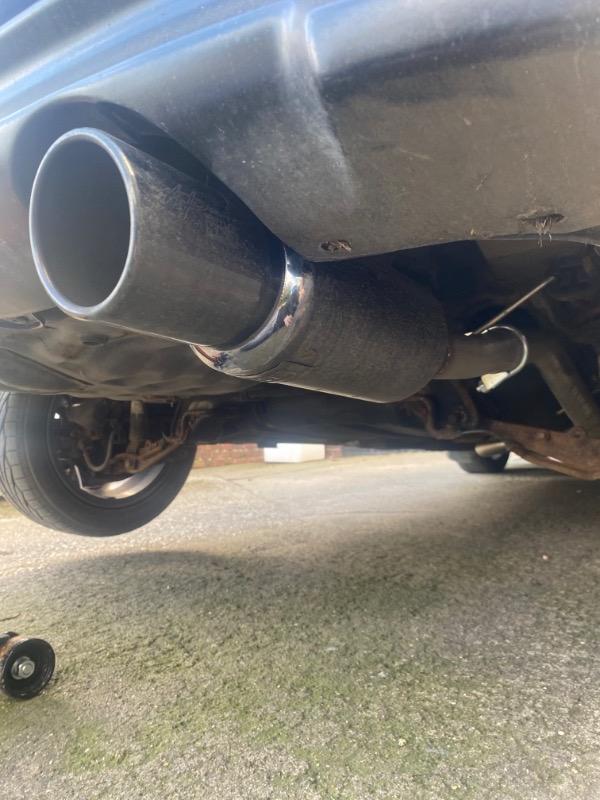
 Not too sure why the last 2 photos are upside down!
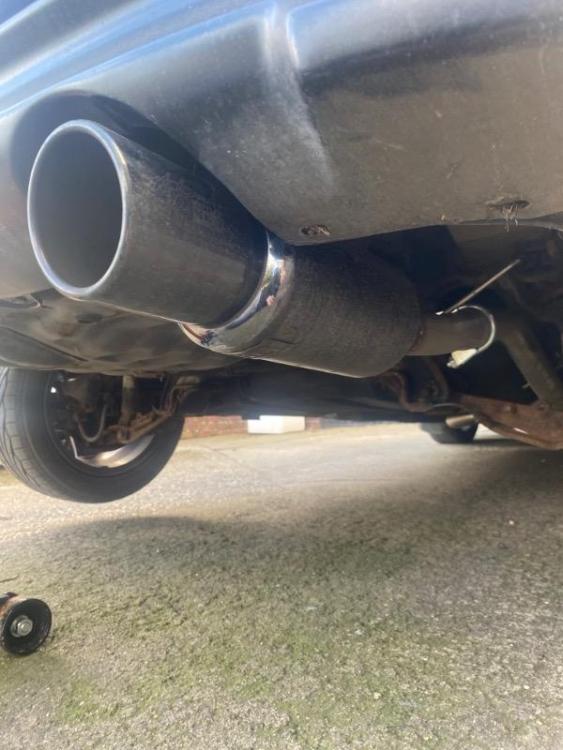
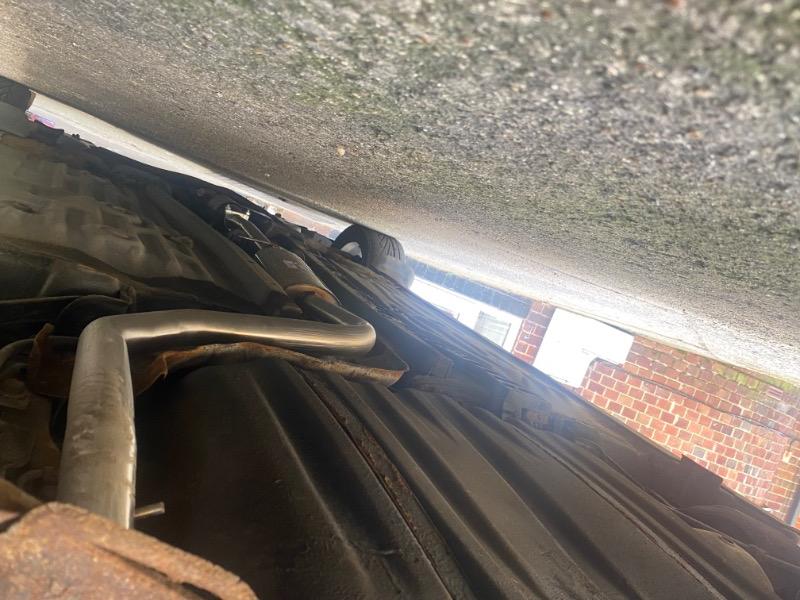
But shows the cat back anyway, 2 inch, rear res and exhaust tip I had welding on, sits really well and no wobble anywhere which is always nice!-
1
-
-
On 3/22/2024 at 9:09 PM, Dave said:
Wow! That's a whole load of nice parts and work right there! Regarding the blow in the exhaust, the join either side of the CAT would be the first place to check imo. Could be the flanges are a bit crusty, so unless they gave it a good clean up first would most likely start blowing there. If you can get it jacked up high enough, could hold a small piece of newspaper at the joins and see if it "flutters" when it's running. Was the manifold already fitted prior to the rest of the exhaust or did they fit that at same time? Looking forward to the pics mate!
Yeah it’s for sure the front join, the flanges are bent on the cat so it’s not sitting quite right but it’s not really too bad, spent the past hour attempting to bodge a decat on but it was a 2.5 inch one so miles off! Ended up getting Big Chiz and a hammer out and gutting the standard cat instead, seems to work fine! And no I fitted the manifold and downpipe a while ago, they just did a cat back for me. Though, I’m gonna have to go back there at some point soon to have them adjust the pipe that goes over the lca’s and move it to the right a bit. I was having a look at fitting the mgzs roll bar and the exhaust sits exactly where the mounting L plates go…..swear you can’t win with these cars, everythings a bodge or retro fit, but to be honest it’s kinda more fun that way right? -
On 3/12/2024 at 6:57 PM, Dave said:
How did the new exhaust go? Got ours made by Powerflow over 12 years ago, best part we ever got for the deck! Still going strong!
Yeah it’s nice! He did a 2inch cat back for me and welded on a backbox I already had, had a nicer bassy tone and seems to flow a little better which is nice!
He wouldn’t cat delete it which is fair I can just do that myself when I get round to it, and all in all it wasn’t the most expensive job, was more than I wanted to pay if I’m honest, but a lot less than another place I had a quote from so I can’t moan too much right!
Only issue is that I told him it’s blowing from somewhere I just don’t know where, and whether or not he actually checked I don’t know but he said he couldn’t hear or see it, yet it remains so I dunno. He said it could be the thickness of the Chinese manifold I have on, because it’s that thin it’s noisy, but I find that hard to believe if I’m honest. I don’t think it’s the manifold, I don’t think it’s where the mani meets the downpipe, so now that only leaves where the downpipe meets the cat. Hopefully when I decat it, it goes away then!
Still got a huge parts pile to get fitted, managed to find a zs180 rear roll bar and all the fittings with it for quite cheap, new front wishbones and hard race compliance bushes, front ball joints, track rods, trailing arm polybushes, the 282 for the front and braided lines, the z6 intake mani and fuel rail, some Chinese ‘Bride’ universal seat rails to fit ‘Bride’ seats, coilovers, lca’s and toe arms. Think that’s about it…. Ooh and a new head unit haha. Annnnd new rocker cover and gasket when it gets here. Hmm, tegiwa brake stopper for the MC. Then I think that’s fully it!
Got that different shifter set up all sorted too, not sure I’ve seen anyone else with it on as of yet? I’ll try get some photos and give it a little review. Fully worth it though, better than any generic short shifter / kswap replica ones that are about. Also that reminds me I have to fit the detent springs in the gearbox too…..
-
2
-
-
Ahh thank you! The mounts I ended up getting are different to those ones again, seems to be quite a bit that either fits, doesn’t fit at all, or can be made to fit haha.
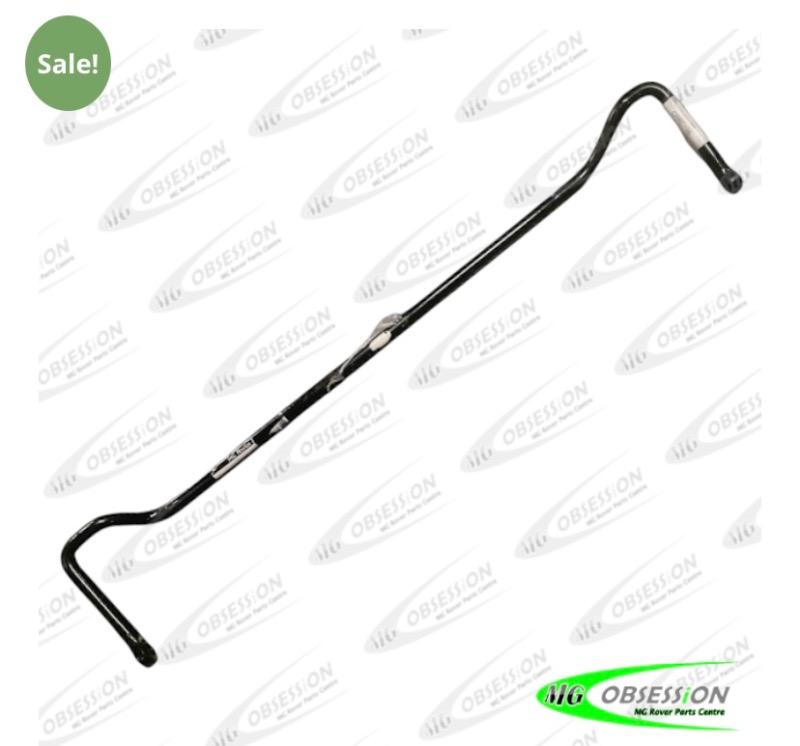


The last photo there is of the bar on an mg zs for reference I found, looks like the mounts I have fit elsewhere, but I’ve seen this setup on an mb before so hoping everything will tie together nicely without me having to mess about too much! Also had to get the correct links for this setup too. Yeah the 24mm bar I got would have been overkill, I think the one I ordered is either 16 or 18mm so should be fine!
Thanks for the reply though!
-
1
-


You’re my boy blue (mb2 build)
in Honda Civic MA/MB/MC
Posted