-
Posts
443 -
Joined
-
Last visited
-
Days Won
30
Content Type
Store
Calendar
Forums
Gallery
Downloads
Posts posted by DeLaSoul
-
-
Food for thought

http://pistonheads.co.uk/news/default.asp?storyId=26945
Bucket seats with wrap-around head restraints are not allowed.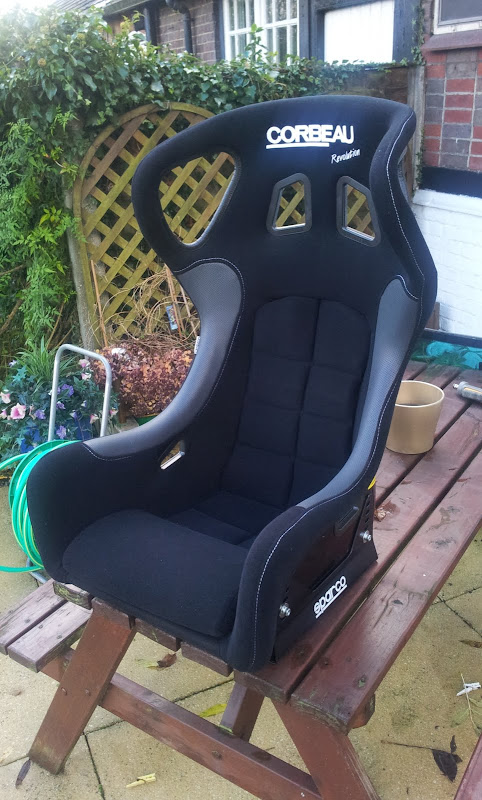
Screw them, they've lost my business then and a few others I saw there
 I would fail on the cage, seat, steering wheel and HANS device. UK track days it is then, which will be a lot cheaper and easier to get to
I could probably go round the ring on an organised track days where it is closed to the public but I won't hold my breath. Thanks for the heads up though, I didn't know any of this.
the barrier can cost €1200 to €2500 so dont crashSeen that first hand, €2900 total bill for one poor idiot that got it wrong.
thats some heavy stoppage power there, cant wait to see this prject completed, looks amazing, definitely wanna see you taking out m3s in the deck, would make my day. loving the car m8, great workCheers, slowly coming together now
![[smash.gif]](https://civic5.com/forum/uploads/smash.gif)
-
 stop!!!
Hammer time
![[smash.gif]](https://civic5.com/forum/uploads/smash.gif)


 Its getting there!
And to think I was impressed at the weekend with my OEM Honda discs and Brembo pads lol
I liked the stock brakes but for the Nurburgring I though I'd better put something better on and went for EBC. I had a bit of trouble with the EBC discs & pads combo so decided to improve the brakes again - these weren't my original plan! I would've been happy with some EP3 type R callipers and bigger discs. These do look cool though.
This seems like an awesome deck it gunna fly without all that weight in it haha and glad I ain't the only one who has a problem with powerflow exhausts and arb I have exact same problem but haven't had chance to get back just been dealing with the vibration noise every now and then haha
Not just me then. To be fair though they did a good job of sorting it, still got that nice stainless exhaust rasp.
This seems like an awesome deck it gunna fly without all that weight in it haha and glad I ain't the only one who has a problem with powerflow exhausts and arb I have exact same problem but haven't had chance to get back just been dealing with the vibration noise every now and then haha
That's a shame about the exhaust, when I had mine fitted last year, i told them to leave plenty of room for an ARB and even with the increased bore it doesn't come close

Didn't even think about it with mine, it was fitted before I even knew you could fit an ARB to the back

-
 wowee!! this means some new wheels as well then
6 pots are huuuuge

whats the size of discs 320mm

I was hoping to keep my wheels but I wanted the bigger hub bearing and drive shafts
 My "old" wheels are unmarked so I hope I can get a few £££ back on them.
 I went for these 6 pots as the pistons are different sizes. Theory is that the larger piston engages first to bring the pad in gradually and reduce snatching of the brakes. Have to test that when I get the chance. I can't remember how big the disc is, but I can measure it when I get home. I ordered this kit back in November and the bells and carriers had to be custom made to fit the ITR hubs, slept since then.
I have a set of larger rear discs and updated carriers to fit as well, but these use the standard rear calliper. Larger disc (even with same swept area) = more braking power. Also saved me buying more bits!
-
Been a while but I'm back from sunny Oman

Progress on the roll cage has been slow over Christmas but it is looking good
Triangulation has begun, and they have beefed up the rear towers
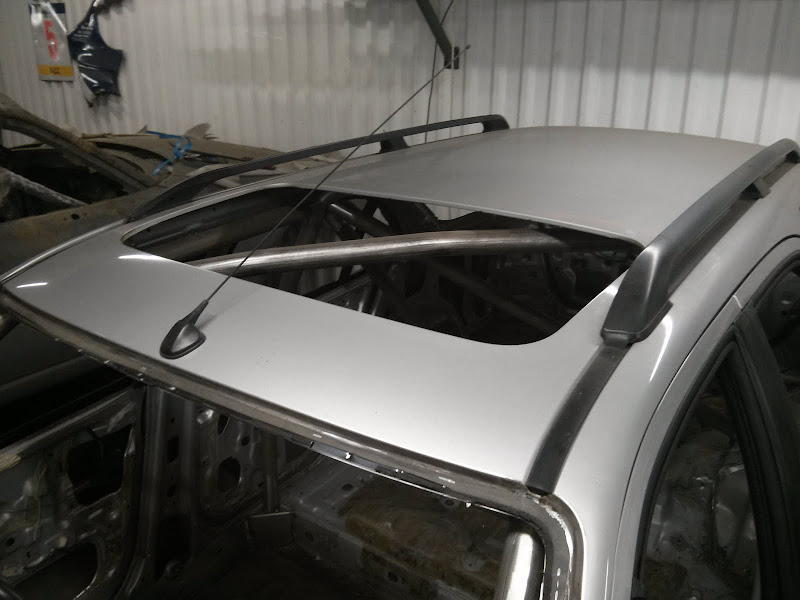
They have yet to fill in the roof but it all looks good so far.
Got a call last week to say my brakes have arrived so I popped over to collect them Saturday. I'll let the pictures tell the story
![[smitten.gif]](https://civic5.com/forum/uploads/smitten.gif)
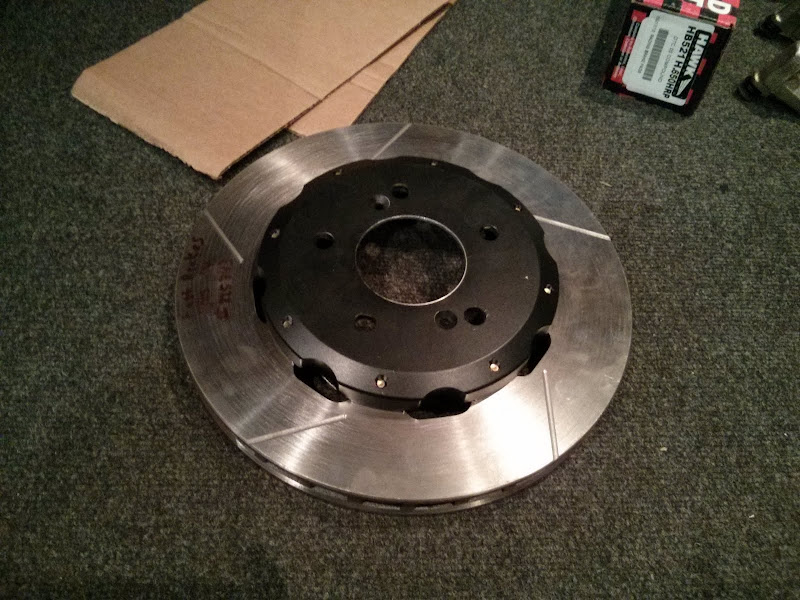
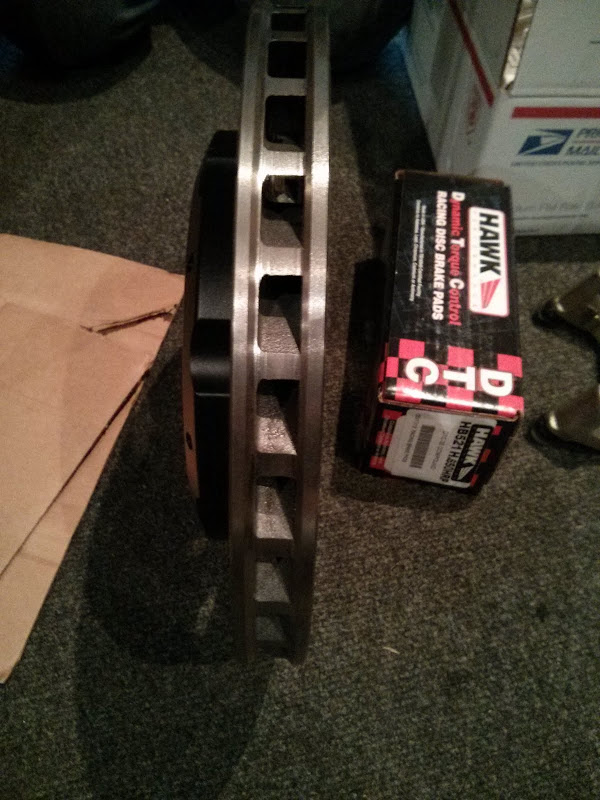
98 spec ITR hubs with custom carriers

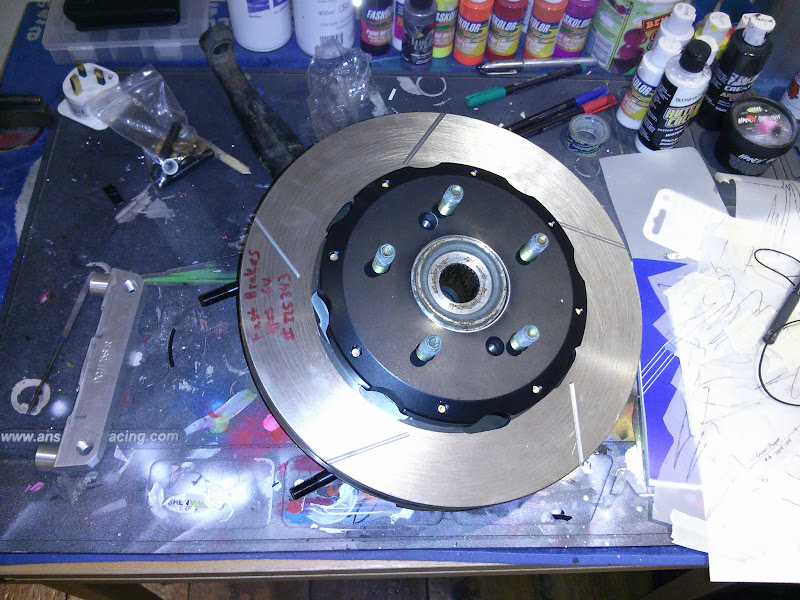
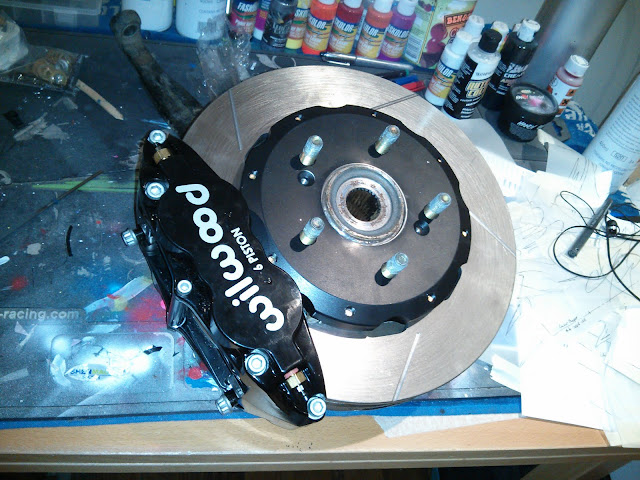
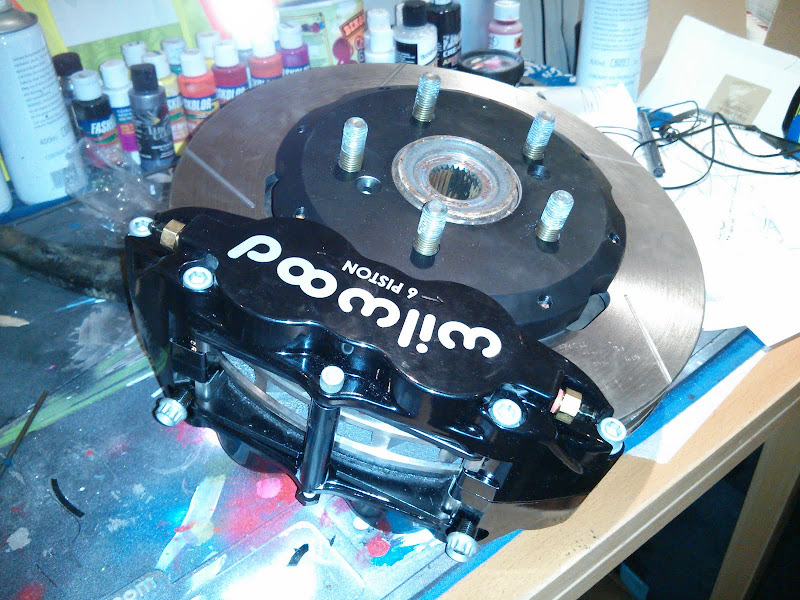
6 pot calipers

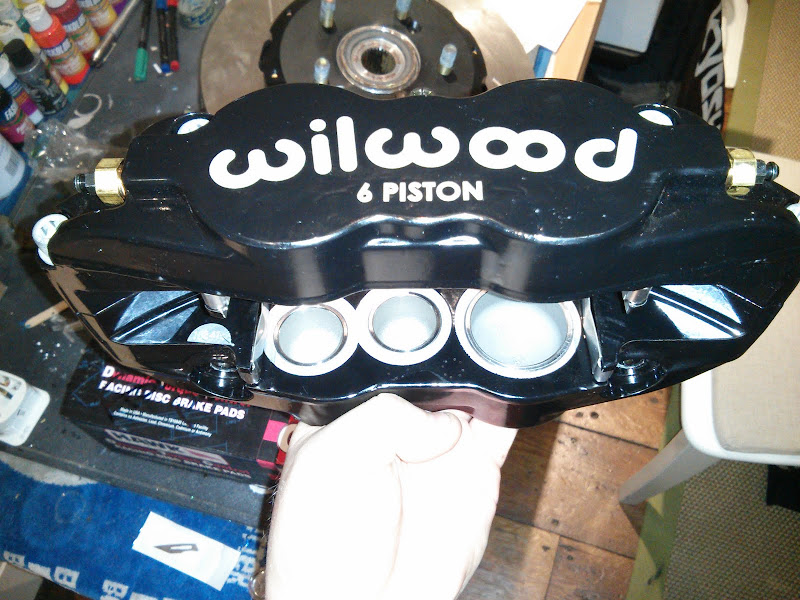
I can't wait to fit this lot to the car and test the new rear setup
-
cut off was 3rd jan for any extras, so order has been placed by Ricky Evans with the manufacturer (safety glass tyneside I think), so we should be seeing these early March if not before - in time for the snow.
Cool, looking forward to getting mine

-
Have you got 4 x 114 hubs fitted now? Id stick with 282 calipers normal discs and ferodo ds2500 pads this is one off the best setups I have had on a 310bhp civic and stopping power was good with zero brake fade. Also consider braided lines
Nope. Still stock 4x100 with the crappiest pads TRW. I'm just waiting for them to ruin the discs completely and then maybe I'll go for stock MB6 setup.
Yea I would go for the mb6 hub conversion
282s front
262s back
1" master cylinder servo
With the above setup you will have good stopping and a nice brake pedal feel
Braided hoses are good too. I will have most of the bits (inc. the master cylinder) taking up space once I get my car back
 PM me
PM me -
but if it was wiring in the door then why effect both sides at same time?
maybe a bad earth though. il have a look at earth points
If it's both windows then what's the common link? Power to the window control regulators/relay and earth. Poor earth connection would give you the problems you describe which would be my first choice. Following that, check the power window relay (see page 1087 of the Civic manual, which you can download from here 1"£££$££"! ) as this too is a common link in the system - could be loose of cruded up?
Let us know how you get on
-
wheels arived too late, they need to wait new sumer driving season

but today i renewed hub conversion idea

do someone think that it is posible only to take of my 4x114 hubs, and on my bearing mount 4x100 hub from for example Civic MB1 or Rover 400 with prelude 282mm 4x100 brake disc?
in my poor expirience and strong logic theres only 2 preconditions
1. wheel bearing must be the same on MB1 and MB6/MC2
2. brake caliper distance
i know that on VW Golfs 5x100 -> 4x100 and oposite hub conversions are possible, because of total compatibility, but i dont know what is situation on our chasis
please correct me if i talking silly things
 then i will consider MG ones
Do you know where i can find exact data for hub ofset on MB6 and MG ZS. MB stock rim is et55, bit that doesn need to mean anything
Just a quick point to make on this thread when you're talking about changing hubs - ask yourself why Honda make 3 different hub sizes?
4x100 - Normally found on smaller Honda's - such as Jazz and Civic. This has the SMALLEST wheel bearing.
4x114 - Normally found on higher power Civic's (and older intergra's), older lower spec Accords etc. This has a larger wheel bearing.
5x114 - Normally found on highest power Hondas such as the later DC2 Integra and Accord Type R. This has the LARGEST wheel bearing.
Larger bearing = larger load capacity. Downgrading your hubs is a bad idea!!! Hubs on the MB6/MC2 are bigger as they have bigger wheel bearings so they are not the same as the other Civic 5 models.
There are also slight differences in the offset of the hub, and to be honest I don't have that info to hand but it is out there on the web. I would NEVER recommend going down in hub size, go up - there is a reason they go bigger! I know from my car that going from 4x114 to 5x115 I have also had to change my drive shafts to the bigger 36mm nut ones to match - which also take more load
 I have been told (although I have yet to confirm) that my original MC2 brakes will hook up with little/no modifications to the larger hubs. At worst case i have to use a 1mm washer on the calliper carrier, but as I am using after market callipers and discs this is not a problem for me.
For offest explanation:
http://www.alloyguide.com/pcd.php
HTH
Dave
-
Finally!
 been looking forward to this update.
Its looking great is that mate! proper job! How long until you get it back?
I will try and visit the fabricators more often for updates!
Not sure when the car will be finished tbh. It was originally supposed to take 2 weeks but I have asked them to do a few more jobs and they are now only working on the car in between other projects. They had an ex works DC5 Integra and a Suzuki rally car on the go so my track car is low priority. I'm in no rush as the quality of the work so far is outstanding so I don't want to push them.

-
 is there a fuel pump cover there anywhere
  so i dont have to remove my tank
Lol I wish. Tank out job for the pump - I checked

-
When you're done, so so need to weigh the car, she how much she has lost!
Will do. I want to weigh all the dead brackets worth of metal they've taken out, it was a fair size box!
I love the updates in this thread, keep up the good work
Cheers. Hoping it'll all be done ready for next spring so I can start setting it all up for another shot at the Nurburgring. Plastic side windows will be ready next week so I can start fitting them over Xmas. I also put my name down for the heated front screen so should have no issues seeing where I'm going!
its is mentalHear that a lot, or is that I'm mental

-
Okay a small update (as I don't have the chassis to work on at the moment
 )
)Called in to see the progress of the roll cage, forgive the photos as I knackered my phone so I'm using a prehistoric brick of a unit until the new one arrives
Drivers foot-well before and after:


Second skin removed and smooth floor underneath - this will allow them to push the pedal box further
![[smitten.gif]](https://civic5.com/forum/uploads/smitten.gif)
View up into the roof:


Sunroof gone, all support beams gone, cage up into the roof

Work in progress, still got to fit the fillet plates to tie the A-pillars back to the cage:

Amazing what a wire wheel can do to remove sound deadening
![[smash.gif]](https://civic5.com/forum/uploads/smash.gif)

-
Sorry guys
 thought id already said. The gurney flap is on hold for the time being as i need to make a 2 part mold and im not sure how im gonna go about this yet.
Hope that clears things up

The part in the mold is the chrome trim on the rear number plate recess. obviously in cf though
lol, looking forward to it though! Be interesting to see the finish you get using that method for laying up the cf - resin infusion will give you an awesome end product but is way more time consuming to setup

-
Cheers dude! I think it all depends on what you want the end result to be. Im a tad ocd when it comes to stuff like that. I always want it as good as i can possible get it using the equipment and skills i have, even if it takes a little longer.
He bypassed the old honda unit as far as i am aware. It never worked properly any way. But yeh we didn't even touch the old system.
I have no bodywork skills so seeing all the work you put in and how well it came out I wish I could do it, me with welding gear is probably not a good idea though
 Couldn't agree more though, if you have the skills to do a proper job then you want it the best it can be.
 I think the only true way to ditch the Honda alarm/immobiliser is to buy a new ECU but I'm not at that stage just yet.
![[smash.gif]](https://civic5.com/forum/uploads/smash.gif)
-
bodywork came out good, better than the bodyshop that did my cill/door jam last year!! For a rattle can spray job looks impressive to me.
On the alarm- did your mate manage to bypass the Honda transponder system or do you have the 2 running in parallel? Just wondering as I want to remove the alarm from mine completely
-
Wow, so much has happened since I last had a read through!
That's going to be one mega Deck though!

On the intake front, Edelbrock do one that will fit the C4 no problems! Even have a choice of two types depending on if you want more mid-range or more top-end power/torque!

Cheers

I've seen the Edelbrock one but didn't know they did different variants depending on top end or mid range, thanks. Once I work out what route to take with the engine then I will start looking at them in more detail but all this is good to know. I think at this stage once the chassis is back and painted I will run it with the stock engine and see what it feels like with all the weight saving and then look at what the engine needs.
-
people always want a tin top not the other way around!
people always want tintops, as you put it, for track weapons, if its not a track car then a sun roof is a bonus

True, I'm having a panel welded into my roof to get rid of the sunroof in mine

-
I could be interested in this too, if it can be done without the removal of the dash? Would also like to use a sperate switch too (same as the rear one) . Would need a courier price to scotland though.
PS: made this a sticky so it gets more attention

Cool thanks.
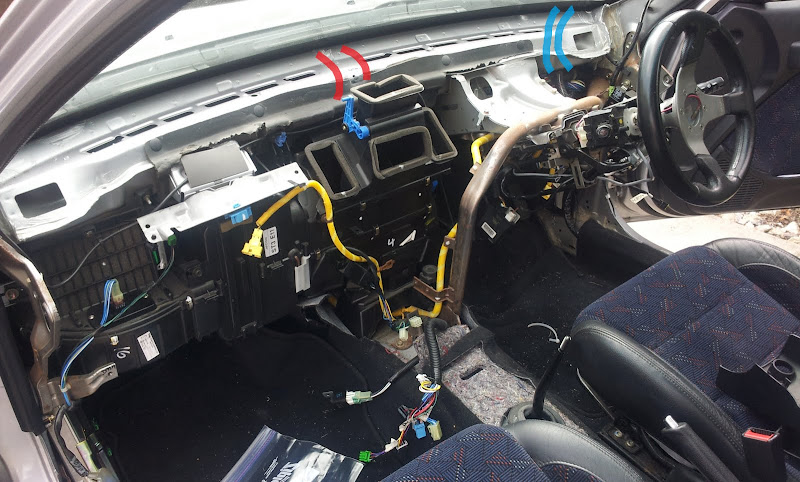
You might be able to do it without taking the dashboard out but you'd have to push the wires through from under the dash before the new screen goes in. Not a job I'd want to do after seeing what is under there but again no impossible. You could use the old trick of using welding rod or a metal coat hanger to push/pull the wires through. As for the separate switch, this is quite easy providing you have the switch and somewhere to locate it. It would be x10 easier if it could be done while the old screen was out before the new one goes in

Photo below shows the interior with the dash removed only (early on in my build
 ), and depending on where the wires end up depends on the route. If they end up in the middle (which I hope they do) then you might be able to just lift out the top centre vent, remove the bolt holding the top of the dash in and pull the dash up a little to feed the wires through, as shown by the red lines. If its the sides then it may be a bit trickier but with the old screen out you would have room to work from the outside in, as shown by the blue lines.
Maybe Jason could shed some light on this???
-
12kg i guess & WOW!
Close, 10kg when I finally weighed it all last night
-
if i take the car to an auto tech would the screen need to be fitted before....????? the above post sounds good but i know nowt about wiring and the diagram that was posted looks good but it looks like every other wiring diagram ive seen...... as you can tell wiring isnt my strong point


To make a harness before the screen goes in you would need to know where the terminals would end up (safe guess is at the bottom middle of the screen). Honestly it's not that bad to do, but to do it properly I would take the dash out to get the wiring in. Luckily I've already done that to mine

If we get enough people committed for Jason to place the order then I will do a "how to" on the harness build how's that?
-
Okay all the bits to wire it up, using the original rear heated screen switch as the trigger (so both come on together) will come to a staggering £17.50 delivered!!
That would include 2 relays and mounts, fuses and 25A cable. Wiring diagram would be as the one Jason already posted, doubled up to handle the 2 heating elements in the screen. If you've done an AC delete then power can come from the AC fused line under the bonnet for ease.
-
I would think that the roof internals are very different between an MB6 with sunroof and MC2 without. Photo below is on the MC2 with sunroof internals, and as you can see there are several mounting points around the roof for the sunroof mechanism, plus the way the roof skin is cut and folded to make the sunroof seal.
I think this is not feasible. It's not impossible!

-
you could just make up the harness for us

 think if i was left to do it id have serious problems

if there was a plug and play harness you would have my money already jason

I can design it, I can even cost the relays and mounts etc. if that's an issue for people to find the parts. Give me a few hours and I'll draw it up but the link Jason has placed on here gives the basics of it.
-
I'm looking into having a heated screen for mine (no brainer really, I don't even have a heater matrix in my car lol) so I am defo up for this. I've been looking around the net and found a few companies that do them, none willing to help.
 I then found someone saying "I've had a call about this, speak to Jason", which I've now done and guess where I end up
Jason - please +1 me to your list as we spoke about on the phone


Come on guys, must be a few more out there looking for this? Especially those with AC delete? I'm quite happy to work out all the wiring and do a guide for those worried about that side of it. Given that if you have deleted the AC then you'll have a spare power feed available from the fuse box



MC2 Project - Chassis prep
in Honda Civic MA/MB/MC
Posted
I took a few days of work to sort a out some stuff for the car. Collected the new perspex window kit from Plastics 4 Performance so if any other crazy Aerodeck owner wants them they are now available as they have the templates. Test fitted them yesterday and they all lined up properly and the back windows all have the black edging to hide the sealant so a proper job. I will get pictures when I remember to take them
Also removed all the doors and cut away the bits I won't be needing anymore-
Another few kg's for the bin
Finally, the detail of the cage has begun so I now have harness bars
Not long now until I get the chassis back!