


DeLaSoul
-
Posts
443 -
Joined
-
Last visited
-
Days Won
30
Content Type
Store
Calendar
Forums
Gallery
Downloads
Posts posted by DeLaSoul
-
-
Well I took advantage of the Tegiwa offers on the lead up to Christmas so impatiently waiting for parts to be delivered!
Also getting ready to put the chassis on the stand so I can start stripping the underseal off
-
I was told not having a sensor plug on decat gives poor fuel economy, right or wrong?
It won't help as the ecu can't confirm if it is running at the correct air to fuel ratio, therefore it plays safe and runs slightly rich to protect the engine hence slightly lower fuel economy.
-
 1
1
-
-
I guess that may not be so bad while he works on the lower half of the car?
True. It's going to get taller once I stuck some decent wheels on it anyway!
-
Do you have a welder?/are you fabricating yourself?
Why would the rotisserie be too high to paint the underside? Just use a crate to stand on

Ok mate, I'll give you a bell over Xmas.
I have access to a welder, but not got my own

The stand if fine for me to work on the car, just thought if the painter is working on the sides of the car, the middle of the door will be at shoulder height!
-
Good plan mate .. So are you using it to seam weld/undercoat underneath ? Or you keeping it on there for the body spraying too? Need a hand over xmas at somepoint? I've got quite a bit of time off, so could pop up?
Cheers mate, yes I'm stripping the underside ready for welding and paint and hoped to leave the chassis on it for the painter but it seems a bit too high. I've got some welding to do also to mount the rad and power steering pump and a few small brackets around the roll cage.
I've got a few pieces to paint (airbrushing hobby) before Xmas then I'm back on the civic but you're welcome any time:)
-
1
-
-
Shame about needing to space out to fit them over the calipers, I'd be showing those photos to whomever said the wheels would clear!
I did call them, they claimed I never mentioned the brake upgrade but they told me how to setup the brake bias! Never mind, live a learn.
Ahhh spacers
:( I hate them too .. Only had 5mm on mine when I put the dc2 wheels on and could feel them vibrating if you have to run them, I would suggest to get hubcentric ones ..Bit naff of the sellers to "assure" they fit ..
I say that rotisserie too ! Nice !
Found some H&R hubcentric ones and longer wheel studs which I'll order up at some point. Got new wheel bearings for front and rear to fit so that'll be the time to do it all.
Rotisserie needs a little fettling to fit the deck, and it's very tall so the chassis is up nice and high to work on, not sure what the painter will think though!
-
Possibly, but I think they will clear once the arches are pulled. I'm trying not to do too much to the stock panels just in case I need to replace them if I put the car off the circuit lol
-
1
-
-
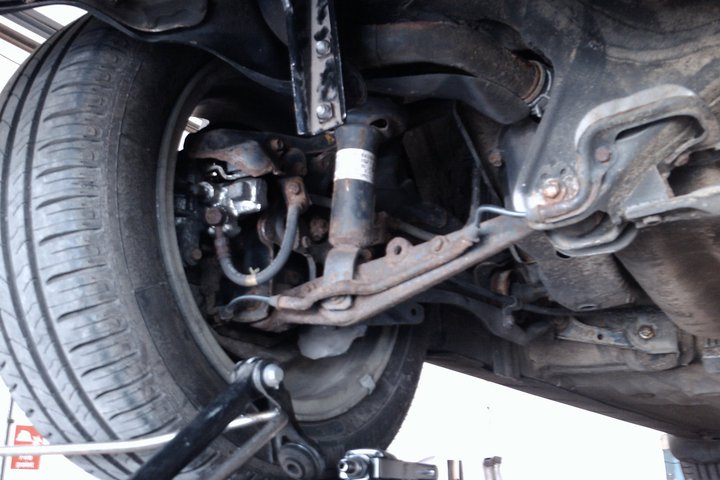
Not really an update, just test fitting some stuff on the chassis. Wheels and tyres arrived a little while back, got an awesome deal on 6 Buddy Club P1 wheels and some 225/45 R16 Toyo R888 GG tyres so jumped on it. Wasn't 100% sure that these wheels would clear the callipers but was assured they would. To be sure (to be sure), I assembled up one of the 5 stud hubs front and rear and put them on the car and initially everything looked good, until I went to spin the wheel and the spokes hit the calliper
Might not be clear on the photo but there is about 0.5mm between the calliper and the back of the spokes and the spoke curves around to fit in the middle of the pistons so it can't turn


Tried to re-shim the calliper on the mounts but it was already in the middle of the disc so no where to go there

Last option is to fit spacers. Only needed 5mm to clear but I hate spacers, especially as I was told it would fit

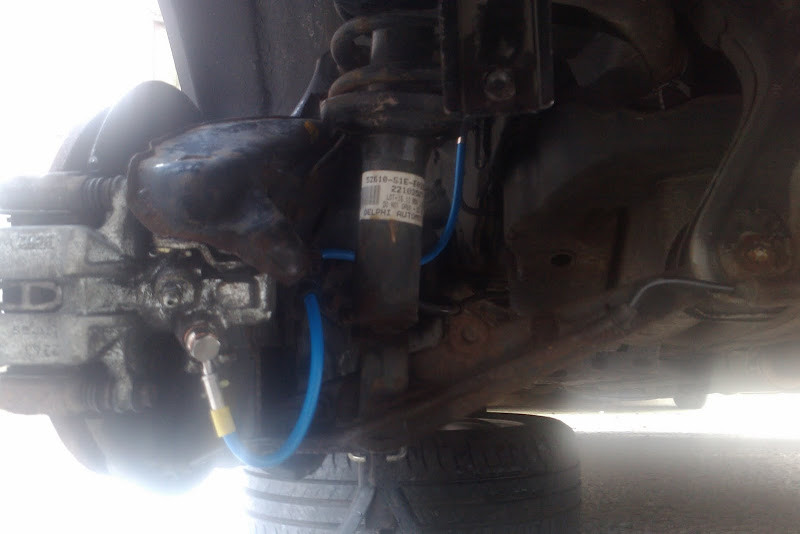
Okay, so they now clear the calliper, so refit the wing and......

Damn things stick out about 10mm at normal ride height. Looks worse in the photo as the suspension is a full travel but it's another issue to sort! To be fair, if I was running the normal 205/45 R16 tyres they would go under the arches no problem at the front but hey ho, too late now!
On to the rear, similar issues...

At ride height (well simulated by removing the shock absorber) the tyre will catch the arch, but at least the wheel clears the bigger brake setup

So the rear arches will have to be pulled too if I want to stick with the wider tyres.
Finally, a chance advert on another site for a car rotisserie caught my eye so I jumped on it. Went down on Saturday to collect it, next job it to fit it to the chassis but it looks good so far, only minor mods to make it go as it was designed for a DC2/EG

Only just fitted in the back of my 4x4!
Slowly onward.......

-
They look similar to the hi-spec callipers i've just got my hands on! Dont suppose you know what size offset the brackets are?
Not sure which ones i need - http://www.hispecmotorsport.co.uk/UniBrkB42.html
No but I can measure them later tonight. I bought the setup to match the DC2 hub, found some old photos while it was fitting it all together, excuse the mess

s


-
Nice!

Thanks for the info
No problem
-
still need to come see this young man !
It's not going anywhere for a while! Only just started to test fit the new wheels over the big brakes and 225/45 tyres under the arches

-
1
-
-
I doubt you'd be able to fit DC5/EP3 hubs, especially at the rear as they are totally different setup - hence why you can't find anything. You can fit EK9/DC2 hubs all around which does convert you to 5x114.3 PCD and the larger wheel bearings at the front as I've done it to my MC2. I also switched drive shafts, but I believe you can just switch the outer ends and keep your original shaft.

Rear fitting on mine
-
4
-
-
Exactly this .. Either build one for a purpose or not at all.. Waste of time and pointless additional weight ..
In all seriousness a show cage is pointless, and let me be very blunt - a total joke. Don't mean to be rude as I know that a lot of the time money and usability are key concerns with any project build but I've seen show cages that have caused way more harm than good and to anyone seriously into racing will know anything safety related (for looks or otherwise) is a major matter. I look at some of the things that people do with "chassis reinforcement" and just want to go over and slap the owner for putting people lives at risk (including their own). Not picking on you dude, you've just asked a question in good faith, but just don't do it for your own sake.
-
4
-
-
Got a bit of a problem worry that though... Got the chip with the p72 map from the states... Just had someone local to do the soldering work
If it's chipped with Hondata, Chrome etc then it should be switchable by the right tuner but maybe need a retune after? I was going to use Romain (races in Time Attack, contacted him through R-Motion) to do my P30 before I changed my mind and went to a DTA S60
-
evening.
Finally picked up the ECU after getting it socketed and chipped, and the IAB components added. Plugged it in and got an engine light. have read the code and it's 13 - Baro Atmospheric Pressure Sensor.
from what I can gather, this seems to be a sensor that USDM ecus have... and my P28 probably doesn't.
http://www.hondata.com/forum/viewtopic.php?t=933
So I'm thinking that the P72 map on the chip is looking for the APS and it's throwing the code coz it's not there...
anyone know if I can run the ECU with this fault showing until I can get it to someone who can disable it in the map? WIll it cause any problems or should I just swap the P9 back in.
Cheers
Hmmmm, tricky. Not sure if this helps, but I've been looking at running throttle bodies with mine on a socketed P30 ECU where some of the sensors will be useless so we (well mainly the guy putting my engine together) was going to switch off the sensor and run the engine on the TPS and revs so it must be possible. Can your tuner not do anything on the map? If our engines don't run the same sensors as the USDM version then I'd guess it can be turned off in the code?
-
1
-
-
I have no holes in the wheel well of my Civic to drain/let in water, but there is a bung that is sealed into the chassis. I've got the entire interior out of my car at the moment with my build and after looking around I would hazard a guess that the water you are talking about is coming from the sunroof drain tubes? As Dexter says a photo would help.
If it is what I think it is then I would suggest checking the drain tubes aren't blocked or haven't come away and are leaking in the back of the car. All 4 corners of the sunroof have a water collection point and drain tubes that drain the water out down the A and C pillars and drop it outside the car. These can block (was a very common problem on my old RX-7!) and just needed cleaning out once a year. Other than that it could be the rear lights leaking. Take some of the trim out and you should see where the water is tracking from?
-
1
-
-
DC2 fitted straight on mine. I believe my one was from a 96' model, came with the steering wheel

-
Bloody hell mate .. Atention to detail is seccond to none !!!
Not much else to do in Swindon other than go to the gym and work on the car

Mate that's mental but probably so rewarding as you'll know what part of the loom you're looking at should you need to trace any cables back. Not that you would given the work that's going into this! Least you'll know it's all decent!
I can't weld and my metal fabrication skills are sketchy at best, but I do like wiring. My dash loom wasn't great but this new direction for the wiring will make life easier in the long run and so much cleaner!!!
love to see this thread pop up in the updates list - always cool stuff going on
Cheers. Just wish I had more time on the car, really want to get this into paint by Jan 2015 and assembled for next summer!
-
2
-
-
Okay, that time of year again.....an update!
After deciding that I should wait for all the brackets and mounts for the chassis to turn up before I go too mad on routing pipes etc, I decided to get back to what I can do, the electrics. I found a site in the US that sells the majority of the engine plugs and ordered a set for a stock engine. Knowing I most probably not need most of the intake plugs, I thought it best just to have them in case rather than place a second order (postage, import etc etc.)

only one missing was the alternator, which is a stock Denso plug and that was easy to find in the UK. I later found out how to strip the plugs and that 90% come from the same company and use the same pins!!!! I now have a source for just the pins & seals (wish I'd found that sooner so I didn't order $100 worth of pins and plugs, never mind
)On to the loom. Working from the back to the front, started with the longest run first. This meant going up into the tail gate for the number plate light, high level brake light and then to the tail lights. I'm using all the old plugs but with new wire, pins and seals (where needed) Sorry for some of the crap pics, was in bit of a rush!

Number plate light wiring, runs down the inside of the rear window...

High level brake light, waiting for the plug.....

Wiring to the fuel cell. This will have a new MIL-spec plug and socket so I can remove it quickly if needed.

Across to the NS tail light

Etc. etc. This lot meets up with the OS loom and down to the front of the car and up to the dash board. It is all overbraided, glue heat shrunk ends and heat shrunk tagged. It will be fixed in place with zip tie holders (which arrived today!) once the chassis has been painted.
On to the front, and starting with the OS wing....

This loom carries the windshield wiper, indicators, lights, fan and horn. Again, all overbraided and heat shrunk. The sticky pads will NOT be staying for the final build!

Pops through the wing behind the headlight. Still need a new H4 headlight plug, which should be here in the next few days.
Across to the horn and fan. Fog light wiring has also been done the same way....

A little bit more detail as I built the NS front loom.....
Once all the wires had been routed and joined together with heat shrink "guides", I covered them all with sections of overbraid. Each end is closed with glue backed heat shrink to stop it coming apart and looking bad after handling.....

Where each cable joins, it is again closed with glue backed heat shrink to hold the sections together. The ends a labelled ready for pinning.

For the head light levelling motor, I fitted the new seals and stripped the wires. New pins in the background ready for fitting....

Crimped on the new pins. Having the correct crimping tools was a must!!! £35 well spent!

Finally refit the plug and locking plate


All the earthing will be inside the wing, but all the wires were crimped, soldered and heatshrunk. Nothing like having to bit of OCD!

Final part is connecting the plug at the inner end of the loom. job for another day, but so far it's only taken 3 full days to wire up the four corners of the car all the way back to the dashboard with all new wire and pins. Some of the original wire was in good shape, but some was showing signs of corrosion. Either way I'm 110% happier doing it this way then recycling old bits of wire with new soldered together. Onward ever slowly!
-
2
-
-
I used EBC discs and Greenstuff pads around the Nurburgring and founds once I'd stopped the pads binding in the carriers they were upto the task 8 laps later they still worked well on the trip home and are still sitting on the hubs in the garage now! The powder coating they put on the back of the pad is a little too thick and needed to be cut away on my car but that could just be bad luck on my part as I've never had the problem before. I've also tried Black Diamond discs on several other cars with Ferrodo pads and had some very good results.
I'd recommend decent over braided brake hoses as well, I've run HEL and Goodridge ones over the years and had no issues, they also improve brake feel and if the car is still running the original OEM ones they will probably be coming up for a change. The HEL ones on the Civic were a good fit.
Stock:
HEL:
DOT 5.1 is another good call, I always swap that into every car I've ever owned after DOT 4 boiled on me during a spirited drive home one night. Never had the problem since!
You could go balls out and put something a little more powerful under the wheels.......

Yet to try these in anger yet but so looking forward to it!!!
-
4
-
-
Like the ingenuity there! Shame the new gauge didn't have a red/orange needle! Great stuff though!
Funny I thought the same thing but I wasn't about to crack open the new gauge and paint the needle. I pushed my luck doing what I did without messing it up!
Ha love it mate .. Thats a great little idea rather than having an additinoal one stuck on the dash somewhere!
Rad looks huge! Should certianly keep her cool !
Oil cooler has now arrived so need to fit that in somewhere behind the bumper. Don't think I'll have any overheating issues on track with a triple core double width unit!
-
1
-
-
Time for a quick update (not a lot happening, work it getting in the way)
New radiator has arrived, doesn't fit but I'll soon sort that


Need to cut off the stock lower mounts for the radiator, unbolt the air con rad mounts and reweld. The pins for the top will also have to be cut off and new mounts made on the sides of the rad. Not something I'm going to attempt but I know someone who can help

This will also pull the rad forward to give more clearance to the manifold
Next job, sort the dials. I know the stock fuel gauge will not work with the new fuel cell, so need somewhere to fit the new gauge. Why not use the old location?
![[smash.gif]](https://civic5.com/forum/uploads/smash.gif)

Stripped down the casing, and a quick skim with the dremmel and the gauge fits the front panel

Time to make it fit the back part, clear off everthing in the way


Mark out roughly where the gauge will end up

Not my finest dremmel moment, but it will do for now.

Cut the circuit board to clear. Luckily, I am only effecting the original fuel gauge connections, nothing I can't bypass

And then time to clean, reassemble and re-glue the housing back together

Saves having a dead dial and another stuck on the dash!
-
1
-
-
There are companies that do turret risers for Civic and Integra that will fit the MB/MC cars. Means cutting out the top of the tower and welding in a new section, repaint and seal so not a small job.
-
1
-
-
I regularly rock in my seat pushing buttons, sounds like work
-
1
-
MC2 Project - Chassis prep
in Honda Civic MA/MB/MC
Posted
ARP wheel studs
Skunk2 Wheel Nuts
Innovative Engine Mounts
Sump Baffle Kit
Front & Rear wheel bearings
Takata 6 point Harness
plus some other bits......