Krzys Posted May 14, 2015 Share Posted May 14, 2015 Keep thinking about one of these after hearing one giving it beans the other day... Sounded lush Like they said on Mighty Car Mods, the sound of a 1000 unicorns farting, they are awesome! Quote Link to comment Share on other sites More sharing options...
noodels Posted May 14, 2015 Share Posted May 14, 2015 Like they said on Mighty Car Mods, the sound of a 1000 unicorns farting, they are awesome! Was one of there own cars,says something And its a Honda 1 Quote Link to comment Share on other sites More sharing options...
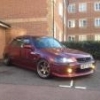
dinochips Posted May 14, 2015 Author Share Posted May 14, 2015 So where was I. seeing the car was off the road It was a good idea to get all the body work mint so after a few quotes Simon from www.chipandpaintrepairs.co.uk was able to come and sort it out for me. he basically turns up in his van and works his wonders .i like Simon was a cracking guy and will defo get him to sort any issues i have in the future And heres the finished work He only charged £300 for the whole job which involved hammering out most of the dent, treating and removing any surface rust, and then the casual sanding filling, sanding filling then final coat. PROPer Job Quote Link to comment Share on other sites More sharing options...
dinochips Posted May 14, 2015 Author Share Posted May 14, 2015 So my front bumper also had a small nick in it but I thought I would tackle this one myself. So this is few pics from the process Then the fun of getting it silky smooth once that was sorted lick of paint then a few coats of Laquar and leave it to dry for a week Finished it off with a 1200 grit sand and a polish to blend it in. then Boom So if you noticed its wasn't all attached flush as one of my headlight/bumper mounts was bent so needed replacing (the next job) 1 Quote Link to comment Share on other sites More sharing options...
dinochips Posted May 14, 2015 Author Share Posted May 14, 2015 NEXT JOB So headlight/Bumper mounts got one through already then the other arrived and it was yellow so had to respray that b****r aswell BOOM I was determined to make sure every part I take off gets revamped before it goes back on. then fitted the mounts and it finally looked lie a minter with lush body work apart from 2 minor stone chips lol So next job was too really start on getting every mechanical working sound and there was a huge list. 1 Quote Link to comment Share on other sites More sharing options...
KiNK43 Posted May 14, 2015 Share Posted May 14, 2015 Fair play man stunning job in the bumper. That guys brave Suprised he doesn't get bit blowing on the paint. But looks a top job. Car looks great now Quote Link to comment Share on other sites More sharing options...
noodels Posted May 14, 2015 Share Posted May 14, 2015 Is that from a aerosol ?my front bumper looks like its has been shot blasted<small stones> ,needs a repaint Quote Link to comment Share on other sites More sharing options...
Krzys Posted May 14, 2015 Share Posted May 14, 2015 Looks loads better! Quote Link to comment Share on other sites More sharing options...
dr_broon Posted May 14, 2015 Share Posted May 14, 2015 Nice Quote Link to comment Share on other sites More sharing options...
dinochips Posted May 14, 2015 Author Share Posted May 14, 2015 Is that from a aerosol ?my front bumper looks like its has been shot blasted<small stones> ,needs a repaint yup but i have some fancy nozzles for them which i can adjust for best results. friend at halfords mixed the the colour which was spot on honestly cant tell the difference. Quote Link to comment Share on other sites More sharing options...

Recommended Posts
Join the conversation
You can post now and register later. If you have an account, sign in now to post with your account.