Leaderboard


Popular Content
Showing content with the highest reputation since 02/10/2025 in Posts
-
Hi Ben, The calipers in the photo are for the 260mm front brakes, not the larger 280mm front brakes. Manufacturer caliper numbers for the larger calipers are LCA333 & RCA333. You can use eBay to get the oem numbers from them. Basically the calipers are the same for the mg zs180, mg zr160 & accord of that era, but the carriers differ i believe (ive not checked any fit on an mb other than a zs). I can confirm that the calipers and carriers from the zs180 will fit onto a mb2 4x100 as thats what I'm currently running! If youre upgrading the brakes you'll need to change the master cylinder and prop valve if you don't have abs for it to work properly. My setup is: Honda Civic MB6 brake master cylinder Honda Civic MB6 brake servo Honda 40/40 brake prop valve (46210-S5A-912) Wezmoto Braided front and rear brake lines (700mm front / 560mm rear) MG ZS 180 Front & Rear brake calipers MG ZS 180 Front & Rear brake discs Cheers, Dan4 points
-
A rather inebriated looking K24A showed up this morning But it has the RBB markings on the head which is what matters - meaning it is the "full fat" version with 3-lobe VTEC and ~200hp. There is a similar looking version with 160hp and only 2 cam lobes so you have to be careful! Hopefully get that mounted up onto an engine stand at some point and take a closer look inside but so far so good. For peace of mind i'm going to give it a compression test and have a peek into the cylinders with a scope before going any further.4 points
-
Hi mate. There is some mystery over the actual numbers of each VTiS model made. The logbook should have made it easy to identify a genuine one, but unfortunately even that is a minefield as Honda dealerships made mistakes with them when registering the car with the UK DVLA. Some have VTiS on the logbook, some just state model as VTi. The only parts that were unique to the VTiS were drivers side floor mat which had the VTiS logo on it (the other 3 mats were just standard) the gear knob (alloy and engraved in the early VTiS, silver plastic/black leather with "VTiS" in black on it for the post 1997 ones) and the alloys (again, these differed so early ones got 15" Speedline Chronos wheels, later ones got the same as the ones in your photos which are 15" Speedline "fans"). The body kit was available in the accessory catalogue, but was standard on the VTiS. The "mid spoiler" on the aerodeck was also an accessory option. The other thing that marked out the VTiS was the pirates black paint. All VTiS came in pirates black only, so any you see that don't have pirates black are 100% not a genuine VTiS. The Aerodeck ones are a lot rarer as most were the mb6 5 door hatch. Hope this helps a little.3 points
-
Hello to all of you, First time posting on the forum, kinda wanted to share a bit about my mb2 since i first came to find some knowledge about these mb chassis. It's my first car, family owned since new and it's getting to the 100k km mark, and in my two years of driving and enjoying the car i can say it's a great car and frankly very underrated and deserves a lot more recognition The car has nothing major done to it, it's mostly stock aside from some small cosmetics. The mods are: Front mudflaps out of a junkyard pirate black mb2 1DIN android auto radio Reuphostered steering wheel Rear spoiler out of a Rover I have many plans for it later but most of em are cosmetics and i won't bother to modify a D14, maybe just a intake at best since the oem one is plastic. It's getting lowered and i want it to ride on some ek4 vti rims, or civic jordan rims and vti lip is also in the list Cheer, Costa.3 points
-
Its been a long time since the last update. So yeah of course it is fully wrapped now by myself and lowered even more. Looks pretty good but for sure sometime in the future I might paint it (I'm currently doing car painting education) plans for the future: Turbo... I found a cheap kit on marketplace and then I'm gonna try and make a reliable stock internal setup, so not that high boost3 points
-
Looking good if I do say so myself! Headlights definitely letting the side down, need a good polish and coating.3 points
-
Smaller power steering pulley (hopefully it will clear the bonnet without hacking any big holes in it) and 10% underdrive alternator pulley fitted As we've deleted the AC the factory belt was much too long (think it was something like 7pk1735 from memory). Managed to find a belt that will fit (7PK1400) - it seems ok but apparently there is a mark on the tensioner that you can check - i'll do this next time im with the car to confirm but seems like the right size. Engine mounts ordered - I went for Innovative Mounts for a Civic EG as the price for Hasport mounts in the UK is insane (£700+!) and I wanted to avoid ebay china copied junk on this project...3 points
-
Thanks for the update on the fogs - I managed to get a set of good condition blanking plates so i've removed the fairly rotten big fogs for now but I may reinstate them later. Left the connectors tied up behind. A bit more progress on the K-swap side of things: Drilled a couple of holes in the firewall just under the heater outlet to allow for the shifter cables to pass through (no photo, oops) Got hold of a billet shifter plate designed for an EG but it was sitting too proud of the tunnel so drilled out the fasteners for the shifter base plate and removed it DC5 shifter mocked up - was worried that it would be too close to the dashboard but it seems to just about be ok - the shifter box came with a short shifter already fitted which should help things Clutch and flywheel test fit - just waiting for various missing bolts to arrive from Japan before buttoning it all up. Toyed with the idea of getting an uprated clutch but we've gone with Exedy OEM EP3 clutch for now as it's many times cheaper than an uprated one (£126 vs ~£400) and I reckon it'll be OK for NA power levels. Any future plans to boost the car would require an LSD as well as a clutch upgrade anyway! Flywheel is a Competition Clutch 3.9kg3 points
-
Thank you for the warm welcome both I am basically following guides for an EG K-swap as the car seems to be almost identical as far as a K swap is concerned. Even the EG conversion harness (to connect the new engine loom to the existing car loom) appears to work for the MB. Spent a day on the car today and progress as follows: Bye bye D14! Some areas of surface rust in the engine bay that we'll go over with a flap wheel and spraypaint over just to stop it getting any worse but not found anything that needs any welding etc so that's good news Made a bit of a mess knocking out the leftmost engine mount bracket (required to install the EGK2 Hasport mounts). Drilled all the spot welds out but it still wasn't budging so ended up going in behind it with a hammer and chisel and it eventually came off - the chassis has suffered a few battle scars but nothing a bit of sanding and paint can't cure! I've agreed to buy an EP3 civic gearbox so now that the gearbox has been chosen the next job I think will be to get hold of a shifter from an Integra DC5 and get that mounted in the car and get the shifter cables fed through to the engine bay and the shifter mounted. If i'd gone for an FN2 or accord gearbox I would've needed an accord shifter as the pattern is reversed. And finally my first mod! A set of clear indicators, I believe they were from an accord - I had to file off a small tab on the casing to get them to fit the connector was a direct swap so that's a good result3 points
-
Progress so far Started to strip out the engine - radiator (probably leaking) and AC condenser (also probably leaking) removed: Painting the rear bumper - to cover various marks and scratches but also somewhat of an experiment to see what it looks like with rubber strips colour coded (from photos i've seen I think it will look better) I've started putting together a list of parts that i'd like to acquire (the amount of small parts you need for a K-swap is crazy. It's all bolt on but you definitely need a spreadsheet or similar to manage it!)3 points
-
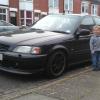
Hey everybody, glad I could be a part of the forums now, I'd like to show you a couple pictures of my new to me MB8, it has some really nice OEM goodies too, like the wind deflectors and metal plates door sills. This is hopefully going to be a build thread for this car as I buy more stuff for it and upgrade it in the future. Hopefully you guys like it!2 points
-
Nice car, factory wind deflectors are always a good choice I spent far too much money getting some JDM ones for my accord !2 points
-
I clear them regularly because I have tin foil hat. So shouldn't be an issue. Merry Xmas anyway.2 points
-
Know what you mean about the weather. In theory winter's the perfect time to get sone jobs done cos the deck is off the road, but got zero motivation to do anything in the cold / wet / dark. @Dave any idea why Jake can't post pics?2 points
-
Yeah, was gutted! Still no idea what it was, but got the parts now to fix her so will probably look at getting them fitted over the Christmas break.2 points
-
I don't have it to hand but I will check the car next time I am with it and let you know (it's not parked at my house unfortunately) - probably at the weekend If it helps there are some results for the rover part number (RGD10001) on autodoc RGD10-001 A.B.S., ASHIKA | RGD10001 in AUTODOC2 points
-
Cheers - thats what we ended up doing in the end and it worked, The pedal has a lot of free play at the top so I need to adjust the pushrod and the bump stopper thing at the top, will tackle that next time2 points
-
Sooo, had a bit of an accident with Lexy ☹️ On way to work at silly o clock in the morning so still dark. Pulled out to pass a van, got almost online with his front wheel and heard an almighty bang! Then followed horrible grinding sound! Thought the engine or gearbox had went, the bang was so loud. Pulled in and went to front of the car and front bumper on passenger side is smashed with a big bit missing, and the plastic wheel arch trim (the colour coded bit that's part of the body kit, not the inner arch) is off and dragging along the ground, held on by one clip at the bottom! 😲 No idea what I hit, but it was solid! Thinking that the van either threw up a rock or maybe a large tree branch. Managed to clip the arch back on best I could and drove home. Had a loud rattle from underneath so was worried what else had been damaged.Checked and whatever I hit also dislodged the exhaust heatshield and also snapped the exhaust hanger clean off the exhaust! Gutted! I managed to source a replacement bumper in the same red down in Durham for £100, and the wheel arch, again in red, via Ebay. Wheelarch was the hardest bit to source and cost almost as much as the bumper! She still drives fine, just looks a bit of a mess, but will get her sorted soon. Will post up a couple of pics when I get a chance. Alwayshappens near Christmas!2 points
-
This car is a "profile" edition, I believe it only came in 2000's mbs it came with a few cosmetic stuff including the painted door handles and mirrors and a nice exhaust tip. I got the head unit for 40 bucks on AliExpress, I just searched android auto 1din radio and it poped up and went for it and I'm pretty happy with it2 points
-
Just took a rather nerve racking first proper drive of around 15 miles to a local stainless exhaust fabrication place before work. I've left the car with them as I really didn't fancy driving any further with the noise level/fumes but I should get it back next week! I've asked them to make up a 3 inch exhaust, with a high flow cat, centre res and back box. I want the least restriction but I don't want the noise level to be too crazy and get kicked off a track day so we'll see what they come up with. Its definitely overkill for NA but we might boost it once day so it would be "future proofed" for that. Car for the most part drives fine - the only things I've noticed so far: - The steering is a bit off centre - it could be just the boss isn't on right but I think it probably just needs an alignment as we've had the front suspension apart several times to fit driveshafts, coilovers etc. The power steering is working perfectly though which was a big goal of mine as most people delete the PS on these kind of swaps but it's not pleasant to live with off the track. - The throttle is a bit "sticky". Sometimes it idles at 1200rpm and then if you pull the pedal up with your foot it settles down. I have tried to adjust it once before to no avail and I've checked the TPS is calibrated properly. It may need a new throttle cable as im using the 25 year old original one. - Just as I was pulling into the exhaust place the car started to run really badly and stumble. I turned it off and back on then it was fine. I did notice on my laptop that it is running very rich - I am hoping it's just over fuelling due to the o2 sensor being almost certainly too close to the end of the pipe (its just before the flexi and there's no exhaust after that point). I'll not worry too much about this until there's an exhaust fitted! - The front end feels a tiny bit loose but ive not driven the car enough really to comment fully. We haven't adjusted any of the suspension or changed any worn bushes etc at the front so I will reserve judgement until thats all done. But honestly, for a first proper drive it didnt go badly at all. No fluids leaked out or parts fell off!! Did get a few odd looks as frankly the car sounds ridiculous but that will be all sorted soon enough... My father in law followed in his car with a bunch of tools and a jack in the boot but luckily we didnt have to do any roadside repairs.2 points
-
Spot on. I'm sure these cars look better the older they get 😎2 points
-
It depends on the head unit. I know that some old Pioneer Head units are easy to hack. They have a 3.5mm jack input for audio controls and you only need a combination of resistance value for each button (vol up, down etc). Some others as JVC are more complicated as they need pulse modulation so you need to find or hack the code from remote control with reverse engineering. I dont know about new head units we have to do some search.. First of all you need to mount some switches on your wheel.and get or retrofit (if it's possible) the cable reel so that you can get 2 extra wires from it. That's what I am also searching for :)2 points
-
All looking good mate, those wheels should look great! The arb should defo help stiffen things up aswell. Doing stuff without a press is a right pita. I treated myself to one last christmas and it defo paid for itself when I did my polybushes haha2 points
-
Great, that means I am okay with the dash trims already. Hoping to find a badge and some mats in the meantime 🤞Just ping me if you want to get rid of that badge.2 points
-
Met a lovely lady at the phycopath horror amusement park tonight in newcastle, told me to post in here as she loved the car2 points
-
Another thing to check is what type the buttons are. Some use voltage signals to operate lathing think that is probably for newer cars. Thinking you'll probably need the complete harness from the clock spring/spool to whereever it goes behind the dash. If you're just planning on fitting the ones for volume, then just terminating the other ones should in theory be fine as they won't be used. You'll also need the harness from the wheel to the radio as it will have some form of connector on it for the radio. Without seeing it, im guessing it will have a female 2.5mm or 3.5mm jack plug socket. Or possibly a male jack plug of the size mentioned above. Have a look in the integra forums (not the FB groups as the info in them is limited and sometimes incorrect!) for folk who are doing radio upgrades/double din conversions on their integra's. I think you'll be looking at getting these from America though as never seen any UK spec ones with those buttons fitted.2 points
-
One lady owner from new , has every single mileage stamp from the same Honda dealerships from new 86k on clock, its pretty clean i did replace Headliner as it was sagging, just a little runs on rear arch's that i would love to sort out but not a clue who to go too this is my first car coming from motorcycles , yours looks so mint dude!2 points
-
So are you looking to replace the steering wheel with one that has cruise control switches? Assuming that the steering wheel fitment on the ma9 is the same as the MB/MC one, then you're looking at wheels with the same fitment as eg/dc2. I'm fairly sure that ek and accord shared the same wheel, but it's a different fitting to ours. EDIT... Just realised that it looks like the cruise control buttons are an add on to the steering wheel. It might be worth exploring parts diagrams like on Honda parts uk to see what optional extras might have been available and get some parts numbers to help your search. If, as the first post suggests, the US integra had it as an option, then the cable fell from that could be compatible - in which case have a spy at acura parts websites in the US for parts diagrams2 points
-
Yeah fingers crossed I'll get to have a quick spin in it, the plan is once the wheels and tyres are on, better front brakes fitted, and a few other small bits are sorted I can take it for an exhaust at least as somewhat of a test drive. Hoping to avoid the cost of getting it delivered there as we don't have a suitable tow car unfortunately. The car came with 12 months MOT when I bought it so we have a bit of time.. technically I am sure it's not valid any more as no exhaust is a fail but just to avoid getting in trouble (hopefully)... that is the next priority item as starting the car up is really antisocial at the moment for the neighbours! The car does run and drive but I've literally only been up and down the driveway in it so far 😂 but nothing flew off/leaked out of it yet so that's good progress... It still needs a proper map on the ECU and there's still a whole bunch of other work to do on the suspension and then safety gear inside (half cage, seats, harnesses, etc) but we can sort that over the winter and be fully ready for a show/track day in spring. To be honest that is all fairly straightforward fitment wise and more about saving up the money to buy everything than actually fitting it that will take time!2 points
-
Moving to Kelso in the borders mate, it's about 20 odd mile from here, nit too far but further into the borders. Closer to your direction lol. The village has been fine but the land with this house is too much to maintain, so bought a lovely detached bungalow with garage and a lot smaller garden. Will give us a lot more free time, and Kelso is our favourite borders town. Plenty to do there, plus it gets its fair share of classic car shows too along at the events ground. Win win!2 points
-
Thanks, it's an alpine unit so even though it's new I think it fits with the 90s-ish vibe of the car. It's no doubt the brand I would've gone for if I had the money back in the day haha. It has RGB lighting so I can change it to march the dash which is nice (I'm being picky but I don't like it when the colours don't match!) The car came with a pretty retro looking JVC CD player but only 1 channel was working for some reason and it had a really shoddy aftermarket Bluetooth kit (calls only) with wires bodged in all over the place so I thought it was best to bin it all and fit something new I did consider not bothering with a head unit but even though the build leans towards track car, I've been in cars which are totally stripped before and whilst you might be able to get an extra 20kg out by removing the heater, stereo, half the dash, etc, it makes the car unusable for anything other than trailering really Yes he basically said he managed to get it all down the side by sticking a pair of long noise pliers through the popped out hazard switch and holding the cables out of the way of the head unit I've stripped everything from the front seats back and deleted the air con (it was broken anyway) so I'm not even sure I'll be able to hear the radio over the rattling but that's about the extent of the weight reduction for now. It should be a lightweight chassis anyway as it doesn't have a sunroof or other luxury features 😂2 points
-
Hi all, So I can confirm aftermarket seats, without cutting frames or welding mounts to car, are completely possible. If you have read my before method with the universal frames this way is a lot easier and more cost effective. After 3 months of research I found a company called Planted Technology, they produced made to order seat sub frames for many cars. I emailed them to ensure my car was not an EK or an EG. I measured up the cars holes and got back the details of the closest fit frames they make. The Honda Accord 4th & 5th gen have the same interior as the MB3/MB6. I took a risk bought the frames and they do in fact directly fit. I admit it was a bit of a fiddle as they had to come from America so may have been slightly warped or bent on delivery, never the less I got them in as seen in the image below Here is a link to the main page, it would better off ordering them from GSM performance Planted Technology https://www.plantedtechnology.com/products/planted-seat-bracket-honda-accord-4th-5th-generation-1989-1997-passenger-right GSM performance https://www.sportseats4u.co.uk/product/planted-honda-accord-bracket/ Things to consider, these frames do not come with threads. M12 Nuts will be needed to fit seatbelts, M8 Nuts and bolts to fit seats to rails or frames, washers highly recommended2 points
-
Got this photo from my father in law this morning that he got the head unit in in about 5 mins on the first try, always the way 🙃2 points
-
More progress MB6 dash installed and MB6 cluster fitted Modified the centre console slightly (basically just removing the tray in front of the gear stick) to accommodate the shifter box Cut a hole in the back of the glovebox and mounted the ECU inside Installed a steering wheel boss and OMP 300mm wheel Unfortunately I wasted a couple of hours trying to get the head unit to fit in the dash as I was struggling with all the spiders web of cables behind so I couldn't get it rolling today 🥲 but it's a marathon not a sprint!2 points
-
Spent the bank holiday installing the new timing chain/guides/tensioner, service manual print outs in hand and triple checking everything. All sealed up now, should be able to get the engine back in next weekend, all being well. Chain that was on was stretched - not by as much as some i've seen but the main difference I noticed is the chain tensioner was quite far extended whereas the new one is much less extended, maybe it couldn't take up the slack or something jumped on first start. Anyway, hopefully this is all sorted now. Also changed the crank pulley seal as I don't ever want to be going in there again!2 points
-
After nearly a month delay with far too many emails back and forth we finally got hold of the replacement engine mount bracket from Innovative Mounts and the engine is now finally bolted in! Got a few other bits fitted after this photo like the radiator, hoses, and fan, and then started to work on some of the plumbing like the clutch line. Getting exciting now - to be continued!2 points
-
Quick pic of the mini honda meet at ours now. Karen's civic, Steppy McStepwagon, and Tubs2 (aka Shelly) Still waiting for the bumper for the wagon.. Got one sent eventually, but they sent the wrong one, so waiting for it to be collected and swapped. Other than that it's mot ready.2 points
-
thanks Simon 👍 yes looking at the rubber parts, found the parts for the top e.g. Items 9 & 6 , struggling with the bump stop ATM, Item 11, PN 51722-st3-e01.2 points
-
Some of the rear seat configurations The middle row also flip round to face backwards.. Pretty clever setup 😎2 points
-
Shifter mounted properly in car and cables routed. Some hacking up of the console will obviously be required but I should be able to have all the dashboard etc back in Shifter cable plate in place - still needs a bit of work to get the other two bolts mounted and enlarge the hole in the grommet slightly. It's sitting at a less than ideal angle but it was the best placing we could come up with - the DC5 shifter cables we're using are on the shorter side Air con delete block off plate fitted so no huge hole directly into the cabin!2 points
-
You can't really tell from the pics how grotty the interior is/was, but it's starting to come up nice. Used some leather cleaner on the seats yesterday and the filth that came off them was amazing. Still need another go and conditioning, but well impressed with how well they've come up. Not sure what to do about the bumper yet, as it's pretty bad with a big section missing... Tempted to go dial it back a bit with the bumper, but it does look cool on the import photos2 points
-
Well, the tourer is no more, a nice chap from Wales bought it, and it's either going to be saved to tow his race eg, or end up as an engine donor for it. Karen's got herself a nice blue R18 fk civic, but it's not any good for family adventures. So we've just got a new project...2 points
-
Can confirm these are direct replacement to the existing big fogs. You might need to swap the plug over however. If I remember correctly the front seal wasn't great so I used a big o-ring between the glass and the front screw on cap piece to keep the water out2 points
-
Yes definitely! Focus at the moment is building up the engine ready to go into the car. I've got most of the things sorted that need/are easier to go into the car before the engine is in place, e.g. the shifter box, shifter cables and the power steering hoses (it's a real pain to reach the bottom of the PS rack with the engine in!) ready to go now I haven't got any engine mounts sorted yet but im hoping that some genuine Civic EG hasport ones come up for sale used at some point. They're incredibly expensive new (£750!) so I can see why people are tempted by chinese knock offs you can get on ebay, but personally I won't do that. You can get an alternative from Innovative Mounts for about £400 or so, but I dont need to order yet until i'm ready. A lot of these parts, its worth biding your time and seeing what comes up for sale on marketplace, ebay etc rather than getting things new as usually the price is high because it's come from the USA generally and import duties etc are rolled into the price. I've also managed to purchase a VTI-S front lip and side skirts from a car being broken, along with some door mouldings that were in better condition than ours which are all cracked and horrible (the ones right under the window on the top of the outside of the door). They seem to not be available new, i've tried both Honda and Rover part numbers. Most of the clips got smashed during the process of prising them out (I think you're supposed to do it from the reverse side with the door card out to release them) but it seems like you can still get those new fortunately. Also got a set of used MB-specific Meister-R coil overs which seem to be in very good condition so that was a score as they're also pretty pricey new. The rear lip is elusive but I think we may end up modifying the bumper somehow anyway depending on exhaust fitment etc so it's probably just as well for the time being.2 points
-
Tubs2 looking good in the sun today, even with a thick coating of pollen.2 points
-
yeah it should be compatible.2 points
-
Quick test pic2 points
-
Welcome to the club and good luck with your project! Also used to (briefly) think about a K-swap a few years ago, but I quickly changed my mind after I found out that all the extra bits and pieces you need to make it all fit and work can easily cost twice as much as the K-series engine itself. And as far as I remember you're going to need EG parts for the engine bay, suspension bits and headers. While the M-chassis does share parts with the EJ/EK platform, Integra and EG parts are much more numerous.2 points
-
New OEM-grade replacements should be a safe bet. Even if they are not as stiff as 'upgrade' parts (which are only an upgrade if you want to track your car), they are still a lot better than any old, chewed out bushings.2 points
-
Yes it is a before and after. It has great shine when throwing flash light on it ☺️2 points

_11zon_11zon(1).thumb.jpg.028f6fcb5abccf32134004c4105ab909.jpg)