SirPaperbag
-
Posts
47 -
Joined
-
Last visited
-
Days Won
32
Content Type
Store
Calendar
Forums
Gallery
Downloads
Everything posted by SirPaperbag
-

inbound5683614335470230296
SirPaperbag commented on mb3civ's gallery image in Showcase Members Car Gallery
 That wing looks awesome! Is it from an Integra?
 -
Urgent Headlight Question (headlights needed)
SirPaperbag replied to TaikoHax's question in SOS! Help!!
Here in Germany you can still get tons of aftermarket headlights, regardless of you having a facelift or pre-facelift model. My primary source for parts like this is good ol' eBay. Could be that the German version has a completely different catalogue of offerings, but in the age of machine learning and LLMs you can easily navigate the German version (ebay.de) by copy/pasting the text, or even using translation tools built into your browser. My only concern would be shipping in a post-Brexit world, but I recently ordered something from Rimmerbros for my Civic, so that shouldn't be a huge issue. -
honda civic aerodeck My 2000 Civic MB8
SirPaperbag replied to Miki2305's topic in Honda Civic MA/MB/MC
Oh, funny you should say that. Right now someone on this forum is also doing a K-Swap, maybe you could shoot them a PM if you've got some specific questions about that. What I know about K-swaps (thought about doing it a few years ago) is that the engine swap kit is actually the cheapest part of the procedure. xD What adds up insanely fast are all the extra bits you have to get to make it all fit - shifters, cables, mounting kits, brackets, all that jazz. You could spend the same amount of money you paid for the whole swap kit - just for a nice exhaust header. So if you're serious about swapping your engine, maybe reconsider going for an (albeit overpriced) D16 instead of a K20/K24. If 50% more power than stock isn't enough you could still go for forced induction to easily reach 200hp. I personally am more than happy with my 'stock' D16Z9 (full bolt-ons though), but I'm also not that interested in sheer power and acceleration. Got my Kawasaki for that. -
honda civic aerodeck My 2000 Civic MB8
SirPaperbag replied to Miki2305's topic in Honda Civic MA/MB/MC
Oh yeah, I can definitely relate to that. Sadly, even D16 swaps have gotten pricier and pricier as time went on. At least where I'm located, ymmv. When I got my Civic a complete B18 swap kit was around 2000€. Now you can count yourself lucky if you even find one to begin with. And then it's never below 4k. Got a spare Z6 a few years ago to pull apart and build with forged internals. In those few years it literally appreciated by 100%. Just crazy. Hondas used to be those cheap, easy to get into modding platforms, but I guess no car is safe from ... 'collectors'. But welcome to the team! :) -
MB2 K-Swap Civic project - from base spec to race spec
SirPaperbag replied to btjtaylor's topic in Honda Civic MA/MB/MC
Welcome to the club and good luck with your project! Also used to (briefly) think about a K-swap a few years ago, but I quickly changed my mind after I found out that all the extra bits and pieces you need to make it all fit and work can easily cost twice as much as the K-series engine itself. And as far as I remember you're going to need EG parts for the engine bay, suspension bits and headers. While the M-chassis does share parts with the EJ/EK platform, Integra and EG parts are much more numerous. -
New OEM-grade replacements should be a safe bet. Even if they are not as stiff as 'upgrade' parts (which are only an upgrade if you want to track your car), they are still a lot better than any old, chewed out bushings.
- 2 replies
-
- 2
-

-
- general chat
- general
- (and 1 more)
-
No probs, if the experts say it's fine then it's fine. Power steering ain't my forté to begin with, so better trust those who know what they're doing.
-
As far as I know, regular PSF ist more viscous than PSF-2 or PSF-S (2 is less modern than S) and has different additives, so it's a bit like differently weighted oils. That means that topping up a PSF-2/-S system with regular PSF should be okay for a bit, but there are also many other factors like corrosion prevention, temperature resistance and all kinds of things at work in those different fluid standards. Not as drastic as with DOT3/DOT4 brake fluids, but still big differences nonetheless. Better to get the proper fluid or you're possibly going to damage something in your power steering system over time. Nothing's as expensive as cheaping out. Edit: You can also check the reservoir for any foaming that'd indicate problems with running that fluid (-mixture).
-
headlight switch issue and upgraded lights
SirPaperbag replied to mc2hammer's question in SOS! Help!!
To be honest, I've rarely even heard about these switches acting up, so my best guess would be either to just go to a wrecker or buying a used one from someone parting their M-chassis out. There are still enough of those around for that to be an option. And this is just speculation on my part, but I also noticed that pretty much all 90s Hondas share visually the same stalks, be it an EG or an NSX. So maybe that's another thing to look into. Regarding the brightness issue - I myself fitted some ultra bright H4s from Philips that are actually meant for motorcycles, and they are considerably brighter than the normal ones before. But that's still only an alright level of brightness, not neccessarily great. So I always also use my fog lights when driving at night, which really helps light up the periphery. And retrofitting HIDs and LED bulbs is... kinda sketchy and also possibly illegal, depending on where you live. But there are pretty nice LED ones on the market. So you only really got a choice between adding extra lights, getting the brightest H4s, or going down the sketchy route of retrofitting more modern tech into your M. Those 'Ultra Bright LED Laser Matrix Plus whatever' lights modern cars use are just so extremely overpoweringly bright that no matter what you get- as long as it doesn't outshine the literal f-ing sun, you're gonna get the short end of the stick. It's ridiculous. -
engine Nothing more ever lasting than a temporary solution
SirPaperbag commented on Fenny's gallery image in Showcase Members Car Gallery
That's the typical 16-valve sound. Any four banger with 16 valves has a certain point where it really starts to growl. Be it bike or car. ;) -
engine Nothing more ever lasting than a temporary solution
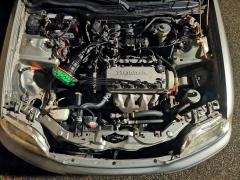
SirPaperbag commented on Fenny's gallery image in Showcase Members Car Gallery
Clean looking engine bay, I like. But I didn't know that they made plastic intake manifolds for earlier D-Series. Interesting. And just a friendly warning about these HKS-style air filters - they tend to disintegrate and get sucked into the engine! -
Regarding your audio upgrades I'd recommend getting a head unit that's not too deep, as I've had some issues with longer/deeper units before I got my Blaupunkt one. So, Ideally one without a CD drive, as those add a lot of length and therefore might interfere with the wiring loom in the back. You'll probably need some spacers for aftermarket in-door speakers, and the dimensions you're looking for are a 165mm diameter and around 18mm in thickness. For example I myself got a set of Hifonics Vulcan VX-6.2C speakers, which are a two-way set with an external crossover unit that I just taped to the inside of the doorcard, and the Hifonics tweeters perfectly fit into the OEM triangle tweeter units, at least if you carefully adjust the metal prongs that hold them in place. They sound quite good by themselves, but definitely lack bass. But I guess folks that want to upgrade their audio system are also going to get a standalone subwoofer, so... yeah.
- 9 replies
-
- 1
-
-
- honda civic mc
- honda civic aerodeck
- (and 1 more)
-
That's a damn nice looking MA! Really gotta give the paint on my own one a bit of love after seeing this. Though I'm not so sure about giving up AC for a supercharger. Summers 'round where I live get brutal.
- 6 comments
-
- 2
-
-
- honda civic ma
- honda civic 5 door hatch
- (and 2 more)
-
I just bought handbrake cables for the MB6/MC2 models. They have rear discs and in the case of the MB6 are the exact same chassis as mine. Haven't attempted the actual swap yet, but I've got all the neccessary parts lying around already and am pretty sure that the MB6 cables are gonna work. And don't forget that you'll need different brake lines, as well! (Just the flexible part, though)
-
You are technically right about not needing the whole trailing arms, but good luck with both finding the spindles by themselves in usable condition and taking the old ones off. Finding parts like that is getting progressively hard as our cars start to turn into oldtimers, and most of these super specific upgrade parts have already been grabbed about a decade ago. We're kinda late to the party in that regard. The spindles are also secured to the trailing arms with extremely strong threadlocker, which oftentimes are pretty old and corroded on top, which makes removing them near impossible without drilling them out. Stripped a bolt attempting to remove the disc brake ones, even with applying heat and using rust remover beforehand. No chance. So, yes - you technically don't need them, but realistically you will. Except if you're fine with drilling all of the bolts out and dealing with that headache. And the part about bleeding the brakes is also generally correct. Most cars have their brake systems set up like that so you can still come to a stop if a brake line fails. Otherwise if you combine FR with RR / FL with RL you will only have working brakes on one side of your car, which I don't have to explain why that would be very bad.
-
honda civic mb IMG_20241116_002056
SirPaperbag commented on Fenny's gallery image in Showcase Members Car Gallery
Man, I envy you facelift guys for your spoiler lips and sideskirts. Finding them for the pre-facelift models is virtually impossible. :/ Also usually not a big fan of silver wheels on a silver car, but you pull off that look quite well! -
Looking mighty fine
SirPaperbag commented on SirPaperbag's gallery image in Showcase Members Car Gallery
Thanks! I primarily bought them for those foggy autumn morning commutes, but the look quickly grew on me. :D Also imported some yellow bulbs for them, and the light coming out of them looks freakin' amazing. Had quite a few BMW drivers mistake me for an E36 because of them, as well! xD- 2 comments
-
- 1
-
-
- honda civic ma
- exterior
- (and 1 more)
-
Small update on the whole brake prop valve situation: Apparently, EG6 prop valves could also work, as they don't have ABS and 262/242mm rotors in the front and rear, just like our M-chassis Civics. So, if that's true, you could get a brand new valve for less than $200 from Japan. Part number for these bad boys is 46210-SR3-013 And you should be fine sticking with your original brake master cylinder + booster! But if you've got 242mm discs all around instead you'd need a "1725" valve (46210-1725-XXX) off a Del Sol, not off an EE/ED/EF Civic! (Different f/r rotor sizes)
-
Might have to get a bit more specific with those questions. But generally speaking, EG and Integra suspension parts are usually compatbile. But there is a great compatibility list on this page which should help you out for now. Sadly I can't help you out with your steering wheel lock, never had anything happen like that to me.
-
Came across this pic I snapped earlier this year. All those reflections really make the kaked paint stand out. Really gotta give her a good polish sometime.
- 2 comments
-
- 2
-
-
- honda civic ma
- exterior
- (and 1 more)
-
Got some from Climair installed rn, and they fit very well. They're still available brand new. Only thing I had to do is grind off a bit of the holding tab in the front (was a bit too long) but that's completely normal with these things. And you can even choose between clear, tinted, and dark, which I find quite nice.
-
The part about needing new trailing arms is 100% correct, as the drum brake ones lack the proper mounting points for a disc brake system. But you've got to be careful with which arms you choose, as the wrong ones could end up increasing your rear trackwidth and that's gonna end badly for your handling. As our M-chassis have borrowed a lot of suspension components from 5th gen Civics (EG), I'd recommend searching for EG5/EG6/etc. trailing arms, as they should keep everything in spec. I for one got a pair of EG5 arms to go with my non-ABS system. But that's only part of the problem. If you've somehow managed to get yourself the right trailing arms then you still have to find a matching brake proportioning valve (or prop valve) that splits the pressure correctly between front and rear. Otherwise your rear brakes might either not bite enough, or bite too much and cause the rear to kick out while braking (very dangerous). This is especially important if you've got something like an MOT or TÜV here in Germany, where your car gets an inspection every X years and they check your brake performance. M-chassis Civics also use an old style of prop valve, which makes it EVEN HARDER to find the correct ones. What you generally want to get is called a "4040" valve, which is just the model number, nothing more (some dumbasses online claimed those valves split 40/40, but where the hell would the remaining 20% go?) I also found a nifty table somewhere on an obscure forum, and I don't know where exactly I got it from, so I sadly can't attribute the original poster, but here it is: And depending on the caliper sizing, you might even have to upgrade your master cylinder, but that's getting really technical. So, in short, get the correct trailing arms, a somewhat correct prop valve and maybe upgrade your master cylinder. If you want to do it properly, it's a whole lot more work than just doing enough for it to work. Pro Tip: You can also fine-tune your front/rear balance by using more or less aggressive pads. And regarding rear ARBs, you've got a choice between either buying some used EG6 brackets, using aftermarket ones, and reinforcement braces with mounts included. I went with a used EG6 ARB, plus mounting hardware, because I wanted to try out how much difference just that dingy little thing would make (a lot). Here are a few pics of it both installed, and some pics of the used mounting hardware. You also need fitting lower control arms with mounting holes for the endlinks. And I'd recommend buying new endlinks while you're at it. And maybe a few harder rubber bushings on top. I also had to fabricate some small metal standoffs for the mounting bracket to properly fit to the rear frame (top right picture, the screw just above the yellow marking). This would be the alternative, a rear brace with mounts included: But some places also carry aftermarket versions of the OG hardware that I mentioned and shower earlier, so that's an option, as well. All in all, it's a s**t job with tons of little hang-ups, researching, browsing marketplaces and painful installation, but the handling difference is night and day.
-
With ECU stuff OBD1 really is the way to go, because whether or not you decide to chip it or put an S300 in it, it's basically the best choice to use an old OBD1 ECU. I've actually got a S300 installed in my Civic right now and since it's a pre-facelift it already was OBD1 from the factory. But OBD1 conversions are relatively easy and well documented online. Depending on your personal tastes you could also go with a standalone ECU like a Link or Haltech unit. They cost roughly the same as a S300, but offer a very different featureset and more modern management options. (But they are not plug-and-play) And while I don't have any experience turboing cars, I'd say a relatively safe power figure for a D16 would be 160 to 180-ish hp. (Those conrods are thin) Already took apart a spare D16Z6 that I bought this summer, as I plan to completely rebuild it for a high comp NA build, and when I held those tiny little spaghetti-conrods in my hands I almost couldn't believe that those suckers manage to survive regularly hitting 7500RPM!
- 9 replies
-
- 2
-
-
- honda civic mc
- honda civic aerodeck
- (and 1 more)
-
Basically any D-Series manifold will fit all kinds of engines out of that particular family. Except D17s, those are "special" (aka the worst engines Honda ever made). Got a 4-2-1 header myself that I bought when my car still had the stock D14 in it and it directly fit my D16Z9 without any modifications. And I can attest to the rust concerns - my rear arches were pretty bad (but still manageable) when I got mine, the front corners where the fenders meet the sideskirts were rotten through and the rear corners are also slowly starting to bloom, as well. Definitely make sure to check those spots when you've got the time! Oh, and your distributor is probably going to die at some point. All of them do, it's kind of inevitable. Do yourself a favor and don't get one of those repro units when it finally goes out - Blueprint and Yingzhen and whatnot units are all Chinesium garbage. The only high-quality replacement I could find was one of those rather tacky sounding "Dragon Fire" units, but quality-wise they are pretty much OEM+, made in the US (not China), and even provide a stronger spark than the stock dizzys do. Other than that, welcome to the club! :)
- 9 replies
-
- 2
-
-
- honda civic mc
- honda civic aerodeck
- (and 1 more)
-
A faulty vaccum line or a bad IACV could very well be the reason for all of your problems. Bad vacuum line / IACV -> more air gets into the engine -> lean mixture That explains the slow rev-downs because the extra air works like a stuck throttle and also explains the timing being pulled in higher RPMs due to a lean mixture. Your engine is definitely being fed too much air, and it has to get in there somehow. Now the fun begins - searching for a leak. I'd recommend checking your intake system with (low pressure) pressured air and soapy water that nicely foams up where the air leaks out of your system. I don't envy you, searching for mechanical gremlins is always a s**tty job. Especially on modified cars. Start in the obvious areas, the easiest explanation is often the correct one. And check your gaskets, too! Good luck brother
- 6 replies
-
- 1
-
-
- engine
- electrical
- (and 2 more)