Leaderboard


Popular Content
Showing content with the highest reputation on 05/03/2014 in all areas
-
Ok, I refrained from saying it on facebook but I'm going to say it here, are you ready? That is Marvelous. Seriously though, I love that.5 points
-
So! Don't have many before pics, don't need to really, I think they are all now lookin a little tired! But here are the pics. Not a completely proper job, would've liked more time to take the rear calipers apart and inspect and then paint. But this close to the meet this evening and fest next weekend I didn't dare. Everything went really well, better than I could've hoped, not seized/snapped bolts. Pads all round are in good order, there's still a little life in the front discs, but rears will need to be done reasonably soon. Anyway, here go, excuse the dirty wheels, I'm cleaning this arvo.4 points
-
Ok so i thought this needed to happen.. the pics can do the talking Cheers for all the love on facebook too guys4 points
-
Cheers guys! Had thought about changing the H for a red one but I've changed my mind! Think it looks sweet as is! Just need to sort the VTi-S badge and maybe some light tint on the tail lights?!3 points
-
So first job today, bolt the VTi-S interior into the MB4 so it can 4uck off out the way! Done but no photos, didn't see the point! Now for the good bits! Managed not to break or snap anything doing it! Then I replaced my N/S wing mirror: And fitted the OEM Honda bumper fixings to the front wings! Plus I stole a couple of dash bulbs from the MB4 and a fixing gromet for the arm rest so plenty of little jobs done! Last one I want to do today is drill the blanking cap out of the tail light I got from Jake to replace mine so the rest of the reflector is there and it doesn't look like I have a light out3 points
-
Oh wow!! Can't wait to see this finished. Give him a break, he slept under his car last night with a paintbrush up his nose.3 points
-
Now thats some type error right there3 points
-
Clean vtis aerodeck = best car possible3 points
-
Progress tonight, pulled the carpet up and removed the bodged wooden! devider in the back, quite a few holes to fill, Im going to clean it all and paint brush a coat of black hamerite the floor and for the moment i will keep the back open and see how loud it is lol Also started sticker bombing the roof Also the previous owner finally sent me pics of the tina before it was painted and the work done in the both before it was painted. I want those the shiny wheels!! Theres about 60 pics but heres the highlights, tbh i im digging the previous rat paint lol3 points
-
So as lots of you requested; I am going to start off making a small amount of projector headlights to see how they go. To start with I am making these in my own personal time and they are not cheap to make, so please be patient with me. The headlights are a pretty much a direct replacement and take aroud 30mins- 1 hours to fit depending on your skills , all they need is a loom, amber indicator bulbs and HID kit which can supply at a extra cost. The reason is I have had some Issues with finding a HID kit which works perfectly, so if you have problems with pulsing HID's your not alone. The HID's I can supply will be the same as mine (which still pulse just its very hard to see). The next thing; these lights have LED strips for side lights, NOT halo rings like my own personal set. I am only going to make them with strips as it takes to long physically to add halo rings and fiddly for the time I have available. The price: Option A: £200 for basic headlights Option B: £250 for HID's, Loom, and indicators Add £15 for UK postage if needed. If from outsidde UK please add EU after your name so I know if you need LHD or a RHD set. I know they are pricey but can assure you personally from my experience these are better than competitors. I have not yet run them through a MOT but fairly confident they would pass as they are fully adjustable, through the standard headlight controls. Also unlike some out there, mine have High and Low beam. I do currently have my old set ready for sale. These will be the only set I am selling with LED rings in. They are not up to the standards of my new creations and need to be wired in compared to the new plugged ones. But if you fancy them PM me with your offer (highest Offer wins). All I need you guys to do is to put your name down if you want a set, as make them I will let you all know; and hopefully one by one make my way through the list. For fairness; this will be names picked from a hat. Once you are chosen, notified - I will then run through with you to what you need to do get them running (its very very simple). Photos of the finished objects installed will be added soon - (after a special few have already had their sets made). So if you fancy a a set please enter your Name and Op: A or B Below. 1. 2. 3. 4. 5. 6. 7. 8. 9. 10. add more if needed2 points
-
I am trying to keep all the standard parts so if I have to sell it I can make it standard and keep my parts for the next project2 points
-
Cheers fellas! Just about to go out and get to work! Need to put the donor interior into that Civic so it can go and then I'll be able to crack on with mine, got a few other jobs I want to get done this weekend. Pictures to follow once I'm done!2 points
-
Yeah why not http://civic5.com/forum/index.php?/topic/8686-milkys-2nd-vti-s-de-greened-cleaned-new-sidelights/2 points
-
Something like this??2 points
-
Just replied in your project thread. http://www.halfords.com/webapp/wcs/stores/servlet/product_storeId_10001_catalogId_10151_productId_922503_langId_-1_categoryId_2552331 point
-
Don't do the red badge! If its not a Type-R or have a Type-R engine don't it!1 point
-
1 point
-
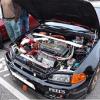
Me neither from that angel it looks good! That Escort is lovely, i have also seen a couple of mk1s with s2k conversions best of both worlds!1 point
-
In addition to the shiny looks and racey sounds my 0-60 times have improved. I did some before and after pulls using G-tac Free on iphone to get the results. Even though they sound too good to be true, they give an idea that the car accelerates better now. Before fitting the exhaust, on the drive there the best time i got out of a series of pulls on similar stretches of road, was 7.69s. With the new exhaust, my best pull was 7.40s and a average out of five 7.48s. I highly doubt that the times can really be that good, but my bum dyno agrees that there's been an improvement! Especially in the mid-high range. So all in all money well spent!1 point
-
It's bloody glorious over here!! Just put the first coat of PB down1 point
-
Exhaust will be done eventually! Just hasn't been high up on my list of things to do!1 point
-
Very clean behind those wheels, looks mint!1 point
-
Well, the bonnet is ok I think, it just shows up a bit under the fluorescent light in the garage, in daylight it probably won't look so bad and it still looks better than it did when it was covered in white spots. I just think a respray is needed for my perfectionist needs. And the lip, well we shall see, I've just thrown another coat on, once that's gone off a quick rubbing and some lacquer and what will be will be.1 point
-
Loving the photos, especially the one with both M's facing each other. Car love....1 point
-
Tinted repeaters fitted. Looks so much better1 point
-
Yes, should know better really.1 point
-
Good work there mate! Need to deal with my brakes in the near future!1 point
-
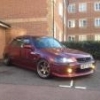
Colour is BMW sparkling graphite Mr B. it's awesome, photos don't do it justice, it properly sparkles in the sunlight! Cheers fellas Plenty of painting going on the w/e1 point
-
Up my nose you say??1 point
-
Top job, serious dedication too! Looking very mint now.1 point
-
very tidy mate, looks spot on with those naughty colour rims you got..That colour on those rims looks so nice on my monitor, different to the norm ???1 point
-
Alloys are 15"1 point
-
I'll be collecting mine at Japfest but won't be fitting them until the end of the month, though I could possibly jiggle some money and order a HID kit now and hope it comes before Friday!?1 point
-
Just. Temporary 'phase' mate. Normally will be restored soon! well, as soon as the couriers find their arses from their elbows!!1 point
-
LOL my mrs and i were looking at some metal shed affairs earlier as we decided i needed a parts locker as they are building up1 point
-
Cheers Mr B. There was me thinking it was only going to take a couple of hours got a tad carried away lol. Just finished, high as a kite from the paint. Lol. It should look good. This is how the old girl will have to stay for the evening.1 point
-
Congrats on the new rims mate. So glad you finally got them. . Suit your car so much. . Is that 6mm rim tape you got on there how do you put it on? Easy or hard? Loving that pic of both Ms opposite each other1 point
-
I have definitely not spent the last 6 hours rubbing cleaning and painting calipers carriers and discs :-O and in still going lol. Pics in the morning1 point
-
Not sure about a hard life, don't forget these cars aren't as young as they used to be, modern classics in the making!1 point
-
1 point
-
All clean so decided on getting a pic1 point
-
The wife having shot of mine. Lol1 point
-
Weekends job has arrived! One to test the flip!1 point
-
1 point
-
Very nice mate and even better that you're happy with the sound! I'm sure you always stick to 100kph limits1 point
-
1 point
-
Greedy gits the pair of you1 point
-
Very nice!1 point
-
Loads better, very shiny!1 point
-
Nice progress here mate looking sweet1 point