Leaderboard


Popular Content
Showing content with the highest reputation since 07/10/2025 in all areas
-
Hello guys! Been a while since I last posted on here and my car park has changed... but not really! My MB2 is sadly not with us anymore, I was involved in an accident last year around march and sadly sustained chassis damage. They had just redone the asphalt on a road I used to enjoy driving on at night, it suddenly switched from old harsh but grippy road to freshly new asphaltwith no signs. New humid roads = slippery like ice so I understeered into a cement block, saved it a bit but not enough so I hit the corner of the block with the back of my front right wheel arch, bending the roof rail and the firewall corner. I was fine but I didn't recover mentally for another 2 months at least, I was really attached to my car. Time came when I started looking for a new car, and in just 2 years the marked had imploded, I couldn't find anything I liked for a decent price. My dad then reminded me about Rovers! I started learning more about the history of this joint venture and really liked the R8 platform in particular (Honda Concerto, Rover 200 [Coupe, Hatchback, 3 doors and Cabrio] and 400 [Sedan and Tourer wagon!]. Many of you will know about it in detail already but for a quick debrief, the R8 platform had Honda D series engine options as well as rover K and T series options, front Rover Macpherson suspension for Rover T series engine size concerns ( Double wishbone domes are way too bulky for the T16 2 liter, especially turbo on the 220 Coupe ), Honda Civic EF derived rear suspension, mostly upmarket Rover designed interior with real wood trims and honda sourced switches + little details. With that in mind, I set out to scour the menacing dephts of facebook marketplace and found 2 candidates under 2k euros, a black prefacelift Rover Coupe with 280k KM and a British Racing Green facelift fascia Coupe with 317k KM. We went to check out the first one, lo and behold it ran on 3 cylinders at best, had a rust hole in the sill big enough for 2 fists and was resprayed black from Nightfire Red, which is a gorgeous color and a sin to respray. Only thing left to do was check out the other one! Turns out it was on its 5th owner, a farmer with an extremely thick regional accent I could barely understand, and apparently hoarder of cars (even had an MB6 once). The car had a lot of chipped spots on the doors and generally anything around wheels, like it was driven HARD on gravel. Despite that, it run well and had 0 rust! The interior was dirty, driver seat scratched but still solid once cleaned, and the extremely bolstered Rover seats were RIGID still. We ended up getting this one for 1200 euros! Even drove it home 400km on worn front bushings, still a pleasant ride nonetheless. Fast forward a year and it's still my daily, improved upon every month I owned it, from maintenance to sorting gremlins. I really love the D16A8 DOHC lump, it sounds heavenly with a filter and pulls quite high in the rpm! The gearbox has super short ratios, even more than the CRX equivalent (in fifth gear my tacho sits at 3800rpm at 100kmh...) Pardon my formatting skills, just tried to cramp as many photos as I could of the things I really like about the car! The frameless doors are definetely up there, but the T top roof with removable glass pieces is amazing! By now you would probably be asking yourself "Wait, why make a post about it NOW of all times, and why here?!" My dad recently got wind of a pretty sick and well preserved example of a CIvic MB1 1.6i SR VTEC in Orleans Blue Pearl near our city! The car has 52k KM on the odometer and has been garage kept its entire life, 1 owner, only used for big trips around europe apparently. The catch? it hasn't actually ran outside the garage in 22 years at most. We thoroughly checked it out and haggled it down to 2k euros. It is an almost fully optioned example, with the only options missing being the Honda head unit + CD changer and leather interior (Which I wouldnt have liked as much). It has 4 rotors and ABS, Sunroof, 15 inch alloy rims, spoiler and bumper lips, fog lights, all four electric windows, AC and alarm + keyfob! I don't have many great pics of the car as a whole, since the calipers are seized and basically every single wear item needs to be replaced because of the age, but I'll surely post one in the gallery in a week or 2! For now, I only have these messy photos under my dad's garage's neon lights, which alter colors way too much... Under the passenger seat, in the secret cubby I discovered the original folder with every single document about the car and even a Honda Gold Card! So there's that, I'll definetely update this thread whenever I feel like it, thanks for reading :D3 points
-
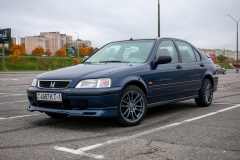
 My d15z8 civic mb3 owner for just about 5 years now3 points
 -
Yes, there are some marks - I guess it was to align the drill or whatever they were using in the factory if the car was to be an MB6. I'd love to know what they did - I imagine just drill and tap a hole, thread in a stud ... or maybe there was more to it than that? Maybe some extra reinforcement underneath? I found a video of someone working on an EG just now doing basically the same thing as I wrote earlier but using a piece of metal behind as reinforcement - it seemed to work OK for them3 points
-
A basic smoke tester can be useful in these situations. Leave it inside the car with the doors and windows closed for 30 mins or so to fill the car with thick smoke, you should see it leaking out of the holes. I have this one - its basic but does the job aliexpress.com/p/tesla-landing/index.html?UTABTest=aliabtest125094_24784&src=google&src=google&albch=shopping&acnt=708-803-3821&slnk=&plac=&mtctp=&albbt=Google_7_shopping&gclsrc=aw.ds&albagn=888888&ds_e_adid=784528327853&ds_e_matchtype=search&ds_e_device=c&ds_e_network=g&ds_e_product_group_id=2463919240694&ds_e_product_id=en1005006642306652&ds_e_product_merchant_id=106959561&ds_e_product_country=GB&ds_e_product_language=en&ds_e_product_channel=online&ds_e_product_store_id=&ds_url_v=2&albcp=23272714697&albag=191864323674&isSmbAutoCall=false&needSmbHouyi=false&gad_source=1&gad_campaignid=23272714697&gbraid=0AAAAAD6I-hHL-qdK3MTpI0Ema2awFtvJN&gclid=CjwKCAjwspPOBhB9EiwATFbi5PCAR3LaZGphD23BdD1CPkhjJilbrB9rcTukI15yr1pC9FbnhiKokBoCeDkQAvD_BwE&aff_fcid=a41b7480c3234acabb05997aa673a8c1-1774543819938-06152-irey5Th&aff_fsk=irey5Th&aff_platform=promotion&sk=irey5Th&aff_trace_key=a41b7480c3234acabb05997aa673a8c1-1774543819938-06152-irey5Th&terminal_id=24f51958e50f4dda8253ef308c411e91&scenario=c_ppc_item_bridge&productId=1005006642306652&_immersiveMode=true&withMainCard=true&OLP=1116833308_f_group1&o_s_id=1116833308&afSmartRedirect=n Also useful for testing out exhaust and intake/PCV/etc leaks3 points
-
The easiest way is to get a bar that mounts into the top mount studs of the suspension, like this However, I have been given an MB6 strut bar for free so I wanted to attempt this install. According to the internet I should do as follows: Offer up the bar Mark and drill 8.5mm holes into the strut towers Use M8 bolts (grade 10.9) with penny washers through from the underside and tighten it down I have all the parts ready to go and will report back soon ...3 points
-
Hi mate. There is some mystery over the actual numbers of each VTiS model made. The logbook should have made it easy to identify a genuine one, but unfortunately even that is a minefield as Honda dealerships made mistakes with them when registering the car with the UK DVLA. Some have VTiS on the logbook, some just state model as VTi. The only parts that were unique to the VTiS were drivers side floor mat which had the VTiS logo on it (the other 3 mats were just standard) the gear knob (alloy and engraved in the early VTiS, silver plastic/black leather with "VTiS" in black on it for the post 1997 ones) and the alloys (again, these differed so early ones got 15" Speedline Chronos wheels, later ones got the same as the ones in your photos which are 15" Speedline "fans"). The body kit was available in the accessory catalogue, but was standard on the VTiS. The "mid spoiler" on the aerodeck was also an accessory option. The other thing that marked out the VTiS was the pirates black paint. All VTiS came in pirates black only, so any you see that don't have pirates black are 100% not a genuine VTiS. The Aerodeck ones are a lot rarer as most were the mb6 5 door hatch. Hope this helps a little.3 points
-
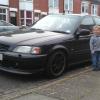
Hello to all of you, First time posting on the forum, kinda wanted to share a bit about my mb2 since i first came to find some knowledge about these mb chassis. It's my first car, family owned since new and it's getting to the 100k km mark, and in my two years of driving and enjoying the car i can say it's a great car and frankly very underrated and deserves a lot more recognition The car has nothing major done to it, it's mostly stock aside from some small cosmetics. The mods are: Front mudflaps out of a junkyard pirate black mb2 1DIN android auto radio Reuphostered steering wheel Rear spoiler out of a Rover I have many plans for it later but most of em are cosmetics and i won't bother to modify a D14, maybe just a intake at best since the oem one is plastic. It's getting lowered and i want it to ride on some ek4 vti rims, or civic jordan rims and vti lip is also in the list Cheer, Costa.3 points
-
Its been a long time since the last update. So yeah of course it is fully wrapped now by myself and lowered even more. Looks pretty good but for sure sometime in the future I might paint it (I'm currently doing car painting education) plans for the future: Turbo... I found a cheap kit on marketplace and then I'm gonna try and make a reliable stock internal setup, so not that high boost3 points
-
On the car meet i went on sunday3 points
-
Looking good if I do say so myself! Headlights definitely letting the side down, need a good polish and coating.3 points
-
Sorry for your loss, but nice to see you found a solution you're happy with! Although for some 'more reasonable' people than us old car people that 2 car solution you picked might seem a little risky or unreliable even, i think its a good choice for a lineup of daily and project nonetheless. Looking forward to seeing it unfold, and to see what you'll be doing to both of them!2 points
-
It almost seems old fashioned to create a build thread these days on the age of social media (one of the worst things that happened to the car community is the 2382834 facebook groups full of scammers and people asking the same questions over and over - but thats a rant for another day). I always find they are a great thing to do, if for nothing else for my own benefit to remember what I did previously 🙃 also found lots of great gems of info already on this forum - and more to discover im sure A bit of backstory - I've been bitten by the Honda bug after buying a 2010 Honda Accord with a K24Z engine - I'd originally intended to get something as a cheaper, ULEZ compliant run-around (I don't live anywhere near a ULEZ but sometimes have to drive into them for work) after getting bored with a non-ULEZ diesel Mercedes that i'd owned previously. I then discovered the scene for those cars, and good they look with the right modifications. I love it to bits but it's heavy, and the modifications you can do are somewhat limited by it having the less desirable R40 head on the engine and the rarity of 2.4 petrol, manual examples in the UK. Most buyers bought a diesel version (it was peak era of buyers being encouraged by the government to buy a diesel - how the tables have turned). I only know of a handful of others in existence and even fewer are modified. They are popular in the USA so some tuning parts are available over there but it often results in expensive shipping, import duties and long waits for things to arrive, and no chance to get anything second hand as most sellers aren't willing to ship internationally. Me and my father in law have been looking for a project to do together for a while as we've reached the end with most of our other projects (mostly just repairs and upgrades to our other cars) - initially I thought maybe a restoration project but we went to a car show recently and saw lots of cool JDM cars and thought that it might be an idea to do something along those lines. I have always been interested in a K-swap of sorts anyway and as I know quite a lot about Hondas and K-series engines from modifying my accord a plan was formed.. Initially I started looking at the usual suspects for a K-swap like an EG, EK, etc but we missed the boat on getting one for a good price and even rotten examples are changing hands for more than £2000 now, so I started digging into more unusual choices. After speaking to an acquaintance he mentioned to me that the MB civic might be a good place to look as it shares a lot of parts with Civic EG and Integra DC2, two now (to me at least) unaffordable cars but with great aftermarket support. I also looked at a few more leftfield choices like a really high mileage Honda CR-Z (came to the conclusion the subframe was rotten) and a Honda logo (too much fabrication). The MB/MC seems to be the last affordable 90s Honda, so it was now or never. I found a low mileage MB2 for sale. It was a 1.4i model, completely base spec, but that didn't matter for our purposes. In fact, I was quite interested because it didn't have a sunroof, and I've had nothing but grief with sunroofs in the past letting in water and making the car smell like an "old man's ball sack" (as my fiancée succinctly put it), and the low spec didn't really matter anyway for what we were going to do. Because of the low mileage (56,000) and original looking condition, including what I believe to be original dealer plates and stickers, I thought this could be a promising lead on a shell. It's very late for an MB2 - March 2001 on a Y plate - I've seen EP/EU civics rolling about on older W and X plates so they must've been sold at the same time - it would've looked and felt incredibly dated by comparison I imagine! The pictures weren't great as they were clearly from an auction (you know the ones I mean with the car photoshopped badly onto a showroom backdrop) I arranged with the seller dealer to go and see the car (near Bradford by the way - the stereotypes are alive and well) and when we arrived I was told the car wasn't available as there was "a problem with it" and it was parked at his house (undoubtedly this is why it was auction in the first place). Whilst being annoyed at him, I explained that we wanted to buy the car as a shell anyway and asked what was wrong - some kind of overheating issue - so we went around the corner to have a look at it on a driveway. The car looked fine although very dirty, and the sills/bodywork etc seemed to be solid other than normal age related surface rust and mileage genuine as the seats look almost new. The bodywork was unfortunately a bit tatty with various dubious repairs and perished rubbers but it's to be expected for the price/age. I took it for a quick test drive - which was a particular highlight as the prospective seller lit up a cigarette while I was driving around - without asking permission might I add - but other than the rising temperature everything seemed fine, so we agreed a price - so I drove it to the nearest petrol station, bought a bottle of radiator sealant (it seemed to be losing coolant) and poured that in, along with some water, and then drove it 1 hour home with the windows open and heater blowers on full to try to make sure I didn't break down on the M1. The car made it back fine although the temperature was climbing when stopped in traffic, it went down again when on the move. Here's the only picture I have of it at the moment: The current plan is basically to do a K-swap with a K24A with mild upgrades (K20 oil pump, 50 degree VTC), and an EP3 civic gearbox. We would love to build a boosted car eventually, but lets get the basics done first. As it's a heavier (by 90s standards) car and K24s are much cheaper these days, it seemed a better choice than a K20. In terms of styling i'm not really sure at the moment - probably try to keep it OEM+ for sleeper factor although not full sleeper - the wheels will definitely need to get changed as it's currently running 175 wide 14" tyres, budget brand that were getting on 10 years old (can confirm - they have no grip whatsoever). Watch this space 👀2 points
-
Glad it was straightforward to sort. Nearly MOT time? exciting times 😎2 points
-
My first time trying a string alignment at home - no expense spared alignment rig built out of 2x curtain poles, 2x builders chalk lines, 4x axle stands, and some rubble bags with white grease in between to act as turnplates! 🤣 It did seem to do the job though. At the very least, it means my tyres won't get shredded on the way to get an MOT and then on any test drives. Stance looking bang on now! I went to go for a VERY quick test drive and quickly found I couldnt select 2/4/6 gear .. oops. It was working until I swapped the shifter so I think it's nothing serious just a shifter cable adjustment issue. One of these days it will leave the driveway!!2 points
-
Good stuff, and good to see her in the fresh air!2 points
-
Managed to get the car out into the sunshine today for the first time since October! I set up the ride height as best I could following some online guides (trying to give maximum "bump" travel) and adjusted the camber using a fairly cheap magnetic gauge, which wasn't the easiest thing to read but did the job, -1.75 degrees at the rear and -2.75 degrees at the front which seems to be a good starting point according to people on the internet who are much cleverer than me! Visually it looks about right comparing to other builds i've seen at least. Next time i'll adjust the front and rear toe using strings to try and at least get it somewhat in the ballpark. After replacing the steering rack the front wheels somewhat resemble this GIF currently!2 points
-
Ay up lads indeed of some help please. Can’t find any wings for my Mb1/Ma. Would buying a full front end of an mb6 fit nicely? Needing to know ASAP please2 points
-
2 points
-
Turns out the handbrake problem was actually user error I found a post here that showed me I hadn't followed the correct procedure! Once I did that it was all fine and I didnt need to swap the cables in the end (so I can't comment on the MG Rover ones i'm afraid) What I can tell you is these parts are the correct length and and do work, but the quality control was a bit suspect (I had to file open the hole in the handbrake cable bracket slightly and file off a bit of badly machined cable that was hang out the end of the pin) 92.10.5233 COFLE 10.5233 Handbrake cable 1655, 1469mm, Disc Brake | AUTODOC price and review 92.10.5234 COFLE 10.5234 Handbrake cable 1636/1449, 1636, 1449mm, Disc Brake | AUTODOC price and review2 points
-
VSS sensor top of gearbox, bet the plugs coming apart or corroded inside had a few play up easily fixed normally.2 points
-
Hi Simon we probably haven't spoken in 10 years mate but its the same VTI-S i have had since 2012 seems my account got orphaned in the transfer and i lost access, while the whole time the cars been off the road since 2016 take 3 years of welding and engine rebuilding to get it nearly ready for a return.2 points
-
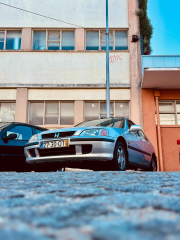
Hi everyone, after finally getting registered in this forum and lurking for a couple of years it's finally time to show my Aerodeck. It's a 1999 MC3 that my dad bought in 2019 as a temporary car, but since I've grown quite attached to it he decided to keep it so it can be my first car. It had 315 thousand kms when we first got it and it now sits at nearly 355 thousand (it was the second car in the family for most of the time it was with us, until I got my license) Here is how it looked like when my dad bought it, and as you can see it had some work done. MTS technik comfort coilovers, JR 5 mm spacers at the back, hardrace adjustable camber arms in the front and the back, retrofitted Rover rear ARB with custom brackets, slotted Brembo OEM size rotors up front and OEM Brembo pads (nothing special) and every bushing has been replaced with hardened Hardrace ones. I've also added a VTi fornt lip. It's sitting on Momo Corse 17×7.5 ET35 wheels and 205/40 Hankook Ventus tires. Since I am a bit of a rally fan the Deck gets used quite a lot for the longer journeys (the pic above is in Austria after New Year when the Jännerrallye took place, had the most fun sliding the car on snow covered roads when driving inbetween stages) This one was taken last year when the ERC was held in Croatia and some of the roads were really rough and unpaved but it was built to take it💪. I'm quite satisfied with the car as is mechanically. The next thing on my list would be the interior. Having only 4 speakers and not that good sound isolation you can't really muffle the sound of the diesel up front so I want to get it sorted in the summer. I was thinking about putting in Recaro SPJ seats and reupholstering them in the original seat pattern which i quite like. But seeing they are getting rarer and rarer that might have to wait. If anyone knows the name of the pattern or where it could be found I would very much appreciate it (I've got other options, but finding an OEM fabric would be best). I was also thinking of putting in an EP3 steering wheel but as far as I am aware that means putting in a different steering column which sounds like a bit of a job so I'll see how that turns out. So that is a short introduction to my pride and joy, I hope that you like it.2 points
-
Yeah i like a Volvo had a V70 T5 probably 12 years ago when i sold my 3rd MC2 missed the induction noise of Vtec so bought my VTI-S. Probably only thing id trust as much as a honda, alot more Juicy though 18MPG i averaged haha.2 points
-
Yes - it's not bad really, i've definitely sat in much worse. The seat could possibly go a little lower but I will probably mess about with that once i've actually driven the thing in its current form (getting restless now 🤪). I can reach the controls comfortably, that'll do for now! Without the sliders in it could go REALLY low. The sliders add a tiny bit of height but you also can't mount the seat at the low position at the front as the locking bar fouls on the seat and you can't adjust it.2 points
-
Well I did finally get her 100% water tight, there were several places where it was getting in, the biggest issues were the panel joints under the far ends of the roof rail flashing clip on bits, but also a coule near the sun roof drains, I want to do a write up when I have time to pinpoint all the areas with lots of photos as it may help others out with the issue in future.2 points
-
Hi, realise I've been a bit of a stranger here lately. Apologies. Hope the team is good, Glad to see still going strong. Thaught id pop in as been tinkering again. History repeating I suppose. This time gone for an ep3 and made a fast road car/semi track car. Baught late 2024 from Southampton. Got it back and realised it was originally from my local honda dealer. So it came home really. Complete Stock car well used but with plenty of history, not the best example but far from a nail. In the last 12 months. Ive done lots of bits. From tidying underside underside. Rebushed. Rebuilt rack. Powder coated arms. New everything really. New timing chain etc. Rebuilt the gearbox. Added lsd. Then started prepping for turbo. Quite a bit of work to do on these to make room for the setup as there's looms and lines everywhere on the bulkhead. Anyway lots of custom bits and 3d printed stuff later. And I won't say it's complete. Cus they never are. But it's a pretty wild little car now. Lots of fun.2 points
-
Totally agree mate. It's a nightmare trying to find stuff out about the stepwagon. There is a UK forum but there's hardly any content on it...everything seems to be on Facebook, but as you say it's rubbish for finding stuff unless you spend hours searching and stumble on something relevant. I'm keeping away from Facebook again nowadays.. Find it a real waste of energy.2 points
-
Yes, it's a shame. It's the same for basically every kind of specialist forum these days unfortunately. The barrier for entry is lower for posting on facebook, even though it's an abysmal format for specialist discussion. It's ok for asking questions, but thats about it. Any kind of long term logging of knowledge like this forum is full of is not compatible with their engagement/advertising driven format. Probably less said about that the better.2 points
-
20 years that's some going & must also be some dedication Simon, I've seled the other top areas around the rear of the weather strips right at the back quarter below the roof rails, it p**sed it down today & the area that was getting all the water on the drivers side is dry as a bone, I did however still find maybe 10 to 20ml of water in the wheel well that had drained down from the side to side seal there, the one under the boot catch & inside the well, I'm hoping that it's just residual water from the previous day slowly making it's way out, but I plan to get the hose on it again to check it, but may not have to after looking at the weather report, seems p**sing it down again for a few hours tomorrow, so one way or another I'll find out if there's still a small leak, if there is I am now clutching at straws on where the heck it could be getting in, but I really want to eliminate every single leak no matter how small, fingers crossed but it's not the easiest of areas to check with no exterior seal there or any obvious areas above now where it could be getting in. if it is still leanking a tiny bit I have a hunch it's inside the tail light where the panels join, but I have looked at them very closely & although they look a bit ropey on the photo, I can't see as much as a 1mm gap anywhere, but will be getting a little tiger seals on them just in case.2 points
-
I should have updated this a little Simon, but with no traffic at all I've been asking on some of the FB groups, you are spot on though as I had all the roof rails & weather strips off the roof & found an area rigth at the back of one on the drivers side where the seal had given way, this has been dealt with & it's reduced the leak from a torrent to a trickle, but there's still water getting in, I suspect from the top panel join behind the tail lights, I did seal up the bottom joint with tiger seal, but soon as the weather lets up I want to do the top ones as I suspect they are my culprit, I suspect it's getting in there & trickling down to the inside near where the rear sunroof drain exit pipes are located, well a little further back directly behind the lights. But I'm also getting it coming through very slowly in the spare wheel well at either end of the top panel joint/seal, someones already been quite happy with mastic sealing it all up from the inside already (before I get her) but that's not solving the problem just delaying it, I want to tackle the cause not the symtom & get her water tight the right way as water inside the panels you can't see will as we know not end well. I really hope it's just as said water coming in from the tail light top joint & making it's way down to this join in the panels in the well, god knows I've plugged enough leaks now, at least I'm moving in the right direction, I'm not doing any other jobs on this one till I get her 100% water tight as would be throwing good money after bad.2 points
-
Got the grille fitted to the car, that was the easy bit as the rest of the day turned into a bit of a nightmare! Could probably do with painting the metal behind black (its not quite as obvious in real life) but other than that im happy with it for a DIY job We then tried to swap in the MG ZS 180 steering rack that I bought... what a pig of a job Once we've eventually wrestled it into place after removing engine mount and subframe bolts, we found it didnt fit because these pipes are shaped differently, meaning it fouls on the engine mount bracket (the factory MB one so I can't even blame this on it being a k swap!) MB pipe: So I had to remove the rack from the car again and then remove the pipes from the MB rack and swap them to the ZS one. I've never seen that mentioned before but it's worth knowing if you are attempting this... Didn't get as much done as i'd like but onwards and upwards2 points
-
I clear them regularly because I have tin foil hat. So shouldn't be an issue. Merry Xmas anyway.2 points
-
Cheers mate. Not exactly mint. But it's tidy enough. Bit over mint. Although I do try do decent work on em2 points
-
Welcome back mate, good to see you back in a civic - looks up to your usual minter standard 😎2 points
-
I don't have it to hand but I will check the car next time I am with it and let you know (it's not parked at my house unfortunately) - probably at the weekend If it helps there are some results for the rover part number (RGD10001) on autodoc RGD10-001 A.B.S., ASHIKA | RGD10001 in AUTODOC2 points
-
Just took a rather nerve racking first proper drive of around 15 miles to a local stainless exhaust fabrication place before work. I've left the car with them as I really didn't fancy driving any further with the noise level/fumes but I should get it back next week! I've asked them to make up a 3 inch exhaust, with a high flow cat, centre res and back box. I want the least restriction but I don't want the noise level to be too crazy and get kicked off a track day so we'll see what they come up with. Its definitely overkill for NA but we might boost it once day so it would be "future proofed" for that. Car for the most part drives fine - the only things I've noticed so far: - The steering is a bit off centre - it could be just the boss isn't on right but I think it probably just needs an alignment as we've had the front suspension apart several times to fit driveshafts, coilovers etc. The power steering is working perfectly though which was a big goal of mine as most people delete the PS on these kind of swaps but it's not pleasant to live with off the track. - The throttle is a bit "sticky". Sometimes it idles at 1200rpm and then if you pull the pedal up with your foot it settles down. I have tried to adjust it once before to no avail and I've checked the TPS is calibrated properly. It may need a new throttle cable as im using the 25 year old original one. - Just as I was pulling into the exhaust place the car started to run really badly and stumble. I turned it off and back on then it was fine. I did notice on my laptop that it is running very rich - I am hoping it's just over fuelling due to the o2 sensor being almost certainly too close to the end of the pipe (its just before the flexi and there's no exhaust after that point). I'll not worry too much about this until there's an exhaust fitted! - The front end feels a tiny bit loose but ive not driven the car enough really to comment fully. We haven't adjusted any of the suspension or changed any worn bushes etc at the front so I will reserve judgement until thats all done. But honestly, for a first proper drive it didnt go badly at all. No fluids leaked out or parts fell off!! Did get a few odd looks as frankly the car sounds ridiculous but that will be all sorted soon enough... My father in law followed in his car with a bunch of tools and a jack in the boot but luckily we didnt have to do any roadside repairs.2 points
-
All looking good mate, those wheels should look great! The arb should defo help stiffen things up aswell. Doing stuff without a press is a right pita. I treated myself to one last christmas and it defo paid for itself when I did my polybushes haha2 points
-
Bought a set of (very) budget semi-slick tyres "Accelera 651 Sport Xtra" from a company called Tire Streets that i'd seen advertised on various youtube channels. I don't have particularly high expectations as they were extremely cheap (£280 for a set of 4) but according to various internet comments/reviews they seem to be reasonable. I can always upgrade them in the future if needs be. The rubber seems soft which is a good start for a track tyre. Normally I don't like to order tyres separately to fitting (as usually the fitting cost removes any savings) but I couldnt find anything suitable supplied and fitted so I paid the local tyre place £15 a tyre for fitting and balancing which seemed reasonable. Look forward to getting them on the car soon... Finally got around to finishing restoring an MG ZS 180 rear anti roll bar I picked up from a friend a few months back. It was in pretty sorry condition but it seems like they are not sold new any more. Fortunately, you can still buy drop links, poly bushes, and all the bolts so it was just a case of stripping it down, removing the rust, painting it and replacing as much of the hardware as possible. The bushes were a real pain to install without a press but after a lot of farting around in the vice I got there eventually... For reference here's how it looked before (!)2 points
-
Another thing to check is what type the buttons are. Some use voltage signals to operate lathing think that is probably for newer cars. Thinking you'll probably need the complete harness from the clock spring/spool to whereever it goes behind the dash. If you're just planning on fitting the ones for volume, then just terminating the other ones should in theory be fine as they won't be used. You'll also need the harness from the wheel to the radio as it will have some form of connector on it for the radio. Without seeing it, im guessing it will have a female 2.5mm or 3.5mm jack plug socket. Or possibly a male jack plug of the size mentioned above. Have a look in the integra forums (not the FB groups as the info in them is limited and sometimes incorrect!) for folk who are doing radio upgrades/double din conversions on their integra's. I think you'll be looking at getting these from America though as never seen any UK spec ones with those buttons fitted.2 points
-
So are you looking to replace the steering wheel with one that has cruise control switches? Assuming that the steering wheel fitment on the ma9 is the same as the MB/MC one, then you're looking at wheels with the same fitment as eg/dc2. I'm fairly sure that ek and accord shared the same wheel, but it's a different fitting to ours. EDIT... Just realised that it looks like the cruise control buttons are an add on to the steering wheel. It might be worth exploring parts diagrams like on Honda parts uk to see what optional extras might have been available and get some parts numbers to help your search. If, as the first post suggests, the US integra had it as an option, then the cable fell from that could be compatible - in which case have a spy at acura parts websites in the US for parts diagrams2 points
-
Yeah fingers crossed I'll get to have a quick spin in it, the plan is once the wheels and tyres are on, better front brakes fitted, and a few other small bits are sorted I can take it for an exhaust at least as somewhat of a test drive. Hoping to avoid the cost of getting it delivered there as we don't have a suitable tow car unfortunately. The car came with 12 months MOT when I bought it so we have a bit of time.. technically I am sure it's not valid any more as no exhaust is a fail but just to avoid getting in trouble (hopefully)... that is the next priority item as starting the car up is really antisocial at the moment for the neighbours! The car does run and drive but I've literally only been up and down the driveway in it so far 😂 but nothing flew off/leaked out of it yet so that's good progress... It still needs a proper map on the ECU and there's still a whole bunch of other work to do on the suspension and then safety gear inside (half cage, seats, harnesses, etc) but we can sort that over the winter and be fully ready for a show/track day in spring. To be honest that is all fairly straightforward fitment wise and more about saving up the money to buy everything than actually fitting it that will take time!2 points
-
Been chipping away at jobs the last few weeks and should be ready to drive soon. Everything in the engine bay should be done now - had a quick tidy up any loose pipes/wires and made sure everything was bolted down securely. It's not a super tucked show car but I think it's neat and tidy enough for the type of build that it is. Plus everything is easily accessible for servicing! Fitted a small washer fluid bottle - £10 from Amazon so it's a bit cheap and cheerful but it connected straight onto the factory washer pump connector and lines! Removed the rear washer pipe as we've already removed the rear wiper. The Hybrid Racing cold air intake bolts into where the factory washer bottle sits so it had to go. Picked up a set of Enkei RP01 (15x7 ET35) wheels for a reasonable price (about the same as i'd pay for a set of Rotas or similar). Will get some tyres on them this week and see how they look on the car. The main thing is they fit fine over the MG ZS front callipers with plenty of room to spare. I wasn't sure they would initially as the ZS came on 16s, although admittedly with much less offset. They've been rattle canned by the previous owner but honestly he (or she) has really not done a bad job at all. Initially I was looking to change the colour but for now they will do as is, for now I'd rather spend money on getting the car working than cosmetics!2 points
-
That E10 is absolute dog turd.. Only e5 goes in ours, especially after it ruined the injectors in Karen's accord. It's like a double bonus of super unleaded in top of not being E10 👌2 points
-
Moving to Kelso in the borders mate, it's about 20 odd mile from here, nit too far but further into the borders. Closer to your direction lol. The village has been fine but the land with this house is too much to maintain, so bought a lovely detached bungalow with garage and a lot smaller garden. Will give us a lot more free time, and Kelso is our favourite borders town. Plenty to do there, plus it gets its fair share of classic car shows too along at the events ground. Win win!2 points
-
Thanks, it's an alpine unit so even though it's new I think it fits with the 90s-ish vibe of the car. It's no doubt the brand I would've gone for if I had the money back in the day haha. It has RGB lighting so I can change it to march the dash which is nice (I'm being picky but I don't like it when the colours don't match!) The car came with a pretty retro looking JVC CD player but only 1 channel was working for some reason and it had a really shoddy aftermarket Bluetooth kit (calls only) with wires bodged in all over the place so I thought it was best to bin it all and fit something new I did consider not bothering with a head unit but even though the build leans towards track car, I've been in cars which are totally stripped before and whilst you might be able to get an extra 20kg out by removing the heater, stereo, half the dash, etc, it makes the car unusable for anything other than trailering really Yes he basically said he managed to get it all down the side by sticking a pair of long noise pliers through the popped out hazard switch and holding the cables out of the way of the head unit I've stripped everything from the front seats back and deleted the air con (it was broken anyway) so I'm not even sure I'll be able to hear the radio over the rattling but that's about the extent of the weight reduction for now. It should be a lightweight chassis anyway as it doesn't have a sunroof or other luxury features 😂2 points
-
Thank you very much for confirming this and your post - makes my car build a lot easier as I was expecting to have to modify the stock seat structure (which in itself is a problem because my passenger seat was accidentally disposed of - best not to ask)2 points
-
Spent the bank holiday installing the new timing chain/guides/tensioner, service manual print outs in hand and triple checking everything. All sealed up now, should be able to get the engine back in next weekend, all being well. Chain that was on was stretched - not by as much as some i've seen but the main difference I noticed is the chain tensioner was quite far extended whereas the new one is much less extended, maybe it couldn't take up the slack or something jumped on first start. Anyway, hopefully this is all sorted now. Also changed the crank pulley seal as I don't ever want to be going in there again!2 points
-
After nearly a month delay with far too many emails back and forth we finally got hold of the replacement engine mount bracket from Innovative Mounts and the engine is now finally bolted in! Got a few other bits fitted after this photo like the radiator, hoses, and fan, and then started to work on some of the plumbing like the clutch line. Getting exciting now - to be continued!2 points
-
Quick pic of the mini honda meet at ours now. Karen's civic, Steppy McStepwagon, and Tubs2 (aka Shelly) Still waiting for the bumper for the wagon.. Got one sent eventually, but they sent the wrong one, so waiting for it to be collected and swapped. Other than that it's mot ready.2 points
-
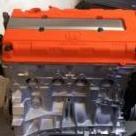
A rather inebriated looking K24A showed up this morning But it has the RBB markings on the head which is what matters - meaning it is the "full fat" version with 3-lobe VTEC and ~200hp. There is a similar looking version with 160hp and only 2 cam lobes so you have to be careful! Hopefully get that mounted up onto an engine stand at some point and take a closer look inside but so far so good. For peace of mind i'm going to give it a compression test and have a peek into the cylinders with a scope before going any further.2 points


(1)(2).thumb.jpg.58917bc3bd5671ab650d9afc754e9a14.jpg)