Leaderboard


Popular Content
Showing content with the highest reputation since 10/11/2023 in Posts
-
Hi Ben, The calipers in the photo are for the 260mm front brakes, not the larger 280mm front brakes. Manufacturer caliper numbers for the larger calipers are LCA333 & RCA333. You can use eBay to get the oem numbers from them. Basically the calipers are the same for the mg zs180, mg zr160 & accord of that era, but the carriers differ i believe (ive not checked any fit on an mb other than a zs). I can confirm that the calipers and carriers from the zs180 will fit onto a mb2 4x100 as thats what I'm currently running! If youre upgrading the brakes you'll need to change the master cylinder and prop valve if you don't have abs for it to work properly. My setup is: Honda Civic MB6 brake master cylinder Honda Civic MB6 brake servo Honda 40/40 brake prop valve (46210-S5A-912) Wezmoto Braided front and rear brake lines (700mm front / 560mm rear) MG ZS 180 Front & Rear brake calipers MG ZS 180 Front & Rear brake discs Cheers, Dan4 points
-
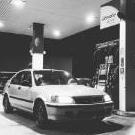
Finally getting around to a build thread for my third car It all started on a dull early may day. A Friend of mine messaged me, asking if I needed any parts from her MB4 before she scrapped it. It had been sitting on her drive since she her daughter had been born. I said to her, "let me know what the scrappy offers, and i'll chuck £50 on top and come grab it", knowing that the d16w4 powerplant in this could replace my lathargic D14 in my MB2 The next day me and a mate collected it, threw some trade plates on and ran up to my workshop. Even with the old 4 speed slush-box, and a years neglect, the MB4 walked away from my MB2 on a straight bit of road. Once we arrived, my friend parked the car up and then headed home. I then stood and had a smoke, looking at this car having a "Wangan midnight" esque moment, seeing the colour of the Sicilian Red paint for the first time. Plans had changed. (see attached image) Rust and engine work: First I got the car up on stands and made a list of everything wrong with it. The rear passenger sill and inner arch passed the good old screwdriver test, however the driver's side failed miserably, along with a few places around the front jacking point, and front inner arch. Out came the grinder, welder, and some conveniently shaped and cut sheet metal that I would be using to patch these big holes. This was a steep learning curve, as I have only ever done agricultural welding, and never thin bodywork. Once the rust was dealt with next came the auto box - I had never planned to keep this gearbox, so the hunt for an s20 close ratio box began. During this time, the auto box, torque converter and PRND lever were all disposed of in an appropriate fashion (Thrown into a skip as fast as humanly possible🤣), meanwhile, the engine was suspended by a ratchet strap around 2 on the gearbox bolts, and a random 2x4 i had laying about across the wings (See attached) Whilst the box was off, I decided to replace the rear main seal, sump gasket, and clean out the oil pickup tube. A few shiny parts were fitted during this time too, including an oil sandwich plate with senders for both oil pressure and temp, HKS oil filter, TTV flywheel and an exedy stage 1 clutch. Once I sourced a box, the new mounts were fitted up and after a copious amount of faffing around the engine and box were in. (I wish I had an engine crane!!) I altered the wiring on the PRND plug to disable the inhibitor switch, as well as the reverse lights. I finished under the bay by rebuilding the distributor, replacing the plugs and HT leads. I also added a bus bar to the firewall as my battery was going to be boot mounted. I am using a Janspeed 4-2-1 manifold, a smashed out OEM cat shell and a Skunk2 megapower exhaust system. I have a Whale pen15 air intake as well. Interior: This car had a creme interior, which I knew wouldn't survive me daily driving it. I quickly tore this out, installed a load of sound deadening and the various wires i'd be needing for my ICE setup, then fitted a black carpet and VTI "bus seat" interior. I mounted the battery and circuit breaker in the spare wheel well, as well as a power distribution block. this would be needed when I got around to building the boot and fitting my 3 amps. I finished the interior off with an oil pressure and temperature gauge set, a fire extinguisher, and an old school pioneer flipout headunit + DVD player. Exterior: The exterior is largely untouched, as it is the rare sicilian red pearl colour. This car was factory specced with a full VTIs kit and Jordan wheels. The jordan wheels went onto my other MB2, so that I could fit my 15" TSW imola wheels. I welded the rear wiper hole up, and the old spoiler holes. I then fitted an "auto spoiler", which had been preiovsly fitted to a friend's recently imported 200sx. This was an almost perfect colour match.4 points
-
See attached, will be posting some more in the near future about rebuilding my engine haha4 points
-
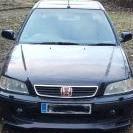
Hi folks. Had a 2010 Civic TypeS GT in red (aka Sexy Lexy) about 9 years ago, followed by a 2008 Civic TypeR in silver (aka Roxy). Traded the TypeR in for something more sensible for a daily driver, and have had a load of various cars since then. Always missed my TypeS tho! Was supposed to be looking for a classic 1980s Vw Golf convertible or an old Scirocco, but got fed up looking at sheds. Decided plan B was needed which was to sell my 1st Gen MINI Cooper s convertible and get a sensible daily driver again! Initially looked at 10th gen civics, but wasn't too keen on the style, so the hunt was on for a TypeS GT again (pref in red). Had to be the GT, had to be the 1.8 and no older than a 2010. Found one down in Yorkshire for £4.5k, years mot, service history, 64k on the clock,in red....and even the first 2 letters of the reg were the same as my old one (OE). She drives like a brand new car, so happy to be back in an 8th gen! Only got a few pics of her so far but will get more. Hope you like! Some subtle mods on the way, pretty much the same as I did withLexy senior lol Oh, and also means DD is relieved of the daily driving duties, so tucked up in the garage. Means I can spend time getting her back to show standard now!3 points
-
Hi all, So I can confirm aftermarket seats, without cutting frames or welding mounts to car, are completely possible. If you have read my before method with the universal frames this way is a lot easier and more cost effective. After 3 months of research I found a company called Planted Technology, they produced made to order seat sub frames for many cars. I emailed them to ensure my car was not an EK or an EG. I measured up the cars holes and got back the details of the closest fit frames they make. The Honda Accord 4th & 5th gen have the same interior as the MB3/MB6. I took a risk bought the frames and they do in fact directly fit. I admit it was a bit of a fiddle as they had to come from America so may have been slightly warped or bent on delivery, never the less I got them in as seen in the image below Here is a link to the main page, it would better off ordering them from GSM performance Planted Technology https://www.plantedtechnology.com/products/planted-seat-bracket-honda-accord-4th-5th-generation-1989-1997-passenger-right GSM performance https://www.sportseats4u.co.uk/product/planted-honda-accord-bracket/ Things to consider, these frames do not come with threads. M12 Nuts will be needed to fit seatbelts, M8 Nuts and bolts to fit seats to rails or frames, washers highly recommended3 points
-
Smaller power steering pulley (hopefully it will clear the bonnet without hacking any big holes in it) and 10% underdrive alternator pulley fitted As we've deleted the AC the factory belt was much too long (think it was something like 7pk1735 from memory). Managed to find a belt that will fit (7PK1400) - it seems ok but apparently there is a mark on the tensioner that you can check - i'll do this next time im with the car to confirm but seems like the right size. Engine mounts ordered - I went for Innovative Mounts for a Civic EG as the price for Hasport mounts in the UK is insane (£700+!) and I wanted to avoid ebay china copied junk on this project...3 points
-
Thanks for the update on the fogs - I managed to get a set of good condition blanking plates so i've removed the fairly rotten big fogs for now but I may reinstate them later. Left the connectors tied up behind. A bit more progress on the K-swap side of things: Drilled a couple of holes in the firewall just under the heater outlet to allow for the shifter cables to pass through (no photo, oops) Got hold of a billet shifter plate designed for an EG but it was sitting too proud of the tunnel so drilled out the fasteners for the shifter base plate and removed it DC5 shifter mocked up - was worried that it would be too close to the dashboard but it seems to just about be ok - the shifter box came with a short shifter already fitted which should help things Clutch and flywheel test fit - just waiting for various missing bolts to arrive from Japan before buttoning it all up. Toyed with the idea of getting an uprated clutch but we've gone with Exedy OEM EP3 clutch for now as it's many times cheaper than an uprated one (£126 vs ~£400) and I reckon it'll be OK for NA power levels. Any future plans to boost the car would require an LSD as well as a clutch upgrade anyway! Flywheel is a Competition Clutch 3.9kg3 points
-
A rather inebriated looking K24A showed up this morning But it has the RBB markings on the head which is what matters - meaning it is the "full fat" version with 3-lobe VTEC and ~200hp. There is a similar looking version with 160hp and only 2 cam lobes so you have to be careful! Hopefully get that mounted up onto an engine stand at some point and take a closer look inside but so far so good. For peace of mind i'm going to give it a compression test and have a peek into the cylinders with a scope before going any further.3 points
-
Happy Christmas everyone! Hope that you're all having a great festive break! 🎄🎄🎄🎄3 points
-
You are technically right about not needing the whole trailing arms, but good luck with both finding the spindles by themselves in usable condition and taking the old ones off. Finding parts like that is getting progressively hard as our cars start to turn into oldtimers, and most of these super specific upgrade parts have already been grabbed about a decade ago. We're kinda late to the party in that regard. The spindles are also secured to the trailing arms with extremely strong threadlocker, which oftentimes are pretty old and corroded on top, which makes removing them near impossible without drilling them out. Stripped a bolt attempting to remove the disc brake ones, even with applying heat and using rust remover beforehand. No chance. So, yes - you technically don't need them, but realistically you will. Except if you're fine with drilling all of the bolts out and dealing with that headache. And the part about bleeding the brakes is also generally correct. Most cars have their brake systems set up like that so you can still come to a stop if a brake line fails. Otherwise if you combine FR with RR / FL with RL you will only have working brakes on one side of your car, which I don't have to explain why that would be very bad.3 points
-
Hey all, already done a load of restoration as getting it back to full N/A Glory before I consider ITBs. Just wanted to make a meal of this that arrived the other day, so happy! 🥰3 points
-
ok, its been some time... but i want to share few photos from a civic photoshoot i made recently. This is how it currently looks like.3 points
-
Amazing reply from SirPaperbag! Just to add ive done this swap on my (non abs) mb2, but also upgraded a few things. My setup is as follows and works sweet: Disc trailing arms off a mc1 aerodeck MB6 brake booster MB6 1" master cylinder Mgzs 180 282mm front calipers (interesting the caliper is the same as from a 97-03 accord, not sure on the carrier) Mgzs 180 262mm rear calipers 46210-S5A-912 40-40 prop valve Regarding the rear arb - the rear brace that SirPaperbag mentions won't fit without modification. DeLaSoul mentions it in his build thread - if I remember correctly the mounting points where the LCAs mount to the chassis are about 8mm narrower on our MBs to EKs3 points
-
Small update on the whole brake prop valve situation: Apparently, EG6 prop valves could also work, as they don't have ABS and 262/242mm rotors in the front and rear, just like our M-chassis Civics. So, if that's true, you could get a brand new valve for less than $200 from Japan. Part number for these bad boys is 46210-SR3-013 And you should be fine sticking with your original brake master cylinder + booster! But if you've got 242mm discs all around instead you'd need a "1725" valve (46210-1725-XXX) off a Del Sol, not off an EE/ED/EF Civic! (Different f/r rotor sizes)3 points
-
Got some from Climair installed rn, and they fit very well. They're still available brand new. Only thing I had to do is grind off a bit of the holding tab in the front (was a bit too long) but that's completely normal with these things. And you can even choose between clear, tinted, and dark, which I find quite nice.3 points
-
Good shout mate, I'll se about getting this added to FAQ. And thank you, cracking info there!3 points
-
A reply this detailed deserves to be in the FAQ section of this site! It really seems a more difficult job than a cam swap and a tune haha If I ever manage to stumble upon the main parts for a cheap enough price (Hondas in general were very expensive relative to other cars here in Italy so not many sales...) to justify all the work I'll definitely try. Thanks for all the info!3 points
-
Great post there mate3 points
-
The part about needing new trailing arms is 100% correct, as the drum brake ones lack the proper mounting points for a disc brake system. But you've got to be careful with which arms you choose, as the wrong ones could end up increasing your rear trackwidth and that's gonna end badly for your handling. As our M-chassis have borrowed a lot of suspension components from 5th gen Civics (EG), I'd recommend searching for EG5/EG6/etc. trailing arms, as they should keep everything in spec. I for one got a pair of EG5 arms to go with my non-ABS system. But that's only part of the problem. If you've somehow managed to get yourself the right trailing arms then you still have to find a matching brake proportioning valve (or prop valve) that splits the pressure correctly between front and rear. Otherwise your rear brakes might either not bite enough, or bite too much and cause the rear to kick out while braking (very dangerous). This is especially important if you've got something like an MOT or TÜV here in Germany, where your car gets an inspection every X years and they check your brake performance. M-chassis Civics also use an old style of prop valve, which makes it EVEN HARDER to find the correct ones. What you generally want to get is called a "4040" valve, which is just the model number, nothing more (some dumbasses online claimed those valves split 40/40, but where the hell would the remaining 20% go?) I also found a nifty table somewhere on an obscure forum, and I don't know where exactly I got it from, so I sadly can't attribute the original poster, but here it is: And depending on the caliper sizing, you might even have to upgrade your master cylinder, but that's getting really technical. So, in short, get the correct trailing arms, a somewhat correct prop valve and maybe upgrade your master cylinder. If you want to do it properly, it's a whole lot more work than just doing enough for it to work. Pro Tip: You can also fine-tune your front/rear balance by using more or less aggressive pads. And regarding rear ARBs, you've got a choice between either buying some used EG6 brackets, using aftermarket ones, and reinforcement braces with mounts included. I went with a used EG6 ARB, plus mounting hardware, because I wanted to try out how much difference just that dingy little thing would make (a lot). Here are a few pics of it both installed, and some pics of the used mounting hardware. You also need fitting lower control arms with mounting holes for the endlinks. And I'd recommend buying new endlinks while you're at it. And maybe a few harder rubber bushings on top. I also had to fabricate some small metal standoffs for the mounting bracket to properly fit to the rear frame (top right picture, the screw just above the yellow marking). This would be the alternative, a rear brace with mounts included: But some places also carry aftermarket versions of the OG hardware that I mentioned and shower earlier, so that's an option, as well. All in all, it's a s**t job with tons of little hang-ups, researching, browsing marketplaces and painful installation, but the handling difference is night and day.3 points
-
Heya bud imho, dual rads are a terrible idea. They are both looking to dissipate heat, but when connected, if you feel the desire to move rapidly or it's a very hot day, the heat in the rad will affect the condensers ability to be effective, thus you would lose cooling ability. I guess it's like putting you home fridge in front of the radiator, if the fridge can;t shift the heat, the gasses can't re condense and the fridge loses it's ability to be effective. I think it would more be a limit to the age of the technology of the aircon, pressures used today are greater and condensers are far more efficient. I say delete the aircon, get a bigger rad and just drive faster with all the windows down! haha! I say when my MB6 VTIs still has it's full aircon :P3 points
-
Thank you guys. I'll try to make a topic of the work in the car I've made so far and all the work I want to do. @SirPaperbag The fog lights are not factory ones but some cheep chinese. I found the originals , bought them but I think the front bumber is an aftermarket bumber so I have to cut the whole thing in there to fit the original factory fog lights. Lots of work has to be made generally and have no time. Nevermind whenever I find some free time I will do it. The grille is handmade, I tried to fit the H emblem from my previous EK civic, but it's too big :( Only the small H emblem of the pre-facelift fits. By the way the car was imported from Germany, as the user manual of the car is in German :D3 points
-
On the night shift downtime and was having a read through this thread, thought the car looked awful familiar. Saw it at cadwell a while back, with presumably its new owner. Looked and sounded amazing, went like f**k too! ahaha3 points
-
Whoops, hope these work haha. Got round to fitting most the parts - also fitted a k-tuned rep short shifter with a stainless weighted knob which makes the car feel so nice to drive - will get a photo soon. Me and my wife have also had a baby so time and money to work on the car are in short supply!! Next steps are to get the interior sorted - really want to fix the headliner, and seeing Kaleverada's thread has me inspired for the pillars! Also really want to strip out the back, tint the windows & fit bucket seats...3 points
-
So, did a good bit of work to the car again. This time I installed a proper mounting bracket for the cold air intake as the old hacked-off and jury-rigged intake mani bracket looked pretty bad, to be honest. Also installed a pair of much more serious sounding horns than that little beeper that the car came with. They sound a lot better than the OEM one did, and are quite a bit louder on top! After that I installed a set of new bumper screws - the original ones were completely rusted and cruddy, and one almost stripped completely when I took that bumper off! Then I got to work on my seat-project. As I said in my last post - the original seats make me sit a bit too high for my own tastes and I have been looking for either some high-quality (road legal) seat rails for aftermarket seats from either Recaro or some other brand, or a completely different way to sit lower than the original seats would allow me to. As it turns out ... you can fit CRX seats on the original M-chassis rails if you drill out the rivets and fabricate an adaptor plate out of steel (10mm thick in my case). I got lucky a few years ago and managed to take a pair of these seats off a guy for jsut 250 bucks total. :) Here's how the first prototype looks like: This was only to take a look and see if my idea could even work to begin with, and if it would make me sit lower than the OEM seats would, but as luck would have it ... this combo works flawlessly and I sit about 5 to 8 centimetres lower than I do in the stock seats! :D They are also quite a bit more comfortable, if a bit worn-out. Real plushy. :) But as things stand right now I'll just make a few more refinements to my adaptor brackets, give those seats a thorough cleaning session and maybe add some more side bolstering to give them a bit more of a sporty feel and I've got myself a nice pair of OEM Honda seats that do exactly what I want from them! :D3 points
-
So, a few boxes full of fun-parts arrived yesterday... :D I'm still trying to find a good machining shop to get a port and polish, a valve-job and to get the rotating assembly properly balanced, but things are slowly progressing on the new engine build. It's going to be unconventional for sure, but I'm going to be fully building an N/A D16Z6 that I've bought for this project. Forged conrods, high compression pistons, stage 2 camshaft, lightened flywheel, the whole nine yards. I've also done some test-fitting already and it seems that the 'LITE'-series of conrods from Skunk2 doesn't require any notching of the block to fit, which is a huge win in my book! Though I had to cobble together a pseudo-piston from a few pieces of plastic and foam for the test-fit, as the pistons I bought are .5mm oversize and I haven't had the block bored out yet. Worked super well, though! But I'm super stoked to see what kind of power gain this is going to get me, and especially how high I'll be able to rev it. Components-wise it should be fine up to 9.000 or even 10.000 RPM, but we all know that it probably won't make much or even any power up that high in the rev-range. Based on my research into other all-motor D16 builds and B20 builds I'm confident that it should definitely hold up to 9.000 relatively comfortably, as many people in the states rev their stock-rod B20s that high without much issue, running only ARP rod-bolts and nothing else. (B20 engines have the same stroke as D16s, btw) It's going to be a while until things get moving properly, but the first step has been taken and all that's holding me back right now is finding that machining shop! :D Some folks are probably going to ask why I would take a D16 that far instead of just going B-Series, and I'm going to answer that by telling you that a B-Series swap costs around four to five thousand Euros where I live. If you can even find one... That's a lot of money for just a stock engine and trans. And it's also why I'm going to spend about the same amount of money to build a D-Series that is going to make roughly the same power, as well. I simply want a built engine. Simple as that. I've always wanted to build a proper all-motor engine and I finally got the chance, both time- and money-wise to do so, and I'm going to do it! :D I've also been doing some research into getting a road-legal bucket seat, or any kind of seat to be honest, because the stock seats are just too high for my tastes and I constantly have to lean forward when I'm stopped at a red light. Someone else on this forum already made an extremely helpful post about the seat rails from Planted Technology, which helped me immensely, but I've also found a local engineering company here in Germany which is able to fabricate everything in-house and even get it entered into the car's paperwork the legitimate way. That comes with its price though... Well, anyways. That's the current state of my project. See ya 'round!3 points
-
Sensor for the ir remote I believe.3 points
-
Its been a long time since the last update. So yeah of course it is fully wrapped now by myself and lowered even more. Looks pretty good but for sure sometime in the future I might paint it (I'm currently doing car painting education) plans for the future: Turbo... I found a cheap kit on marketplace and then I'm gonna try and make a reliable stock internal setup, so not that high boost2 points
-
Bought a set of (very) budget semi-slick tyres "Accelera 651 Sport Xtra" from a company called Tire Streets that i'd seen advertised on various youtube channels. I don't have particularly high expectations as they were extremely cheap (£280 for a set of 4) but according to various internet comments/reviews they seem to be reasonable. I can always upgrade them in the future if needs be. The rubber seems soft which is a good start for a track tyre. Normally I don't like to order tyres separately to fitting (as usually the fitting cost removes any savings) but I couldnt find anything suitable supplied and fitted so I paid the local tyre place £15 a tyre for fitting and balancing which seemed reasonable. Look forward to getting them on the car soon... Finally got around to finishing restoring an MG ZS 180 rear anti roll bar I picked up from a friend a few months back. It was in pretty sorry condition but it seems like they are not sold new any more. Fortunately, you can still buy drop links, poly bushes, and all the bolts so it was just a case of stripping it down, removing the rust, painting it and replacing as much of the hardware as possible. The bushes were a real pain to install without a press but after a lot of farting around in the vice I got there eventually... For reference here's how it looked before (!)2 points
-
Great, that means I am okay with the dash trims already. Hoping to find a badge and some mats in the meantime 🤞Just ping me if you want to get rid of that badge.2 points
-
Another thing to check is what type the buttons are. Some use voltage signals to operate lathing think that is probably for newer cars. Thinking you'll probably need the complete harness from the clock spring/spool to whereever it goes behind the dash. If you're just planning on fitting the ones for volume, then just terminating the other ones should in theory be fine as they won't be used. You'll also need the harness from the wheel to the radio as it will have some form of connector on it for the radio. Without seeing it, im guessing it will have a female 2.5mm or 3.5mm jack plug socket. Or possibly a male jack plug of the size mentioned above. Have a look in the integra forums (not the FB groups as the info in them is limited and sometimes incorrect!) for folk who are doing radio upgrades/double din conversions on their integra's. I think you'll be looking at getting these from America though as never seen any UK spec ones with those buttons fitted.2 points
-
So are you looking to replace the steering wheel with one that has cruise control switches? Assuming that the steering wheel fitment on the ma9 is the same as the MB/MC one, then you're looking at wheels with the same fitment as eg/dc2. I'm fairly sure that ek and accord shared the same wheel, but it's a different fitting to ours. EDIT... Just realised that it looks like the cruise control buttons are an add on to the steering wheel. It might be worth exploring parts diagrams like on Honda parts uk to see what optional extras might have been available and get some parts numbers to help your search. If, as the first post suggests, the US integra had it as an option, then the cable fell from that could be compatible - in which case have a spy at acura parts websites in the US for parts diagrams2 points
-
Thanks, it's an alpine unit so even though it's new I think it fits with the 90s-ish vibe of the car. It's no doubt the brand I would've gone for if I had the money back in the day haha. It has RGB lighting so I can change it to march the dash which is nice (I'm being picky but I don't like it when the colours don't match!) The car came with a pretty retro looking JVC CD player but only 1 channel was working for some reason and it had a really shoddy aftermarket Bluetooth kit (calls only) with wires bodged in all over the place so I thought it was best to bin it all and fit something new I did consider not bothering with a head unit but even though the build leans towards track car, I've been in cars which are totally stripped before and whilst you might be able to get an extra 20kg out by removing the heater, stereo, half the dash, etc, it makes the car unusable for anything other than trailering really Yes he basically said he managed to get it all down the side by sticking a pair of long noise pliers through the popped out hazard switch and holding the cables out of the way of the head unit I've stripped everything from the front seats back and deleted the air con (it was broken anyway) so I'm not even sure I'll be able to hear the radio over the rattling but that's about the extent of the weight reduction for now. It should be a lightweight chassis anyway as it doesn't have a sunroof or other luxury features 😂2 points
-
After nearly a month delay with far too many emails back and forth we finally got hold of the replacement engine mount bracket from Innovative Mounts and the engine is now finally bolted in! Got a few other bits fitted after this photo like the radiator, hoses, and fan, and then started to work on some of the plumbing like the clutch line. Getting exciting now - to be continued!2 points
-
Shifter mounted properly in car and cables routed. Some hacking up of the console will obviously be required but I should be able to have all the dashboard etc back in Shifter cable plate in place - still needs a bit of work to get the other two bolts mounted and enlarge the hole in the grommet slightly. It's sitting at a less than ideal angle but it was the best placing we could come up with - the DC5 shifter cables we're using are on the shorter side Air con delete block off plate fitted so no huge hole directly into the cabin!2 points
-
Thank you for the warm welcome both I am basically following guides for an EG K-swap as the car seems to be almost identical as far as a K swap is concerned. Even the EG conversion harness (to connect the new engine loom to the existing car loom) appears to work for the MB. Spent a day on the car today and progress as follows: Bye bye D14! Some areas of surface rust in the engine bay that we'll go over with a flap wheel and spraypaint over just to stop it getting any worse but not found anything that needs any welding etc so that's good news Made a bit of a mess knocking out the leftmost engine mount bracket (required to install the EGK2 Hasport mounts). Drilled all the spot welds out but it still wasn't budging so ended up going in behind it with a hammer and chisel and it eventually came off - the chassis has suffered a few battle scars but nothing a bit of sanding and paint can't cure! I've agreed to buy an EP3 civic gearbox so now that the gearbox has been chosen the next job I think will be to get hold of a shifter from an Integra DC5 and get that mounted in the car and get the shifter cables fed through to the engine bay and the shifter mounted. If i'd gone for an FN2 or accord gearbox I would've needed an accord shifter as the pattern is reversed. And finally my first mod! A set of clear indicators, I believe they were from an accord - I had to file off a small tab on the casing to get them to fit the connector was a direct swap so that's a good result2 points
-
Welcome to the club and good luck with your project! Also used to (briefly) think about a K-swap a few years ago, but I quickly changed my mind after I found out that all the extra bits and pieces you need to make it all fit and work can easily cost twice as much as the K-series engine itself. And as far as I remember you're going to need EG parts for the engine bay, suspension bits and headers. While the M-chassis does share parts with the EJ/EK platform, Integra and EG parts are much more numerous.2 points
-
That looks stunning! Loving that! @dr_broon yup, something about metallic reds that I just love! Gayles new Micra is a similar colour to that red too!2 points
-
Hi, are you sure you need new trailing arms? Upon a short google search, I stumbled upon this. " You do NOT need the entire trailing arm; ALL 88-00 civics and 90-01 Integras take the same shaped trailing arm. You need only the spindle, which is attached by a 24mm nut, and four T50 torx bolts. Please note that most swap the entire trailing arm because those torx bolts are in there VERY firmly. I have banged the hell out of a hammer and impact and still had them stay. I advise air tools, because even with all my weight and brute force, they may not come out. Brake lines may be stubborn if your car is older and rusty. The brake hard lines can strip easily if you do not use the proper wrench. A brake line wrench is what you need, which is a 10mm box end wrench with a slot cut out so that you can slide it over the hardline. You can use this on the bleeder screw too if you put the bleeder hose over the bleeder valve first so that brake fluid doesn't spill. On an EK chassis civic, the bleeding sequence is right rear, then left front, then left rear, then front right. Don't go in a circle, the EK chassis uses a crossed brake system, so go by this sequence to avoid any cross contamination of air into the lines, otherwise you may be bleeding all day. " Rear disc conversion, keeping the drum trailing arm | Honda D Series Forum Cheers!2 points
-
Need to see the pics of this one 😎2 points
-
Hey Bro, Same with the one I wanted, common area. Poked and made it all worse haha, was the same on the other side, but the stability was still there, so a couple of small welds and used Isopon skin, high build primer, done. Got the other areas the side trim attaches to (in pics) back to bare metal, Jenolited everywhere, painted. Annoying at the time I painted gloss black to get it protected as nh605p was out of my dead budget! So check the side trim as it will have work for you :P You one looks better than mine, still be prepared as Kink says, that rust is coming from the inside out, you need to get at the source. If you love it and really want it, get it and sort it.2 points
-
Ayy I'm on the same boat rn haha, only thing I have a D14 and not a B18 😅2 points
-
Have to agree with Adz about it seeming like a bad idea to share cooling duties with the engine. Have you looked into seeing if there's an upgrade? These ones look like they're more chunky than the standard? (but can't remember as it's so long since I've had air con on my car). You'll have to make sure they'll fit though. https://www.google.com/imgres?imgurl=https%3A%2F%2Fsg-test-11.slatic.net%2Fp%2F16fc733d09b5b70b4fcdabea3a96ad09.png&tbnid=YSSntC5baq6DZM&vet=1&imgrefurl=https%3A%2F%2Fwww.lazada.com.ph%2Fproducts%2Fcivic-laminated-evaporator-esiekegvtilxicrv-1st-honda-car-aircon-parts-i112056049.html&docid=JqTek4HNHjZmzM&w=1080&h=1080&source=sh%2Fx%2Fim%2Fm4%2F2&kgs=8ab1c69962d3ba71&shem=abme%2Ctrie#vhid=YSSntC5baq6DZM&vssid=mosaic https://www.ebay.co.uk/itm/173380831207?mkcid=16&mkevt=1&mkrid=711-127632-2357-0&ssspo=fdbxb7XvSMO&sssrc=4429486&ssuid=VPkI41u3Sse&var=&widget_ver=artemis&media=MORE2 points
-
Heya, The worry is the light on after shutdown, it should go off. Mine had a poor after market alarm installed which caused the door sensors to short which was a mystery for ages as it caused a parasitic leech draining the battery. Has there been any mods you might be unaware of, any filled fuses that should be blank or odd wiring anywhere? Fairly sure euro codes are region wide? as opposed to US/JDM, 18 codes are super common, I think you can just unplug the sensor and do the multi meter test to check them. "Spin the Wheel: Carefully spin the wheel by hand while keeping the sensor detached but not removed. When the magnetic field strength (Hall Effect type) or the teeth on the reluctor ring pass by the sensor (magnetic type), you should see a small voltage fluctuation on the multimeter (if it is set to AC volts)." You could also check resistance I think, to see if it's shorted to earth.2 points
-
Looks sweet that man! Some of the vibration you mentioned could be from the stiffer or solid bushes you’ve fitted, quite a lot of gearbox vibration gets transmitted through those. Either that or whilst in gear the shifter actually sits on top of the the exhaust, I know when I had mine adjusted to as low as it went, so the shortest possible throw, it’s would knock into the exhaust. Have a completely different setup now but the Hybrid Racing one does looks good man! Well done2 points
-
I'm probably imagining things but after hearing it in every possible intake configuration I have, the questions start rolling. Any time I'm flat on the accelerator and cross the 4500/4600 rpm threshold, the sound very clearly changes tone, not in any way same as a real VTEC, but still in the same kind of sound. It also sounds funny and conspiracy-y because 4600rpm is where peak torque is produced on the D14a8 haha. Still, this is no way a serious post, more like a gimmick for fellow D14 owners to try and find it in their cars and confirm it, have fun lol2 points
-
My D14 used to do this too! Lol can't remember exactly what the revs were at as it was an automatic, but if using the gearshift manually when giving it beans there was a distinct change of note from the engine. That wee engine used to spin up the revs really nicely.2 points
-
That blue looks stunning! Loving the car in its latest form mate!2 points
-
today was the day i removed the trailing arm, its been 2 days worth of work trying to get it to come off as so many bolts were properly seized on and i could not reach them with the arm on the car. It meant having to cut the ABS cable, the Handbrake Cable and also the Brake line. Not too worried as all those are getting replaced anyway. The majority of the bolts came out without snapping apart from one which was the LCA bolt to Trailing arm leaving me with a situation where i had to cut the arm. Yet again not a problem as im putting new ones on. Once the arm was off then i was able to remove the tricky bolts. I gave the arm a clean up to be pleasantly surprised at how little corrosion there was on the arm, the hub and spindle are a different matter though so i will get them cleaned up. I managed to remove the remains of the Lower control arm that were stuck in the trailing arm. it has left a bit of thread behind in the trailing arm so i will aim to try and weld a nut onto that and try and free it off that way!2 points
-
Nice looking MB bud. The wiring info should be in the workshop manual that you can download from this site (in the downloads section of the menu) For the manual winders though, take a look on rimmerbros.com for mg rover ones... https://rimmerbros.com/Item--i-GRID0036132 points
-
Hey,.. erm yeah I did some more mods on the crown and got it all set up beautifully. Put some lovely 4 pot brakes on etc. then got a bit twitchy with it because everything is so expensive for those cars. Realised was gonna take 10k minimum really before I'd be remotely happy with performance etc, so I'd be into it for over 20k by that point. And also I drive so Infrequently when I do go out I want something fun to drive , which nice as it was, it wasn't a fun car. So sold it. Genuinely gutted I sold my mb6 actually. Moment of madness. So been in a bit of a rut and a bit grumpy about cars. But have baught an fnPoo with some nice mods on. And plan to put my stamp on that and do some track days etc next year.2 points