Leaderboard


Popular Content
Showing content with the highest reputation since 04/28/2023 in Posts
-
Hi everyone, Thought I'd write up a post to help a few people out. Spent 2 hours researching this today. It is possible to fit after market seats in an MB model civic without a tailored/specially fitted subframe. So for all of those that would like a sportier seat, or some racing seats, this is how you do it and what you need List of parts: Seat (of your choice) Universal side mount rails Base mount conversion rails (you will only need these if you are buying seats with base mount/bottom fitting only) How to install seat seat: Remover factory seats and rails from car Remove factory rails from factory seat install universal side mounts to factory rails ( some bolts may need to be removed or cut off) put factory rails back into car with universal mounts attached Install base mount conversion brackets to side mounts install seat to base mount bracket If you have a seat that is side mounts only you will not need the base mount conversion bracket. you can skip step 4 and install the seat directly to the universal side mounts. The great thing about the universal side mounts is that you have a lot of choice in how you can position your seat. meaning you can have more lean in the seat. be higher up or lower down. this is all depend ending on the side mounts you buy and the amount of holes available. List of parts and seats I used to make this possible: Seat - Sparco R100 - https://www.demon-tweeks.com/uk/sparco-r100-seat-7000253/ Side Mounts - Sparco Steel Side Mounts - https://www.demon-tweeks.com/uk/sparco-steel-side-mounts-s-s004902/ Base mount conversion - OMP Base Mount Conversion Brackets - https://www.demon-tweeks.com/uk/omp-base-mount-conversion-brackets-omphc0-0660/ Hope this helps anyone still trying to figure out how to do this.4 points
-
Whoops, hope these work haha. Got round to fitting most the parts - also fitted a k-tuned rep short shifter with a stainless weighted knob which makes the car feel so nice to drive - will get a photo soon. Me and my wife have also had a baby so time and money to work on the car are in short supply!! Next steps are to get the interior sorted - really want to fix the headliner, and seeing Kaleverada's thread has me inspired for the pillars! Also really want to strip out the back, tint the windows & fit bucket seats...3 points
-
So, did a good bit of work to the car again. This time I installed a proper mounting bracket for the cold air intake as the old hacked-off and jury-rigged intake mani bracket looked pretty bad, to be honest. Also installed a pair of much more serious sounding horns than that little beeper that the car came with. They sound a lot better than the OEM one did, and are quite a bit louder on top! After that I installed a set of new bumper screws - the original ones were completely rusted and cruddy, and one almost stripped completely when I took that bumper off! Then I got to work on my seat-project. As I said in my last post - the original seats make me sit a bit too high for my own tastes and I have been looking for either some high-quality (road legal) seat rails for aftermarket seats from either Recaro or some other brand, or a completely different way to sit lower than the original seats would allow me to. As it turns out ... you can fit CRX seats on the original M-chassis rails if you drill out the rivets and fabricate an adaptor plate out of steel (10mm thick in my case). I got lucky a few years ago and managed to take a pair of these seats off a guy for jsut 250 bucks total. :) Here's how the first prototype looks like: This was only to take a look and see if my idea could even work to begin with, and if it would make me sit lower than the OEM seats would, but as luck would have it ... this combo works flawlessly and I sit about 5 to 8 centimetres lower than I do in the stock seats! :D They are also quite a bit more comfortable, if a bit worn-out. Real plushy. :) But as things stand right now I'll just make a few more refinements to my adaptor brackets, give those seats a thorough cleaning session and maybe add some more side bolstering to give them a bit more of a sporty feel and I've got myself a nice pair of OEM Honda seats that do exactly what I want from them! :D3 points
-
So, a few boxes full of fun-parts arrived yesterday... :D I'm still trying to find a good machining shop to get a port and polish, a valve-job and to get the rotating assembly properly balanced, but things are slowly progressing on the new engine build. It's going to be unconventional for sure, but I'm going to be fully building an N/A D16Z6 that I've bought for this project. Forged conrods, high compression pistons, stage 2 camshaft, lightened flywheel, the whole nine yards. I've also done some test-fitting already and it seems that the 'LITE'-series of conrods from Skunk2 doesn't require any notching of the block to fit, which is a huge win in my book! Though I had to cobble together a pseudo-piston from a few pieces of plastic and foam for the test-fit, as the pistons I bought are .5mm oversize and I haven't had the block bored out yet. Worked super well, though! But I'm super stoked to see what kind of power gain this is going to get me, and especially how high I'll be able to rev it. Components-wise it should be fine up to 9.000 or even 10.000 RPM, but we all know that it probably won't make much or even any power up that high in the rev-range. Based on my research into other all-motor D16 builds and B20 builds I'm confident that it should definitely hold up to 9.000 relatively comfortably, as many people in the states rev their stock-rod B20s that high without much issue, running only ARP rod-bolts and nothing else. (B20 engines have the same stroke as D16s, btw) It's going to be a while until things get moving properly, but the first step has been taken and all that's holding me back right now is finding that machining shop! :D Some folks are probably going to ask why I would take a D16 that far instead of just going B-Series, and I'm going to answer that by telling you that a B-Series swap costs around four to five thousand Euros where I live. If you can even find one... That's a lot of money for just a stock engine and trans. And it's also why I'm going to spend about the same amount of money to build a D-Series that is going to make roughly the same power, as well. I simply want a built engine. Simple as that. I've always wanted to build a proper all-motor engine and I finally got the chance, both time- and money-wise to do so, and I'm going to do it! :D I've also been doing some research into getting a road-legal bucket seat, or any kind of seat to be honest, because the stock seats are just too high for my tastes and I constantly have to lean forward when I'm stopped at a red light. Someone else on this forum already made an extremely helpful post about the seat rails from Planted Technology, which helped me immensely, but I've also found a local engineering company here in Germany which is able to fabricate everything in-house and even get it entered into the car's paperwork the legitimate way. That comes with its price though... Well, anyways. That's the current state of my project. See ya 'round!3 points
-
Sensor for the ir remote I believe.3 points
-
Finally got around to installing my Hondata and let's just say that I might have been a little nervous when I turned that ignition key for the first time, hah! But everything went well, and I now have a running, chipped D16Z9 engine, woohoo! It might be running richer than Jeff Bezos at a marathon for now, but a few good street-tuning sessions are going to take care of that. And I'm talking Lambda-0.8-at-idle-rich; Even a few seconds of cold-start are enough to make the whole courtyard reek of marzipan. Sadly I barely had any seat-time during the past few months, as the bane of every D-Series owner struck - ignition problems. It started as a random ignition stutter (rev-counter visibly took a dip) that quickly ended in a complete engine shut-off on my way home from work, and the car refused to turn back on again for at least five minutes after the initial shut-off. But it weirdly enough acted as if nothing happened when it did decide to work again. Spent a few weeks hunting down the issue, buying a new igniter, new coil, the whole nine yards, but the issue persisted. I suspected that the sensors inside of the dizzy might be the problem and looked up part numbers, but quickly found out that those are not sold separately. Dang it. That's when I went "F*k it, I'm gonna buy a whole damn new distributor." But, as it turns out, 99.9% of aftermarket dizzys for D-Series are hot garbage and people always have to buy new ones as they break down faster than you can say K-Swap. That's chinesium for ya... So I looked at those funny looking "Dragon Fire" -ones, which I admittedly didn't take seriously at first, and through their homepage I found out that they actually meet the IAT standard - Success! If something meets that standard, it's at least not as crappy as all of those cheapo replicas from China. The car has been running fine ever since and even gained a bit of torque down low! :D [A few weeks later...] Last weekend it was finally time for yet another small addition, as I finally grew tired of the original pedals and imported myself these beauties straight from the land of the rising sun. The instructions might be slightly difficult to read, but at least they included some pictures. And, well, installing pedals is kind of self-explanatory, y'know? Quick peek at them, straight out of the box. The installation process is actually super easy, as taking off the OEM accelerator-plastic is the most difficult step in my opinion. But with a small-ish flathead screwdriver and a little bit of convincing you can lift the plastic nose on the top and then just slide it off! After that, simply remove the plastic strips from the double-sided adhesive, set the covers in place and attach the small metal clamps that screw through the pedal covers to sandwich the pedal between the little clamps and the covers. This is what the finished product looks like. :) The clutch and brake pedal have that extremely grippy texture to them, which looks to be some kind of metal foam that has been injected into the frame. (Has even more grip than skateboard-tape!) Oh, and heel-and-toe has gotten a lot easier, as these pedals are a bit fatter than the OEM rubbers. All in all - way too expensive, but worth it. Mmm, take a look at that close-up.3 points
-
Hey all! New here, although I see alot of posts are quite old, its cool to see people still active on these kinds of forums. I thought it would be a great place for information on potential mods, parts and specs regarding civic aerodecks. I know they are far more popular in the UK. Mine is actually the first one I've ever seen in person here in Ireland.3 points
-
You can put lowering springs in B6 too. Bilstein told me you can use OEM springs or lowering springs. These shocks can take both. I installed the Eibach springs, and they are much better than the OEM springs. You can feel that the suspension works much better with the Eibach springs; I even find it more comfortable than the OEM ones, but I think it lowered a little more than I wanted in the front. At the back, it is very good. I have a friend with an EG Coupe with B8 and Eibach, and I feel it is more arsh compared to mine. I'm of the opinion that you shouldn't put EG stuff on MB when there are MB parts available because something has to change in that particular part; otherwise, they are both the same references. Don't use EK springs because the weight ratings are totally different. The spring plate is indeed a little bit small, but I have been running it for two years without a single problem. On the subject of brake lines, I have had mine secured by zip ties for almost two years without a single issue. Now I need to buy a front camber kit because the camber is at -2 degrees. This camber is a tire killer. I leave a picture of my Aerodeck with Bilstein B6 + Eibach Springs.3 points
-
Got round to fitting the MG spoiler I got from Craig on here. Quick lick of plastidip and looks the part I reckon3 points
-
Thanks for replies, wanted this for a "customer" to burn on sst chip on socketed p30 ecu. Did my research and its not possible to do due to eco part of map (basically need to somehow switch between normal map/eco map/high lift map. Made one but with no eco mode (works great, tested if anyone needs) .2 points
-
Took the time to do some more work on the ole Fastback today and installed a nice upgrade for the interior. The object in question being a very nice short shifter from Hybrid Racing and a set of stiffer shift-linkage bushings from Hardrace. The installation was pretty straightforward - take off the interior trim that surrounds the shifter, undo a few bolts and take out the b*tch pin, take off the old shifter and replace all the original parts with the shiny new ones. Even the rubber gasket went on there relatively easily, with a bit of lubrication of course ;) And the finished product looks like this: Had to take out the small plastic ring out from the top of the shifter boot to be able to install the 'swan neck' part of the shifter on top of it, but I really like the way it looks (and feels)! The biggest hold-up was the size of the hole where the shifter bolts onto the shift linkage. Had to take off some material or otherwise I'd have to choose between either only having gears 1 through 4 or gear 3 through reverse. Nothing bad though. File down, reinstall, take off again and file down a bit more and boom - bob's your uncle. There are still some vibrations to chase down, but nothing a bit of lubricant/machine oil can't fix. All in all, I'd say it was a huge upgrade for the driving experience - it's super notchy and rowing through the gears almost feels like racking a gun at times. I'd give the shifter itself a solid 9/10, feels well built, installation is straightforward and well documented by Hybrid Racing, they give you all the hardware you need and you don't have to damage or reuse old components (except filing down that linkage hole, but that's a M-chassis issue only).2 points
-
I'm probably imagining things but after hearing it in every possible intake configuration I have, the questions start rolling. Any time I'm flat on the accelerator and cross the 4500/4600 rpm threshold, the sound very clearly changes tone, not in any way same as a real VTEC, but still in the same kind of sound. It also sounds funny and conspiracy-y because 4600rpm is where peak torque is produced on the D14a8 haha. Still, this is no way a serious post, more like a gimmick for fellow D14 owners to try and find it in their cars and confirm it, have fun lol2 points
-
Long time no see... Small updates to the car only, got a steering wheel with quick release and installed these new wheels which I will use for the summer. This weekend I'm going to dial in the fitment completely adding some more camber (camber kit) and maybe spacers if needed.... To get most stance look as possible. I am so fan of the new wheels btw, they are awesome! Jr6 16x8 et25 if anyone is wondering, fits perfect... Waiting for some custom angel eyes headlights as well so they are coming on soon as well 😎2 points
-
That blue looks stunning! Loving the car in its latest form mate!2 points
-
Had the same issue a while ago. Engine ran fine and then suddenly - dead. You could even see the tach have a seizure a few moments before the engine died. My only fix was to get a new complete dizzy, as they don't sell just the pickups/sensors inside of them. Even a whole new coil and ECM module didn't help and I even tested out a different ECU altogehter. The problem is that most aftermarket dizzys for our Hondas are ... hot garbage, to be honest. If you buy a cheap-ish one, you'll quickly find yourself ordering the next one sooner than later. The only quality brand I've seen is based in the US, by the name of "Dragon Fire". I know, sounds kinda iffy, but their stuff even meets the IATF standard, meaning it really is better than all of that Chinesium-garbage off eBay, and I've been running it for almost half a year now without complaint! Costs a pretty penny, though. :/2 points
-
2 points
-
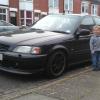
Yeah shadow grey it's called just finished it today on my lunch break lol apart from roof2 points
-
Nice looking MB bud. The wiring info should be in the workshop manual that you can download from this site (in the downloads section of the menu) For the manual winders though, take a look on rimmerbros.com for mg rover ones... https://rimmerbros.com/Item--i-GRID0036132 points
-
Ahh man, sorry it didn't work out with the Crown mate. Truely nice car but like you say, expensive in every way. Had a feeling you would get pangs about the mb6 mate. the amount of time, work and money you poured into it, plus how long you had it, was always gonna be a tinge of regret selling her. Know I felt physically sick after |I sold Ruby the first time, even more so when I saw what the muppet that bought her was doing to her! Wasn't as bad the 2nd time I sold her although still miss her even now. Glad you're back in a Honda though! I have mixed feelings over the FN2's but mostly good feelings! I love the styling more than I think any car I've owned (except my Mk3 Cortina's though!), just think they look so cool from any angle! Also best interior I've had by far! Only things I didn't like about the TypeR FN2 were the fuel consumption and the ride. Just far too stiff for me! Power was nice though but deffo was gonna loose my license if I'd kept Roxy! If I'm honest, think I prefered my FN1 typeS, as a daily anyways. But loved them both, just something about the FN Civics. Even now I'm still looking at them on autotrader! Deffo get a new project thread going for the Fn mate, would love to see where you go with it!2 points
-
Hi Guys and thanks for the replies. I’ve purchased the rear lights apparently from a w reg model (mb) but do have the amber indicators,I’ve purchased the rear struts from struts direct and now looking for the mirror. It’s in currently for a cam belt,water pump and tensioner so will look then. regards Gary.2 points
-
Hey,.. erm yeah I did some more mods on the crown and got it all set up beautifully. Put some lovely 4 pot brakes on etc. then got a bit twitchy with it because everything is so expensive for those cars. Realised was gonna take 10k minimum really before I'd be remotely happy with performance etc, so I'd be into it for over 20k by that point. And also I drive so Infrequently when I do go out I want something fun to drive , which nice as it was, it wasn't a fun car. So sold it. Genuinely gutted I sold my mb6 actually. Moment of madness. So been in a bit of a rut and a bit grumpy about cars. But have baught an fnPoo with some nice mods on. And plan to put my stamp on that and do some track days etc next year.2 points
-
Haven't updated in a while, big upgrades to the car is a full vtis lip kit and full 2.5 exhaust system with 200 cell cat.... Sounds amazing now 😍2 points
-
Hi guys. We've just added a new feature to the forum, Popular Contributors. You should see a box at the bottom of the home page (depending on the device you are using) which shows our most popular contributors. You can change it from week to month and year. If you click on the "see more" this will give a full list of contributors. Don't see your name on it? Get posting! We love to hear from you, even if it's just a small update on your cars projet thread or posting a pic of your car. Have look through the different sections of the forum and see if there's maybe a question been asked that you can help with. Most of all, enjoy the forum. It's your club and site!2 points
-
Hi folks. We have just created an updated version of our popular How To Guide No1 - ABS Fault Codes. The new version (2.0.0) now includes instructions for resetting the ABS light if it still stays on after you have replaced faulty ABS parts. You can find the new version in our downloads section or by clicking HERE Hope you like and find the new updated guide useful.😀2 points
-
Hello everyone, I’d like to share with you all, a purchase I’ve done via Facebook marketplace, of some OEM Honda MB/MC headlight covers. Bought them from Anthony Vickers, super nice dude who isn’t a scam like you see very often these days. Covers were packed very good so no damage at transport from the UK to the Netherlands thank god! Really stoked about these as you never see them! I like rare stuff so these will look nice in the collection for the car! Cheers!2 points
-
First event today with the Aerodeck and my new retrofit headlights with the headlight covers on, imo they just finish the look of the car! Really stoked with the looks now2 points
-
2 points
-
Good morning Dave, didn’t get pictures as I was too excited to get the seats in, will take them apart one day after work this week and show how i did it.2 points
-
Just to show this, was just looking for some new bungs for my spare wheel well as a couple of mine have gone a bit gummy... https://www.parts-honda.uk/honda-cars/assignment_spare_parts/82871671000 £4.52 ex VAT from honda https://rimmerbros.com/Item--i-BNP4028 60p ex VAT for rover.. Quite a difference if you're buying the 10 that honda has as the default number for replacing them all!2 points
-
Weird Honda didn't seal that bit as it's where most of the crap/spray from the wheels lands! Loving your fabrication skills mate, looks so much better with that pitted area cut out and replaced with fresh steel. one less area to worry about now! Deffo inspired me to learn welding, might look at getting a course in the new year. Is it a mig welder you've got and are you using gas or gasless? Got so many ideas/jobs (not just for the cars, some stuff for the garden and garage too!) where being able to weld would be amazing.2 points
-
Today I Didnt get much done thanks to the damp weather but i managed to get the end section of the inner sill sorted. there was a bit of rust that i was not happy with as it was heavily pitted. Its where the Bolt goes up into the chassis and is spot welded to the back of the inner sill, its Sandwiched between 3 layers of metal. The bush mounting section, then the inner sill then the inner arch. Honda didnt seem to seam seal that area!! so it was left for all sorts of crap to get in and to start rotting it. so i got it all cut out, grinded it to bare metal, then zinc and weld through primed the areas, fabricated a new piece to go in from 1.5mm steel and welded it in. Still need to Grind down the welds but ill do that when its a bit drier.2 points
-
Cheers, Dave! The idea is to just Cut out as much rust as possible, if in doubt cut it out! was a bit nerve racking at first making the cuts but once you get going its not too bad. and you can then just build from the ground up with fresh metal.2 points
-
Thats really quick progres your making mate. Nice to see the end sill plate/aarch panels are available. Think i'd be bricking it to cut out the rusty metal but best thing to do, will leave you with a totally rut free shell. Your grandparents would be well proud of the work your doing to save their car. Hats off to you mate, deffo following this build!2 points
-
Lol 😂 you'll be fine mate, they're really strong. Ours have been on for the past 15 years or so and are still like new.2 points
-
This is the colour the car be going soon. Nissan gtr bayside blue2 points
-
Had the same issue, fixed it by fabricating a set of roughly 15mm thick steel plates that go between the top of the shock assembly and the underside of the strut tower. Couldn't even drive into my garage anymore without scraping the front tow hooks. Now it sits at about the same height as before.2 points
-
Hello boys and girls ! Have been modifying cars for many moons but always fancied an Aerodeck so here it is . Knew to the chassis but have owned many Hondas in the past ! Travel send to stoke on Trent from Edinburgh for it today here are some pics once it was home , already fitted some Mg skirts sure I’ll be snooping in the background for info as time goes on I’ll keep updated with what I get upto2 points
-
Hello everyone, This is my Honda Civic MB3, 90k miles. I just came across this forum today, is there any active members? It needs some work doing however its a blast to drive!2 points
-
Got the front lip painted , now to collect some suspension and look into some wheels2 points
-
olsits a bit nicer imo now. Drives better too.2 points
-
Never posted the results of my venture to give the front suspension an overhaul, but it's been done for a couple weeks at least now. Here are some pictures I used to be able to feel the left bearing rotating through my feet on the floor, it was definitely starting to fail, new bearings are smooth as butter. Steering is a bit snappier and direct, but the confidence it puts in the car is awesome. There's hardly any body roll at all, which is surprising considering it's still a stock ARB This thing finally feels underpowered, and I'm yearning for more...next up however, is the rear suspension. Rear LCAs, Camber and Toe arms up next. My Mb2 did not come with an ARB in the rear so perhaps i should invest in one, would it make much difference back there?2 points
-
Looks mint. Proper sleeper! Was reading about the engine yesterday - sounds like a clever bit of kit and a bit of a beast. Bet you can surprise a few folk with that Interior looks cool.. Is it just me or does the wheel look like the mb one. I hadn't spotted that the top part of the radio was climate control - thought that whole unit would be able to swap out. It's always a good opportunity to have some old tunes on though - one reason I keep my minidisc2 points
-
Ahh mate! The mats are lovely. Like arctic camo OEM s**gpiles! Very random. Yes can do double din where the cd player and cassette lives under the big flap at the bottom. Of course cam get large android screens like i have in the alphard too. When money allows ill look into something for it. Until then its got 3 prodigy albums in it. Took a few snaps tonight.2 points
-
This is my bapmobile, 5 door 1.4s fastback. Neat little drive for what it is. I used to drive a 2004 Honda Accord before I moved here from the USA She came with a set of steel 185 14 inch wheels, but I found a set of 16" MG alloys that fit, so I she drives on a set of Toyo TR1s at 205/50/R16 I just replaced the clutch slave cylinder, and a few months ago I bypassed a section of the PAS line returning to the reservoir that had started leaking. Rimmerbros didn't have a replacement part so I ran a reinforced rubber hose back through to the reservoir. I'm currently in the process of installing a hardrace front uprated bushing suspension kit, and a couple pieces for the rear suspension as well. -Front- *Lower control arms + compliance bushing and ARB links *Upper control arms *Hardrace upper and lower ball joints *New front shocks *New hub and bearings *New drifeshafts *Brake caliper slide pin kit *New brake discs and pads -Rear- *Polyurethane bushing Lower control arms *Hardrace adjustable toe and camber links *I do have shocks for the rear but I haven't swapped over the coil yet I might invest in a new trailing arm bushing as well, as it's clearly an important piece of the rear geometry. Let me know what you think! I'll have to get some updated pictures once she is back on the ground2 points
-
Toyota Crown is an amazing car, loaded with kit and the ultimate cruise mobile. Can look so sweet modded too.2 points
-
Ahh its gone now. New owner seems like will pamper it and just use for fun times. So happy about that. Im going to import a Totota crown athlete v estate. Bit old man ish. but always loved them and toyota are so well made. Absolutely love my Alphard.n2 points
-
Hello all once again, i did the investigation regarding the scuttle panel. And needless to say i think i caught it in the nick of time although im still uncertain what lurks beneath the windscreen. I will be infact replacing this at somepoint later on in the project as it has delaminated at the bottom so my guess is water has gotten in and possibly caused a few issues however i did a bit of poking under the scuttle panel and everything all seems solid. I even got a camera underneath just to check and no signs of rust thankfully. However there are 2 patches that are on either side where the bonnet hinges are bolted to. So as a temporary measure i have just removed the rust used some Hydrate 80 and protected it with some etch primer. I will be returning to this and doing it properly with Epoxy primer and will probably just repaint the whole inner wings and arches alongside reseaming the seal that Honda did a recall on. I am just thankful that this was not holed otherwise it would be getting the MIG out again lmao. In other news i got a spare set of Lower Control Arms and have bought some new bushings to be installed, i will be getting these sand blasted and powder coated black so its all nice and original looking. All i need to do now is remove the bush sleeves... fun times2 points
-
Yea I literally just did it a couple hours ago after I saw a guy on YouTube did it. Thank you!2 points
-
Oh, and as above, what's next!?? Dying to know! Whatever you decide to get, please do a build thread on here! I need my fix!2 points
-
HONDA CIVIC 'M' SERIES COMPATIBILITY DATABASE Civic5 accepts no responsibility for any inaccuracies or omissions from this database and all that STEERING AND SUSPENSION COMPONENTS *Wheel and tyre info....Stock ET is 45 for all M's (widest recommended rim with this et is 6.5" at r15? ). DC2 alloys need spacers to fit over 282 calipers *Springs and shock absorbers....Same as dc2/eg/ek/ej/400/45/zs. DC2 coilovers will need the Integra LCA. Matched springs and shocks are specific to the weight of the model so Aerodeck are different as are other civics or Integras. *Front upper wishbone....Same as dc2/eg/400/45/zs. EK is different the bushes are pressed into the arm. *Front lower wishbone....Same as dc2/eg/ek/ej/400/45/zs *Front hub carrier and balljoints....Same as dc2/eg/ek/ej/400/45/zs *Hubs....All M's use 4 x100 pcd hubs from contemporary civics except the MB6 which uses 4 x 114.3 (4.5") pcd hubs from the Integra and Prelude. *Front ARB....Same as dc2/eg/ek/ej/400/45/zs. To upgrade arb size you will need to change the body mounting bushes *Rear ARB....Same as dc2/eg/ek/ej/400/45/zs. To upgrade arb size you will need to change the body mounting bushes. *Front suspension bushings....Same as dc2/eg/ek/ej/400/45/zs *Track rod ends....Same as 45/400/zs *Steering rack...Same as 45/400 *PAS pump...Non Honda engined Rovers use flexible hosing (mounted on right of engine) *Rear trailing arm....Same as dc2/eg/ek/ej/400/45/zs. Drum versions can not be converted to disc. *Rear upper control arm....Same as dc2/eg/ek/ej/400/45/zs *Rear lower control arm....Same as dc2/eg/ej/400/45/zs. Some LCA's do not have a mounting for an ARB. *Rear toe adjuster....Same as dc2/eg/ek/ej/400/45/zs *Trailing arm (compliance) bush....Same as dc2/eg/ek/ej/400/45/zs *Rear suspension bushes....Same as dc2/eg/ek/ej/400/45/zs BODY PANELS AND LIGHTS *Front bumper....All different, to change MA to MB you also need to change bonnet (and front crossmember?) MB6 front lips will not fit the MA without modification. *Rear bumper....MB will fit MA *Sideskirts........MA/MB/45/400/ZS all fit the same mounting points. Vti-s and ZS180 having variations in style. *Front wings....All different *Bonnet....All different. *Bonnet catch and struts....MA/MB/45/400/ZS all same. Catch lever varies on MA. *Scuttle cover....MA/MB/45/400/ZS all same *Windscreen....MA/MB/45/400/ZS all same *Door glass.... MA/MB/45/400/ZS all same *Tailgate....MA/MB same apart from number plate surround. *Tailgate catch and struts....MA/MB/45/400/ZS all same, all standard struts will take the weight of the standard vti spoiler. *Doors.... MA/MB/45/400/ZS all same *Headlights.... MA/MB slightly different outer shape. There are no aftermarket headlights. *Taillights....MB fit MA, MB have clear indicators, MA amber. *Side repeaters.... MA/MB/45/400/ZS all same *Fog lights....MA and MB have slightly different surrounds? *Wing mirrors.... MA/MB/45/400/ZS all fit same, some electric, some manual *Sunroof.... MA/MB/45/400/ZS same. *Handles and other trim pieces.... MA/MB/45/400/ZS same apart from number plate surrounds/ rear light trims. INTERIOR *Front seats and rails....MA/MB/400/45/ZS same fitting. Other Honda seats will need modification to the rails. *Rear seats and rails....MA/MB same ZS will not fit. *Centre console....MA/MB/400/45/ZS same fitting. Some models have a centre arm rest that fits all M's *Dashboard....MA/MB/400/45/ZS same fitting. The MB6 vti-s has carbon dash inserts. *Steering wheel....MA/MB same MB6 has leather finish. Rover will fit but are trispoke so you will not be able to get rid of the Rover airbag and logo. (DC2 will fit with modification?) *Steering column....MA/MB/400/45/ZS same *Switches etc....MA/MB/400/45/ZS same *Instrument cluster....MA/MB/400/45 same. (ZS 180 and MB6 have different tacho's?) *Door cards....MA/MB/400/45/ZS same *Pillar trims....MA/MB/400/45/ZS same *Headlining....MA/MB/400/45/ZS same *Rear mirror....MA/MB/400/45/ZS same *Parcel shelf....MA/MB *Audio components....MA/MB/400/45/ZS same. The MB6 and some Rovers have better speakers and door tweeters that fit all M's. BRAKING COMPONENTS *Front discs....262 except MB6 which uses the 282 system. Some companies make 282 rotors to fit 4x 100 hubs (generally as an upgrade to EG civics) *Rear discs/drums *Front calipers....Single pot lucas 262 system. Same as 400/45/ZS/EG/EK. 282 for MB6. *Rear calipers....Same as 400/45/ZS/EG/EK/EJ. *Master cylinder....Same as 400/45/ZS/EG/EK/EJ.(?) Does the 'teg use this too? *Brake fluid.... *Brake hoses....Same as 400/45/ZS/EG/EK. Drum and disc versions are different. *Rear Disc backing plates part numbers. SMD000080 SMD000090 From RimmerBros (order for MGZS) Just checked still showing in stock around 25 each (as of 21/3/2020) ECU AND ELECTRICAL OBD Loom/ aftermarket wiring Lamda IACV FIT VTEC controlers Fuses and resistors Battery Alternator D SERIES ENGINES- D14A2, D14A4, D14A3 (EDM), D14A8, D15Z1, D15Z8, D16B2, D16Y5. Engine mounts Sparkplugs Engine oil Oil filter Fuel filter Distributer HT leads Valves and valvetrain parts Cam Cambelt Cam gears Crank Pistons Con rods Intake Throttle body Intake manifold Radiator Fan Thermostat Coolant FI info B SERIES ENGINES- B18C4 Same sort of stuff TRANSMISSION COMPONENTS Shifter UJ Shift rod Extension rod Shift bushings Clutch Master cylinder Reservoir Release cylinder Gearbox Gearbox oil Driveshafts EXHAUST COMPONENTS Manifold....B and D series engines use a slightly different manifold Cat section....UKDM cat (different length from the JDM cat) Mid section....MA/MB all same (?) do rover fit? Backbox....MA/MB all same except Aerodeck which has a longer tail (?) There's probably a lot I've missed off, might be best to improve it as we fill out the list? We probably ought to have glossary for terms (stuff like DC2, EG, ITR, IM, PCD) to make it accessible for noobs and non Honda geeks2 points